SSL certificates are everywhere there’s a computer. Without them, you can forget about a safe network. Find out what to do when a certificate expires!
Introduction
I think it’s safe to suggest that any admin who has ever had to work with ESXi hosts has had problems with untrusted SSL certificates. Some browsers simply won’t allow connecting a host under such circumstances, while some will only provide you with the HTTP protocol version that doesn’t support secured connections.
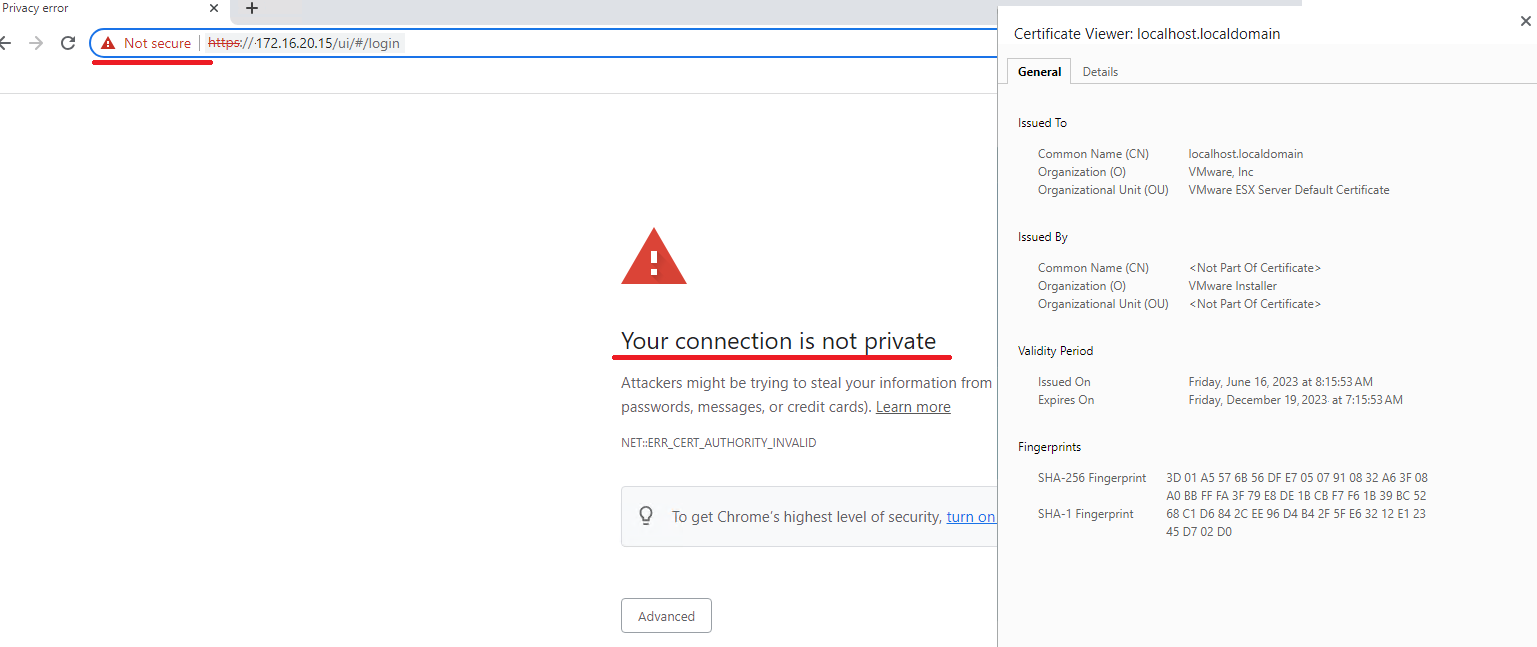
As you know, an issue with SSL certificates isn’t something you can just postpone. Without configuring it to fit your infrastructure, in particular, the whole encryption process is gonna be disabled, which compromises the very idea of network protection for your servers. So, if you’re interested in certificate requirements for different solution paths within the VMware product line, don’t wait up and look for it here.
The situation isn’t pretty at all, and it would take a lot of time to fix it. Of course, if you don’t care for the network security (whatever the reasons) and you aren’t annoyed by constant notifications on unsecured connections… Well, then you can skip the rest. Now, “the rest” is a combination of different suggestions and solutions I have found while surfing the web, and naturally, my personal experience. The results were fine enough for me to decide to share it!

Mind, though, that the following algorithm is a solution for smaller infrastructures with separate ESXi hosts. If we’re talking about large enterprises, it could work only as a temporary measure until commercial certificates are generated again. Oh, and also, this method is perfect for various test environments. So, to fix our problem, we would follow these steps:
- Configure OpenSSL on your ESXi.
- Create a key, certificate request file, and certificate itself.
- Add it to your certificate store on a server or a workstation from which you need access.
- Check what you got!
So, let’s move on with it.
Configuring OpenSSl on Your ESXi
What OpenSSL is and why do we want it, you probably already know. If not, look it up here. It pretty much covers everything you need to know. It should be present by default on your server but may require some tinkering. The purpose is to create a configuration file with “right” parameters for generating the “right” certificates: In further work, you’ll need two more tools:
If you got them all, now you can connect to the host for command execution and file transfer (in both directions). Before getting on with it, you should enable certain options in your ESXi host’s DCUI (Direct Console User Interface) in the “Troubleshooting Mode Options” tab. Just select what you’re gonna need for work, and click on Enter:
- “Enable ESXi Shell”;
- “Enable SSH”.

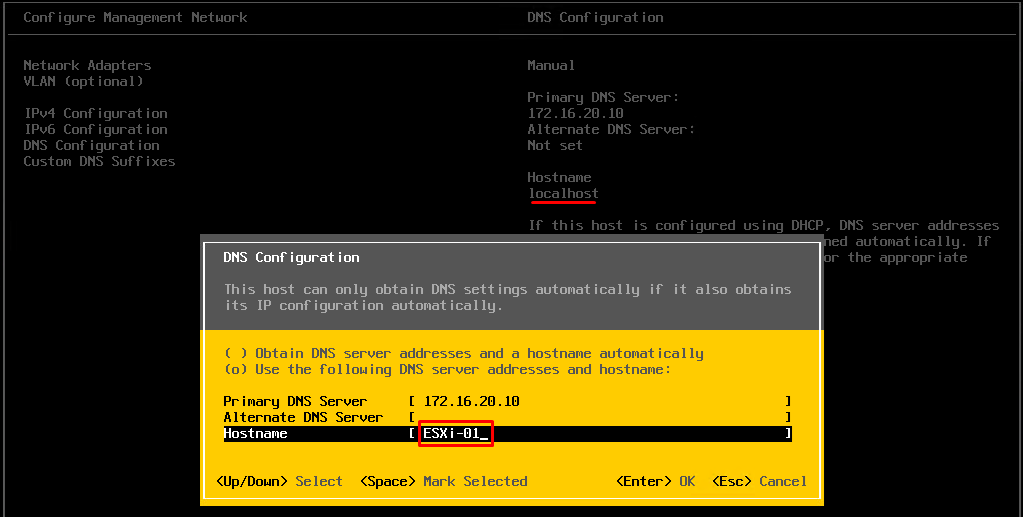
This will allow you to connect to the ESXi host via SSH for management. When all the work is done, return all settings to their defaults! Otherwise, your ESXi host won’t stay safe in a public network for long. Furthermore, in “Configure Management Network”\“DNS Configuration,” change the hostname from “localhost” to anything other than that (mine is “ESXi-01”).
Creating a Certificate
Connect to the ESXi host with the Putty utility, under an account with the root access rights. First, you’ll need to create copies of the current certificate and its key so that they could have been restored later. Use the following commands:
mkdir /etc/vmware/ssl/bak
Create a directory.
mv /etc/vmware/ssl/rui.crt /etc/vmware/ssl/bak/rui.crt.bak
Store the current certificate copy in the new directory:
mv /etc/vmware/ssl/rui.csr /etc/vmware/ssl/bak/rui.csr.bak
Store the current certificate creation request in the directory (you could get an error notification if the request wasn’t performed before).
mv /etc/vmware/ssl/rui.key /etc/vmware/ssl/bak/rui.key.bak
Store the current certificate key in the directory.
ls -l /etc/vmware/ssl/bak/
Check whether the files are in the directory. These copies can come in handy should you ever need to return to default settings (if the process goes south somehow).

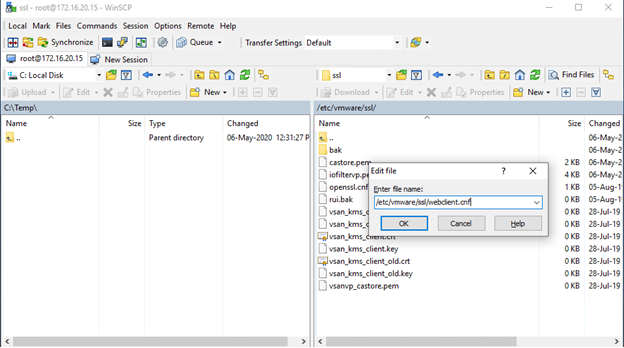
Let’s connect now to the host with WinSCP, create (Ctrl+F4) a new file. Let’s name it “/etc/vmware/ssl/webclient.cnf” (no quotation marks!).
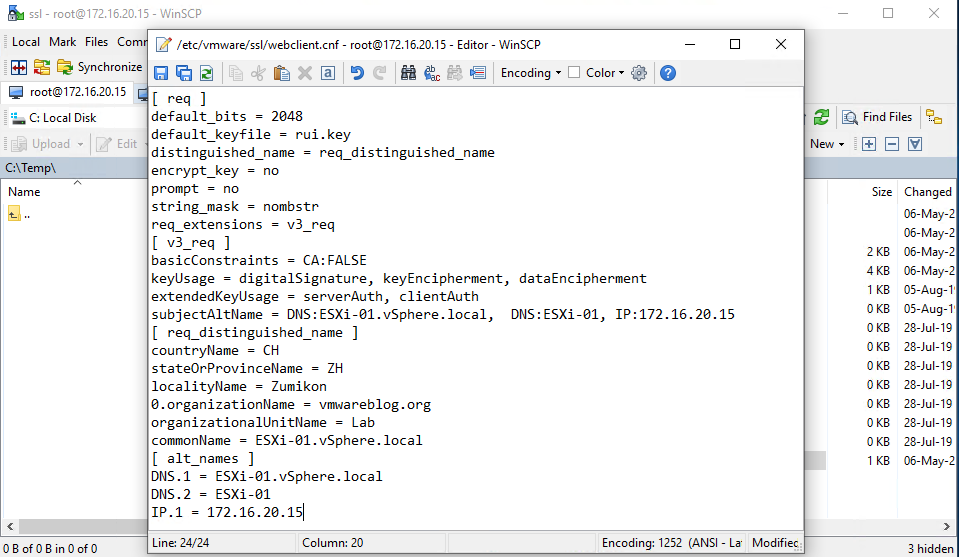
Insert the following:
[ req ]

default_bits = 2048

default_keyfile = rui.key

distinguished_name = req_distinguished_name

encrypt_key = no

prompt = no

string_mask = nombstr

req_extensions = v3_req

[ v3_req ]

basicConstraints = CA:FALSE

keyUsage = digitalSignature, keyEncipherment, dataEncipherment

extendedKeyUsage = serverAuth, clientAuth

subjectAltName = DNS:"ServerName.domain.com", DNS:"ServerShortName", IP:"ServerIPAddress"

[ req_distinguished_name ]

countryName = "Country (two-letter code alpha-2)"

stateOrProvinceName = "State (two-letter code)"

localityName = "City"

0.organizationName = "Company Name"

organizationalUnitName = "Company Unit Name"

commonName = "server.domain.com"

[ alt_names ]

DNS.1 = "ServerName.domain.com"

DNS.2 = "ServerShortName"

IP.1 = "ServerIPAddress"
You need to replace values in the quotation marks with the values you require (again, no quotation marks). The values “countryName” and “stateOrProvinceName” should be in the international alpha-2 code. Overall, be very careful with the values related to your host address and domain name because you are risking your certificate’s work. When you’re done, save the changes.
Generate a new encryption key. It will be stored on the ESXi host keeping your certificate up and running:
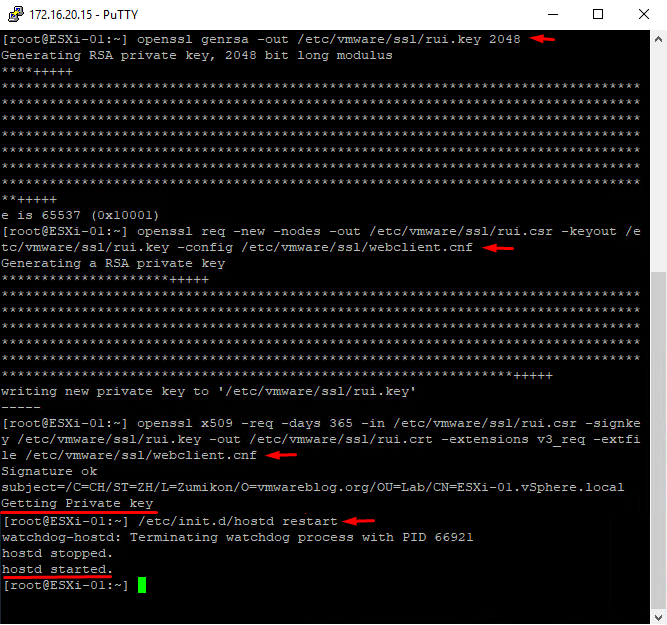
openssl genrsa -out /etc/vmware/ssl/rui.key 2048
Generate a certificate signing request for your certificate. This very request uses data from webclient.cnf, the data you will be adding to the certificate as values:
 openssl req -new -nodes -out /etc/vmware/ssl/rui.csr -keyout /etc/vmware/ssl/rui.key -config /etc/vmware/ssl/webclient.cnf
Generate the certificate itself for further use, with a validity period of 365 days, in x509 standard format:
openssl x509 -req -days 365 -in /etc/vmware/ssl/rui.csr -signkey /etc/vmware/ssl/rui.key -out /etc/vmware/ssl/rui.crt -extensions v3_req -extfile /etc/vmware/ssl/webclient.cnf
Restart the ESXi host services in Putty, that way you can use your brand- new certificate without restarting the host itself:
/etc/init.d/hostd restart
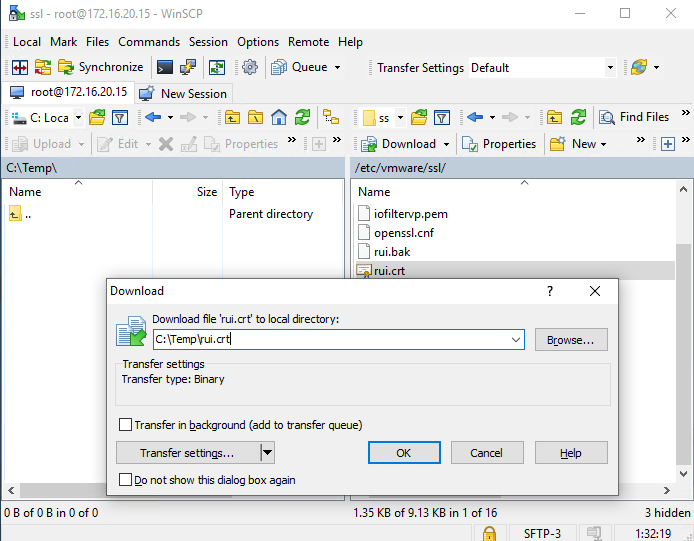
All you have to do now is copy the certificate file to whatever servers and workstations need access to this ESXi host. In WinSCP, update (Ctrl+R) its contents and copy the certificate file (F5) to the local disk, which in our case is C:\Temp directory with a current name rui.crt.
Don’t forget to return all the settings from the “Troubleshooting Mode Options” tab to their defaults!
Adding a Certificate to The Certificate Store
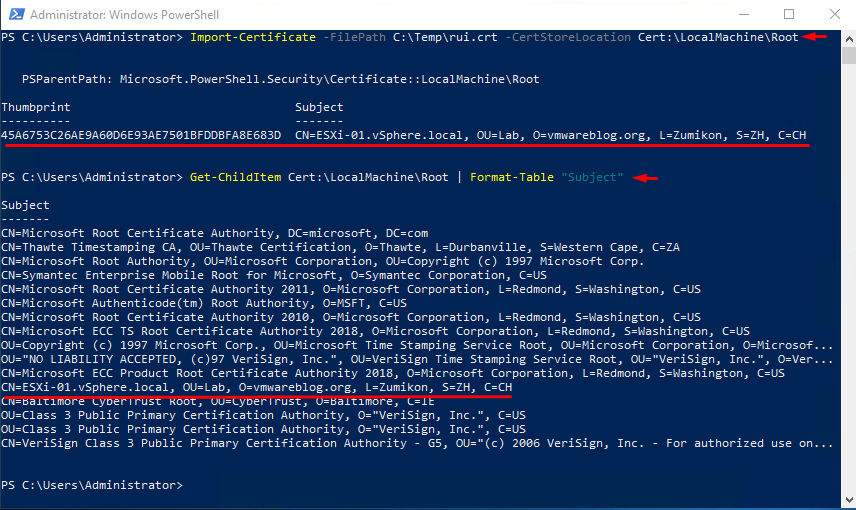
Start PowerShell with admin rights. Import the certificate to the store with the following command:
Import-Certificate -FilePath C:\Temp\rui.crt -CertStoreLocation Cert:\LocalMachine\Root
Let’s make sure that you did have import and find it in the store certificate list with the following command:
Get-ChildItem Cert:\LocalMachine\Root | Format-Table "Subject"
In Conclusion
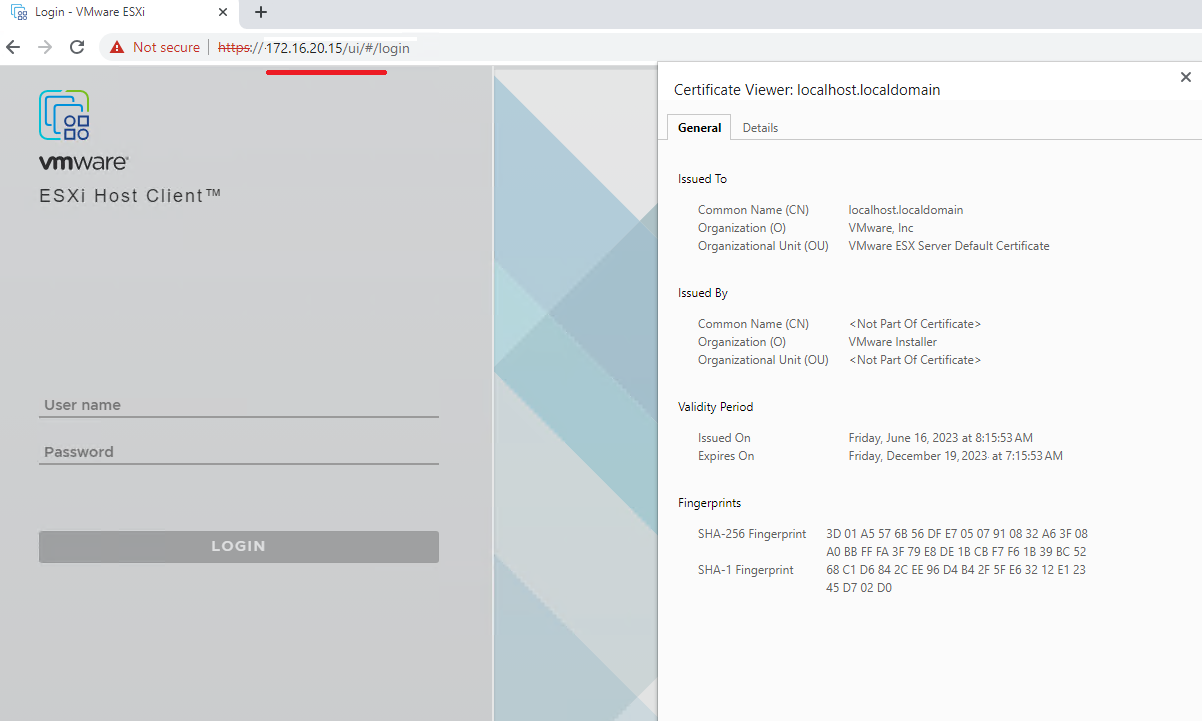
Finally, it’s time for you to start or restart your browser to use the certificate, enter the host address, and enjoy smooth working.
That’s all, folks! I hope this will make life for you a little bit easier as it did for me.
This material has been prepared in collaboration with Oleg Onischuk, Senior Technical Support Engineer at StarWind, and Viktor Kushnir, Technical Writer with almost 4 years of experience at StarWind.
Related materials:
- ESXi is free… So why would you buy an ESXi anyway?
- How to Identify where VMware ESXi is installed – on USB, SD, HD or PXE
from StarWind Blog https://bit.ly/3OdSBwy
via IFTTT
No comments:
Post a Comment