Cheers friends, not so long ago we ran through the process of configuring and connecting an NFS disk to the VMware host. Now, what we’re going to do is measure and compare the performance of NFS and iSCSI network protocols to see which one is more suitable for building a virtualized infrastructure. So, in this part, we’ll create an iSCSI device and connect it to the VMware ESXi host. Just to remind you, our configuration environment looks like this:
Environment configuration:
Server 1 (Windows)
- Intel Xeon E5-2670 v4
- 128Gb RAM Kingston
- 1x HDD Seagate 1tb
- 4xIntel DC S3610 Series 480gb
- Mellanox ConnectX-3 network adapter 10G
Server 2 (ESXi)
- Intel Xeon E5-2670 v4
- 128Gb RAM Kingston
- 1x HDD Seagate 1tb
- Mellanox ConnectX-3 network adapter 10G

We’ve all heard about iSCSI (Internet Small Computer System Interface), a protocol based on TCP/IP and designed for linking and managing storage systems, servers, and clients. iSCSI is based on two most widely used protocols: SCSI – the protocol for transferring data blocks between computers and storage, and IP – a network transport protocol which is now commonly used in Ethernet corporate networks.
Configuring iSCSI target
To create the iSCSI device and target, we’ve decided to choose StarWind Virtual SAN since it has its free version and it’s quite easy to work with. So, run StarWind VSAN and add the server where you’ll be creating a virtual disk.

Click the ADD Device (advanced) button and in the «Select Device Type you want to create or export as iSCSI Target» tab, select Hard Disk Device.

In the «Select Disk Device Type» tab, choose the device type (Virtual Disk).

Further on, in the «Virtual Disk Location» tab, specify the name, location, and size of the device that is to be created.

Next, specify the «Block size». Generally, it’s 512 bytes for VMware environments and 4096 bytes for Windows Server.

In «Specify Device RAM Cache Parameters» tab, use a default option with disabled RAM Cache (N/A).

In «Specify Flash Cache Parameters» tab, use «No Flash Cache» option.

In the «Target Parameters» tab, click «Next ».

In the «Creation Page» tab, click «Create».

The result of the device creation can be seen in StarWind Management Console.

Configuring VMware iSCSI
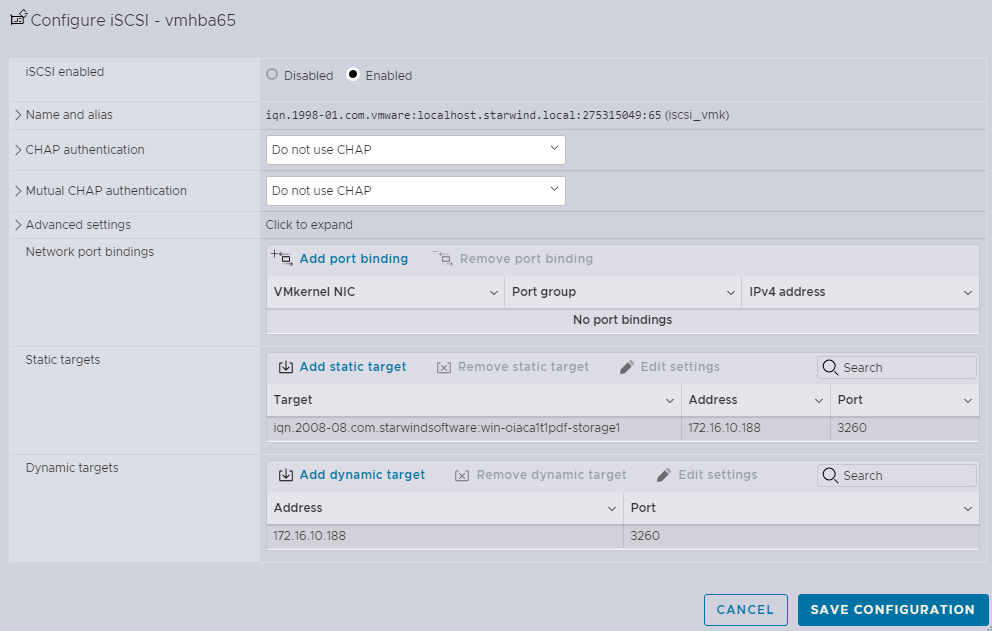
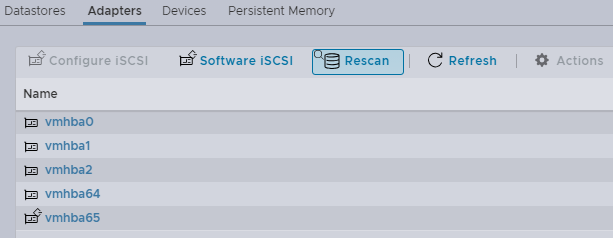
Now, in vSphere console select the host and go to Storage. After that, navigate to Adapters tab and enable Software iSCSI adapter including adding Dynamic targets IP address on which StarWind is installed. You can see the result in the screenshot below.

Rescan adapters

After the successful scanning, the StarWind device connected to iSCSI will appear in the Storage Devices section.

In the VM properties section, connect the StarWind device as RDM Disk.
In the VM’s Disk Management, you can see the added disk as unallocated.

Conclusion
In this chapter, we ran through the configuration and connection process of the iSCSI device to the VMware host. Now, we have everything ready for testing our network protocols performance. And, that will be in the topic of the third part: https://www.starwindsoftware.com/blog/hyper-v/whos-got-bigger-balls-testing-nfs-vs-iscsi-performance-part-3-test-results/
This material has been prepared in collaboration with Vitalii Feshchenko, Solutions Engineer at StarWind.
Related materials:
- Who’s got bigger balls? Testing NFS vs iSCSI performance. Part 1: configuring NFS
- Virtual Machine Storage – File vs Block [Part 1]: SMB & NFS vs iSCSI & NVMe-oF
- Virtual Machine Storage – File vs Block [Part 2]: SMB vs iSCSI vs NVMe-oF in Hyper-V
from StarWind Blog https://bit.ly/3PzZsQe
via IFTTT
No comments:
Post a Comment