HashiCorp Boundary is a modern privileged access management (PAM) platform that tightens infrastructure security while also simplifying access to infrastructure resources for end users. Unlike traditional VPNs or bastion hosts that give end users access to an entire network, Boundary enforces least privilege access by allowing access only to discrete target resources. Boundary also manages credentials (e.g. usernames and passwords, SSH keys and certificates) and can inject them directly into sessions on behalf of the end user. This shields end users from handling credentials, simplifies their connection workflow, and eliminates credential exposure.
This blog post explains the reasons to incorporate just-in-time approval workflows in HCP Boundary with Microsoft Privileged Identity Manager (PIM). It also discusses some of the underlying concepts and components to show how it works. Detailed configuration steps are provided so you can try it in your own environment. Finally, the post walks through the end-to-end experience by requesting access to a target resource as an end user and getting approval for the request from the designated approver.
Why you need just-in-time approval workflows
Boundary’s foundational capability is to allow or deny end-user access to infrastructure resources based on each user’s pre-approved role. However, some organizations prefer to restrict certain privileged roles until a request and approval has been issued. Others want to limit the approved roles to a temporary time period, requiring users to resubmit a request after that window expires.
For example, a site reliability engineer might need elevated permissions to troubleshoot an issue on highly sensitive systems. Or an external contractor could require temporary access to an application. Integrating with third-party products that have workflow approval capabilities, including Microsoft PIM, Okta Access Request, or ServiceNow, lets organizations continue using existing standard practices and workflows for approvals. This automated process means administrators don’t have to manually make configuration changes each time elevated permissions are requested or expired, which is especially important at scale.
How just-in-time approval works with Boundary
To show how the just-in-time approval workflow works, let’s look at how the different components in our example interact.
Microsoft Entra ID (formerly known as Azure Active Directory) includes a directory of users and information about each user. Users can be placed into logical groups that define common roles, teams, or projects. For example, users on a common team of developers can be placed into a group.
Boundary’s managed groups feature syncs with Entra ID users and Entra ID groups. Based on user information shared by Entra ID, referred to as claims, Boundary user accounts can be automatically created and placed in a Boundary-managed group when users log onto Boundary using Entra ID. The Boundary managed groups mirror the user’s corresponding Entra ID group and Boundary users are given access to infrastructure resources based on their managed group. For example, if the user is a server administrator within Entra ID, you can ensure they can access servers (via SSH, RDP, etc.) based on their Boundary managed group.
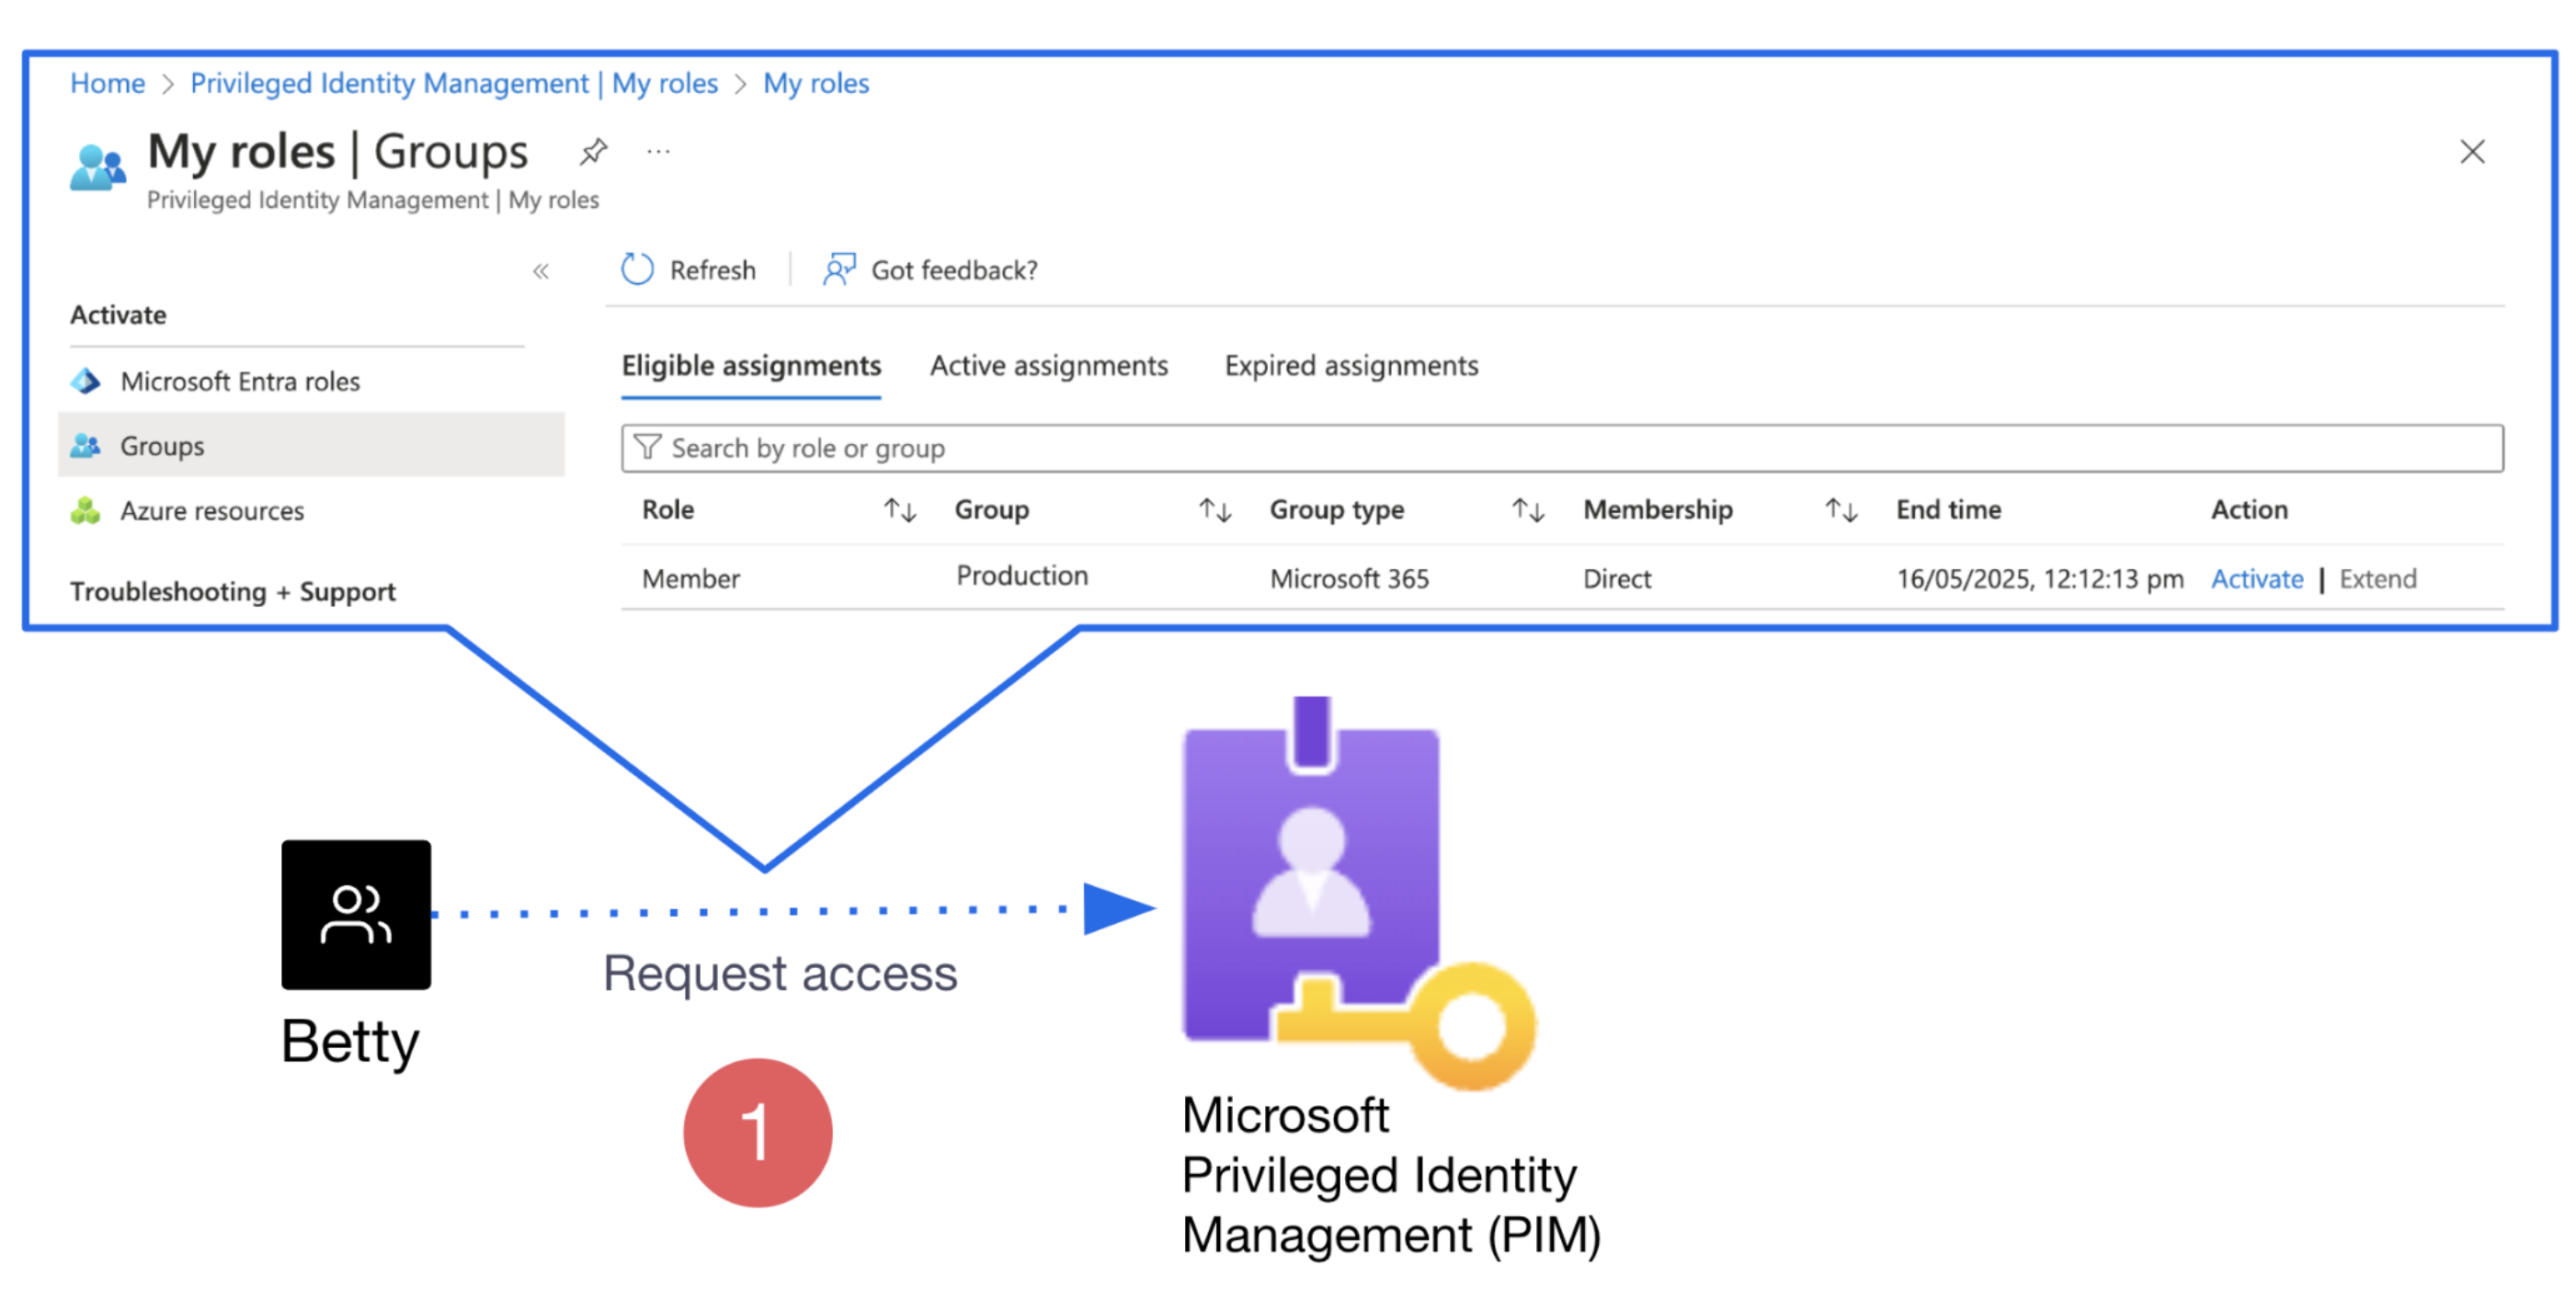
Microsoft PIM is the core platform that facilitates the automated workflow between the requester (end user) and the approver (authorized approvers like a manager or resource owner). End users make requests to become a member of a specific Entra ID group. Requests and approvals are made through the PIM interface in the Microsoft Azure portal:
1. Users request access to be part of an Entra ID group (example group name: Production) from the PIM portal page.
2. The approver approves the request from the PIM portal page.
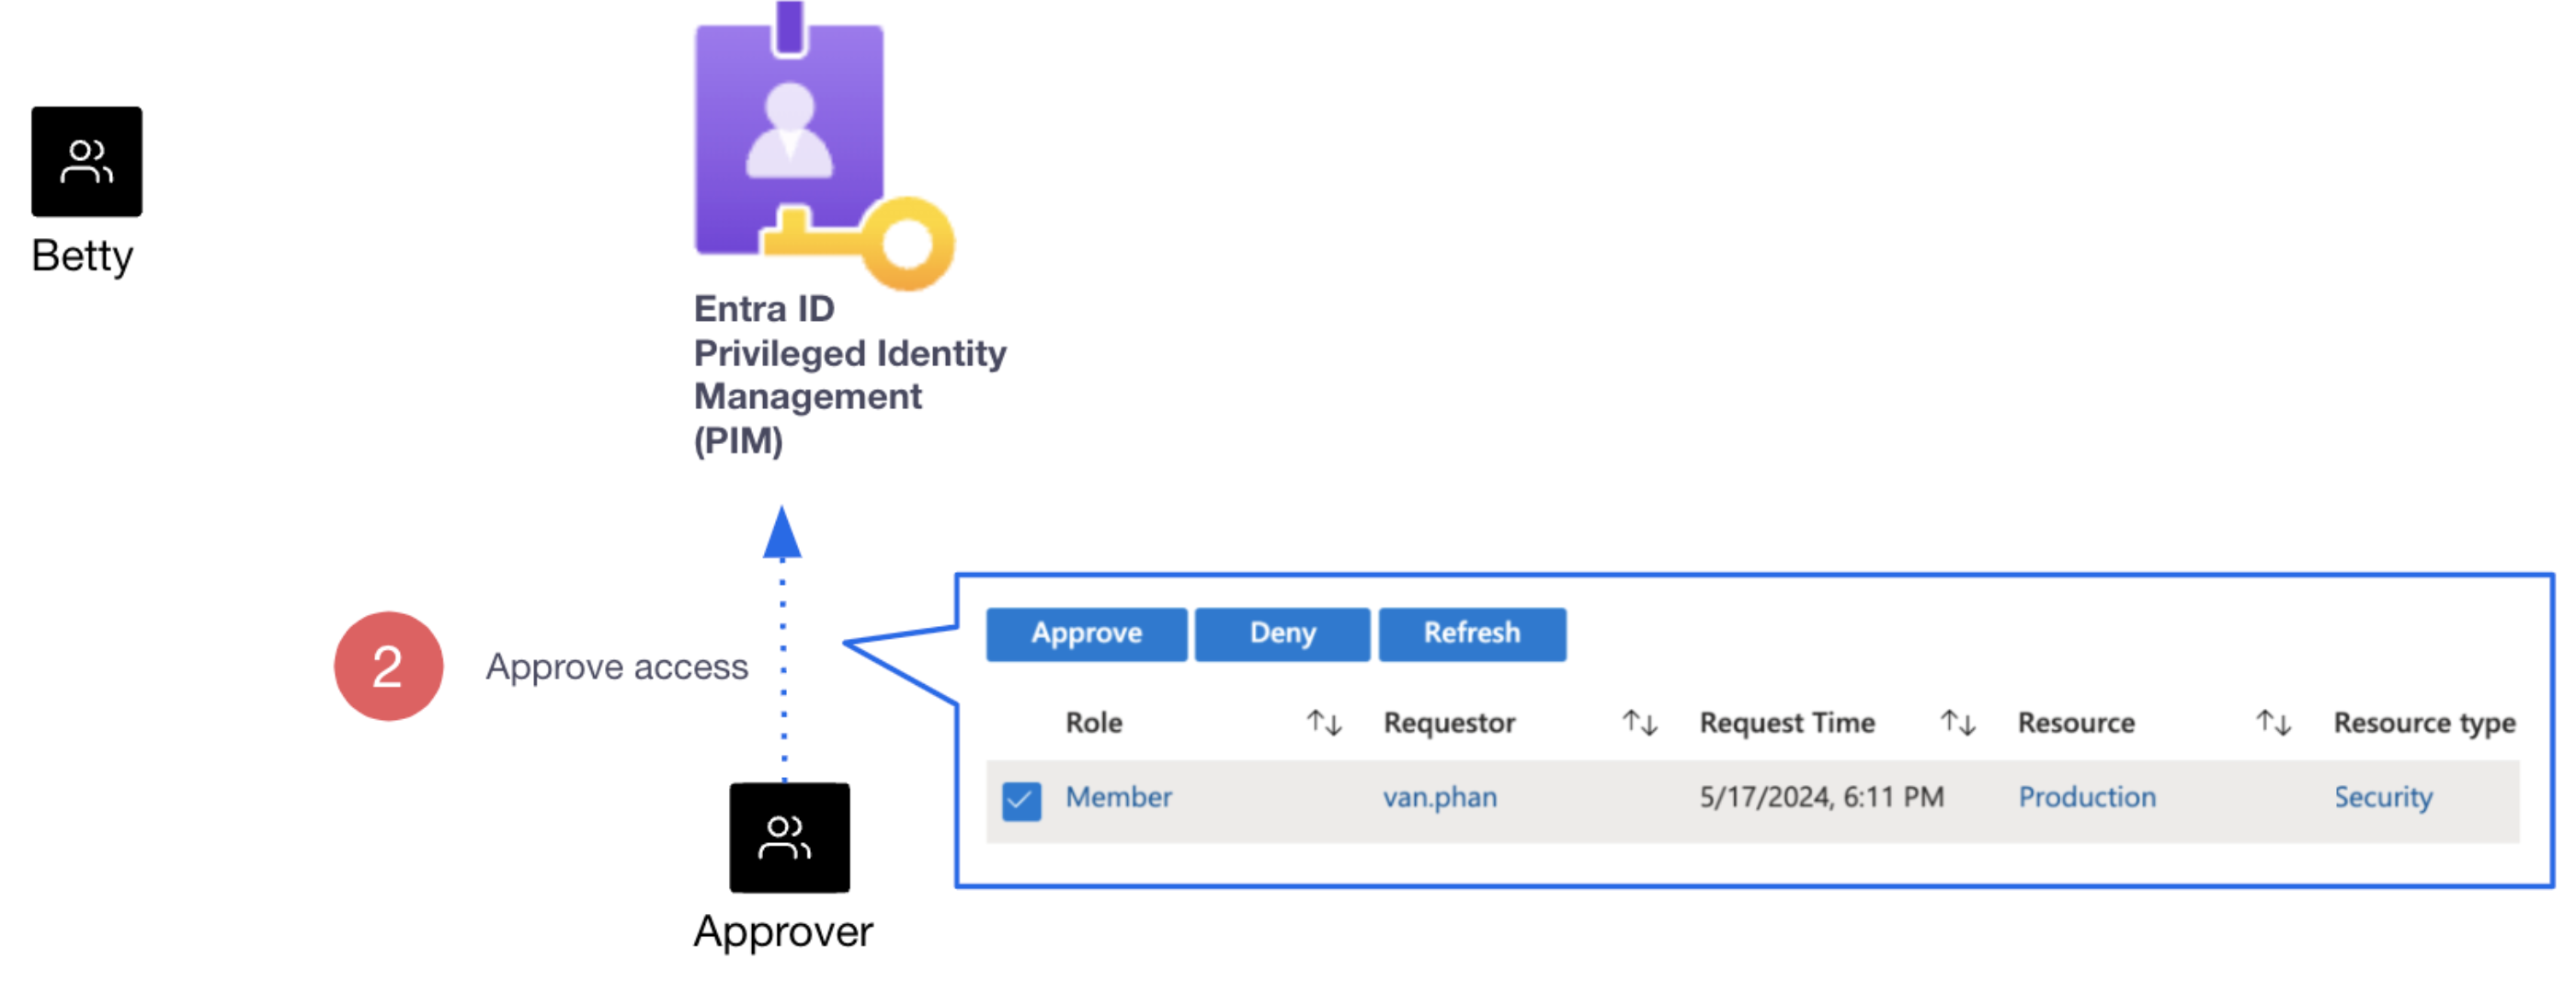
Boundary automatically places the user in a Boundary managed group that corresponds to the Production Entra ID group. As a result, the end user inherits access permissions associated with the managed group when they log onto Boundary:
1. The user logs onto Boundary and is authenticated via Entra ID.
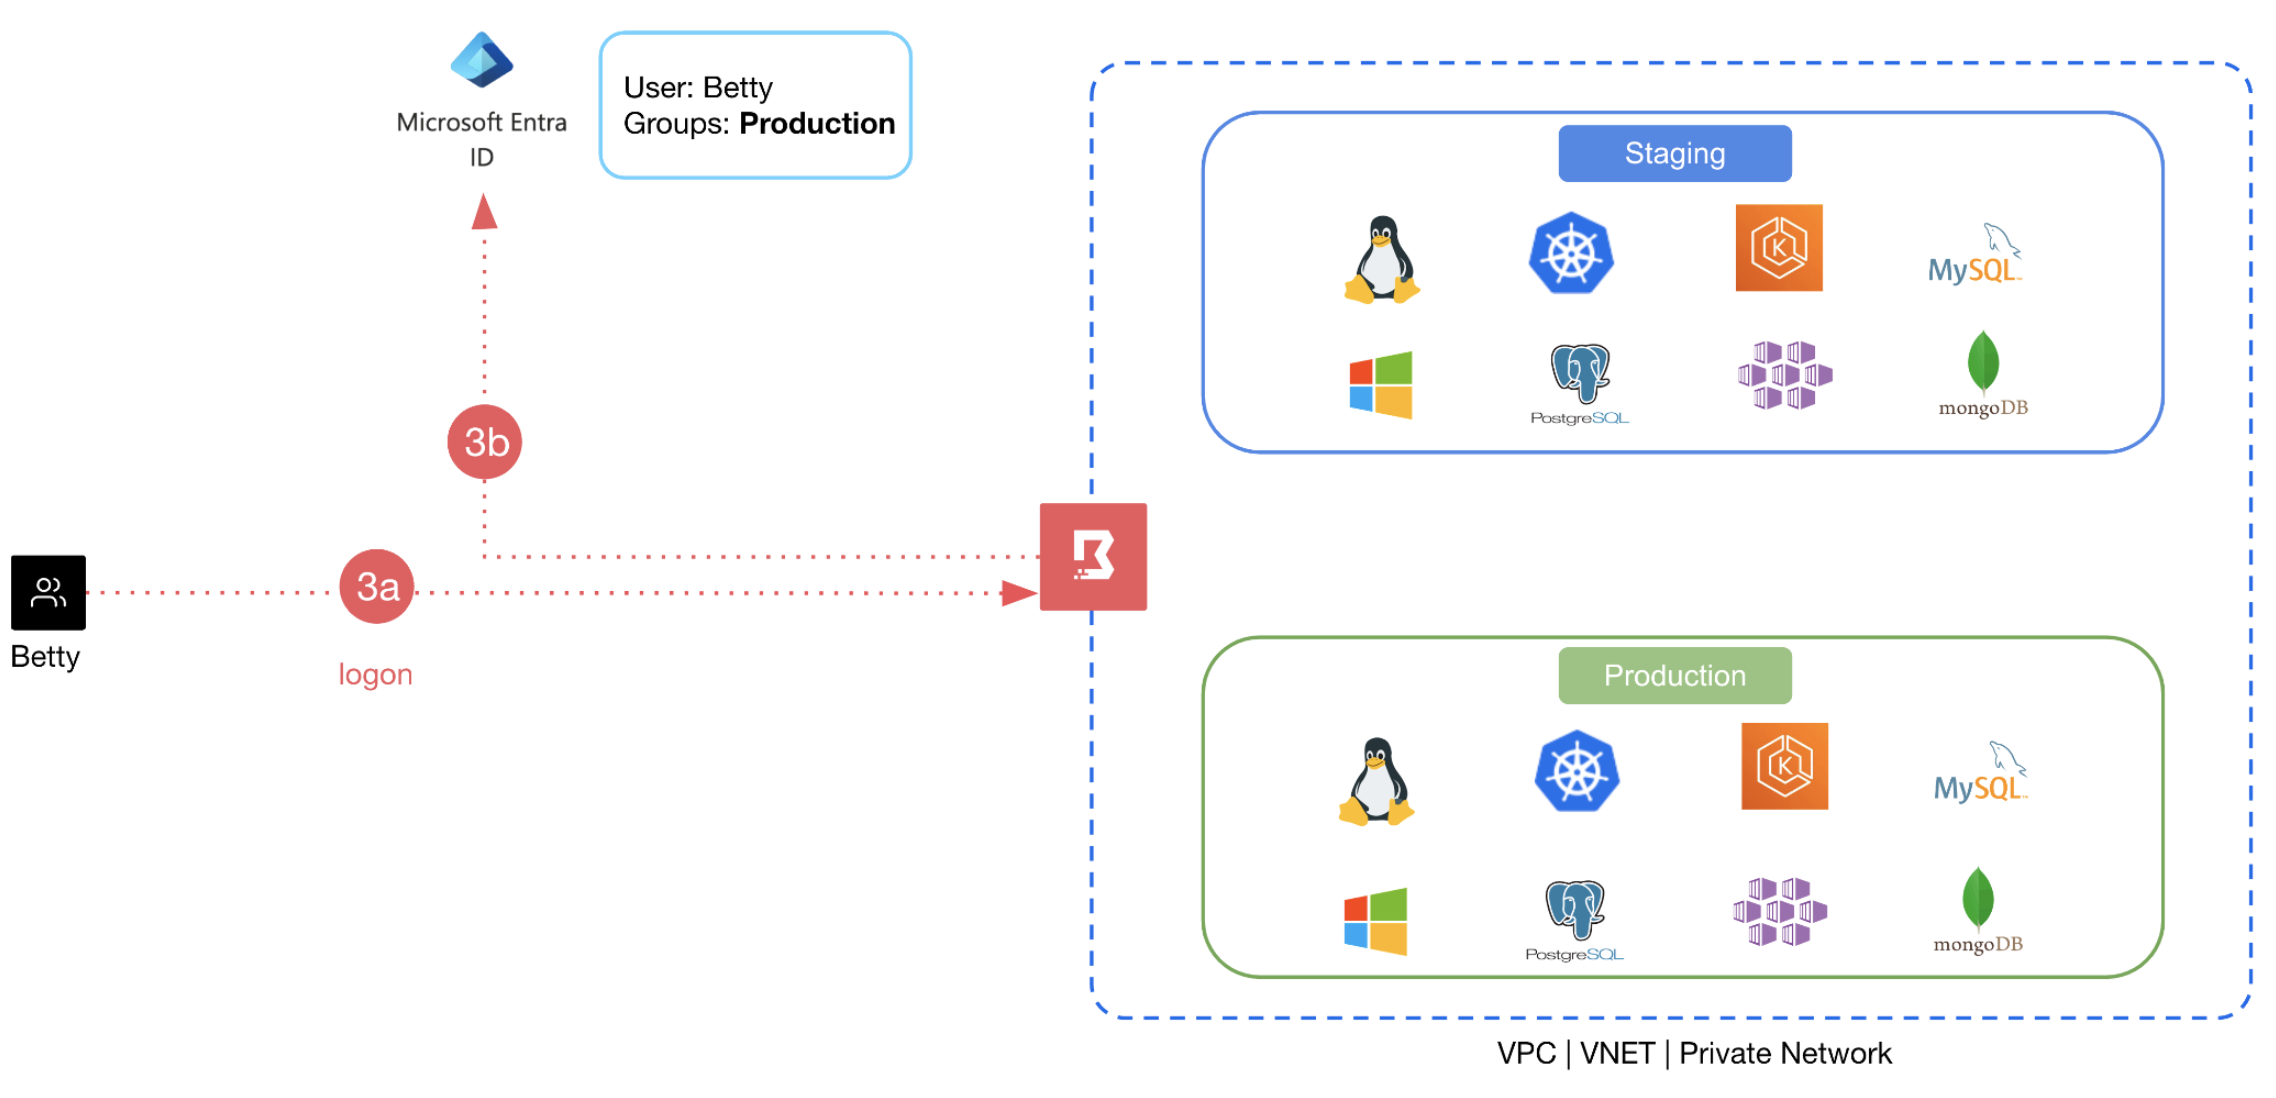
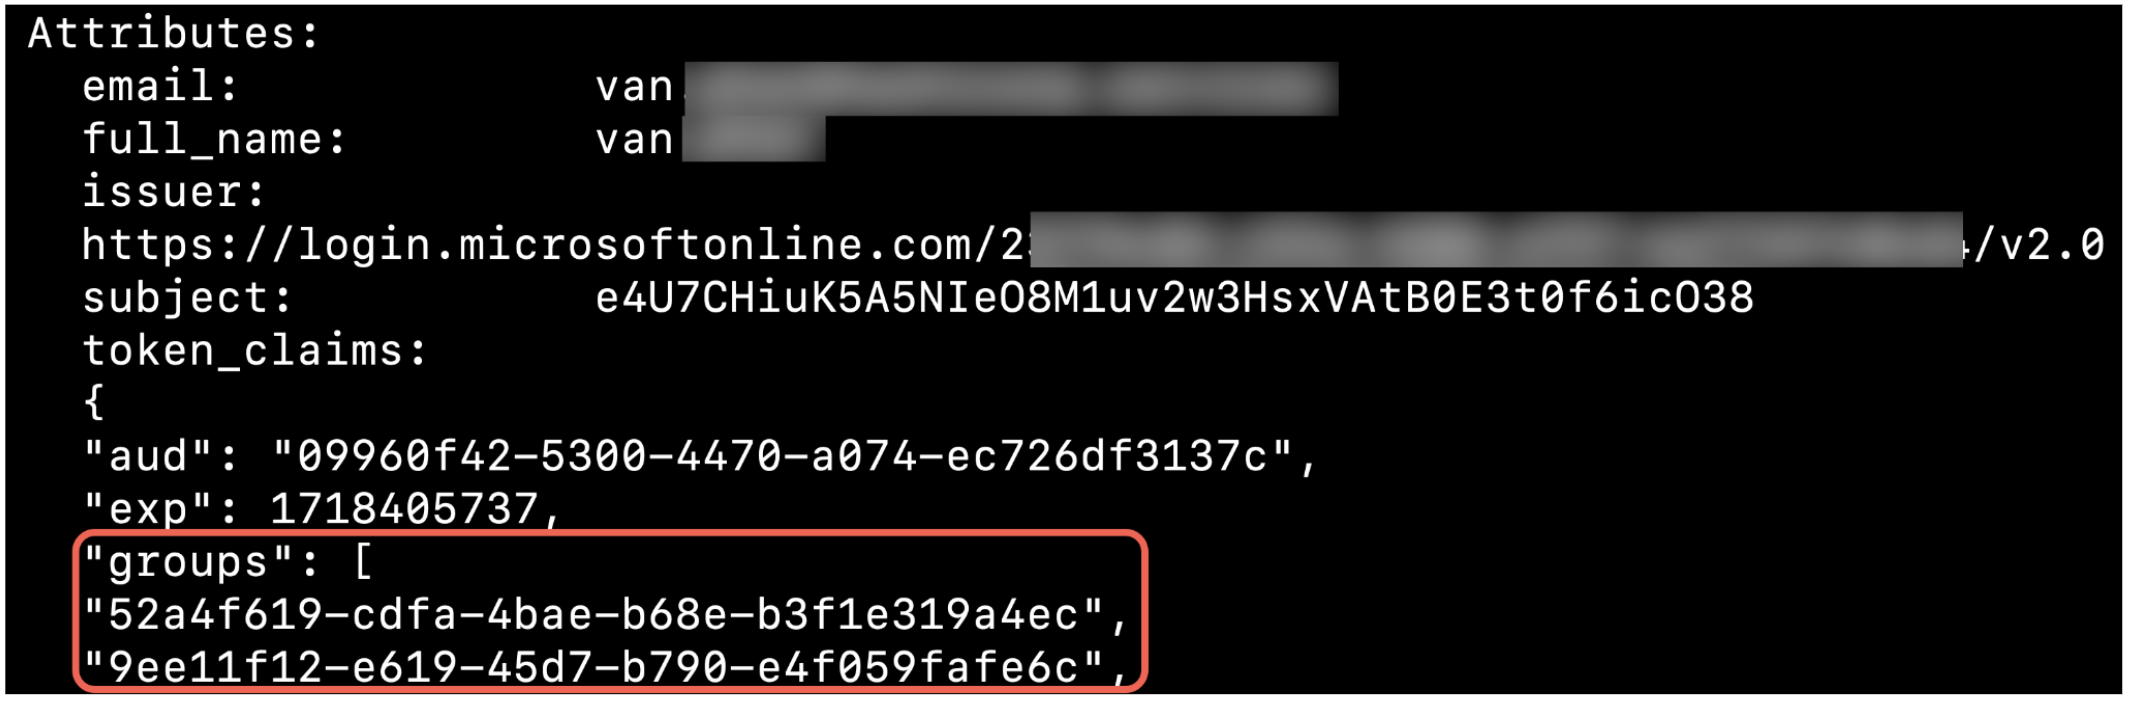
2. An ID token with the user’s Entra group ID embedded in the claim information is sent to Boundary.
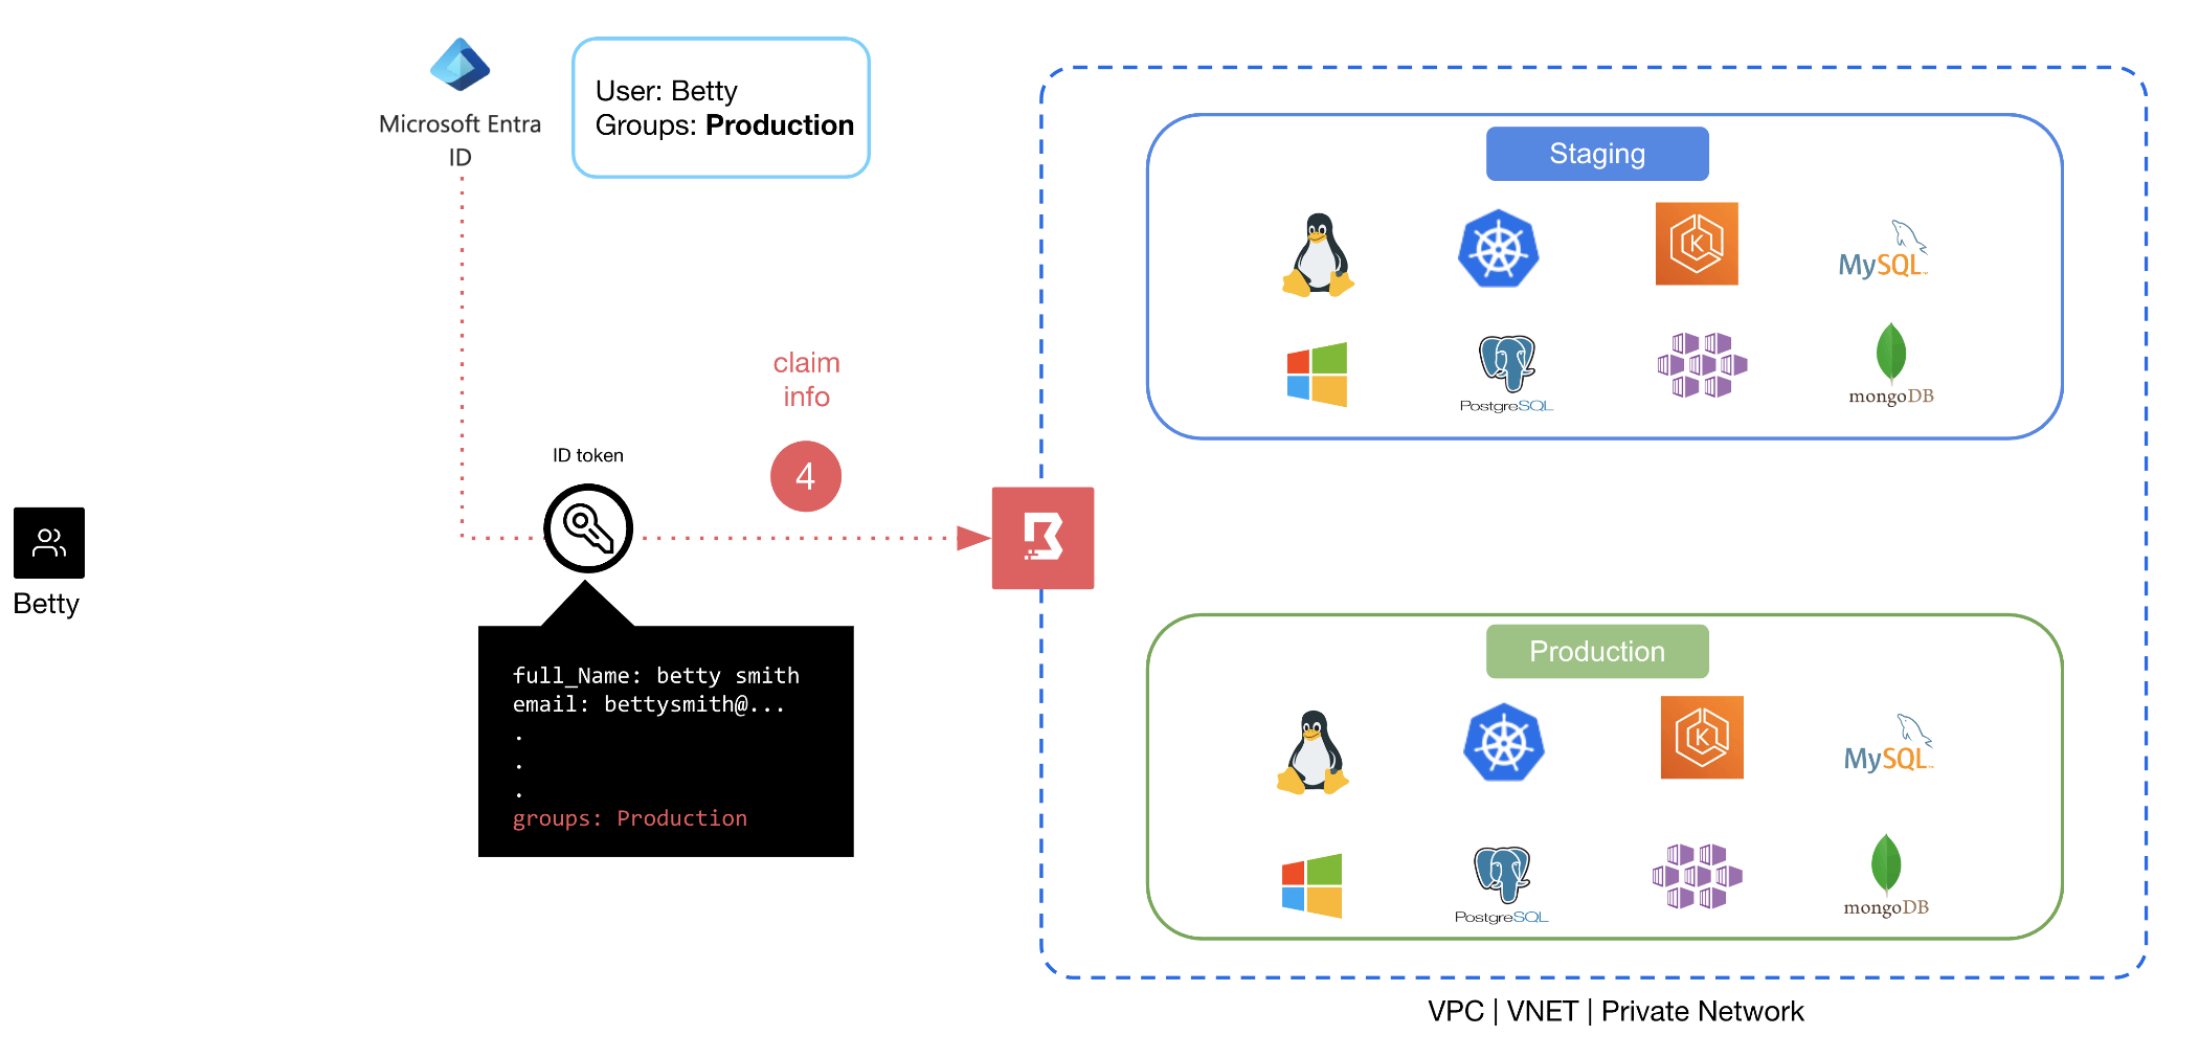
3. Based on the claim information, Boundary places the user into the corresponding Boundary managed group, thereby giving the user permission to access resources that have been granted to the managed group.

Configuration steps
Now let’s learn how to set up this workflow between HCP Boundary and Microsoft PIM.
Prerequisites
This post assumes you have basic knowledge of managing HCP Boundary. You will also need the following setup in your environment:
HCP Boundary:
- HCP Boundary cluster. If you do not have a Boundary cluster, this tutorial explains how to deploy an HCP Boundary cluster.
- A Boundary target (Linux host, Windows host, etc.) configured within an existing project scope. If you don’t have such a target, follow this tutorial to create a new project scope and target.
- Administrative permissions to manage and configure your HCP Boundary cluster.
Azure:
- Microsoft license to use PIM. This is typically available with the Microsoft Entra ID P2 or Microsoft Entra ID Governance license.
- Azure administrative permission in Entra ID to create and manage groups.
- Azure administrative permission in Entra ID to register new applications.
- An Azure user to act as the requester and a different user to act as an approver.
Note: The requester and approver must be two different Azure users.
Configure Boundary OIDC integration with Azure
The first step in configuration is to connect to Entra ID.
Register Boundary as an application in Entra ID
Note: This section is based on a Boundary tutorial.
1. Log onto your Azure subscription.
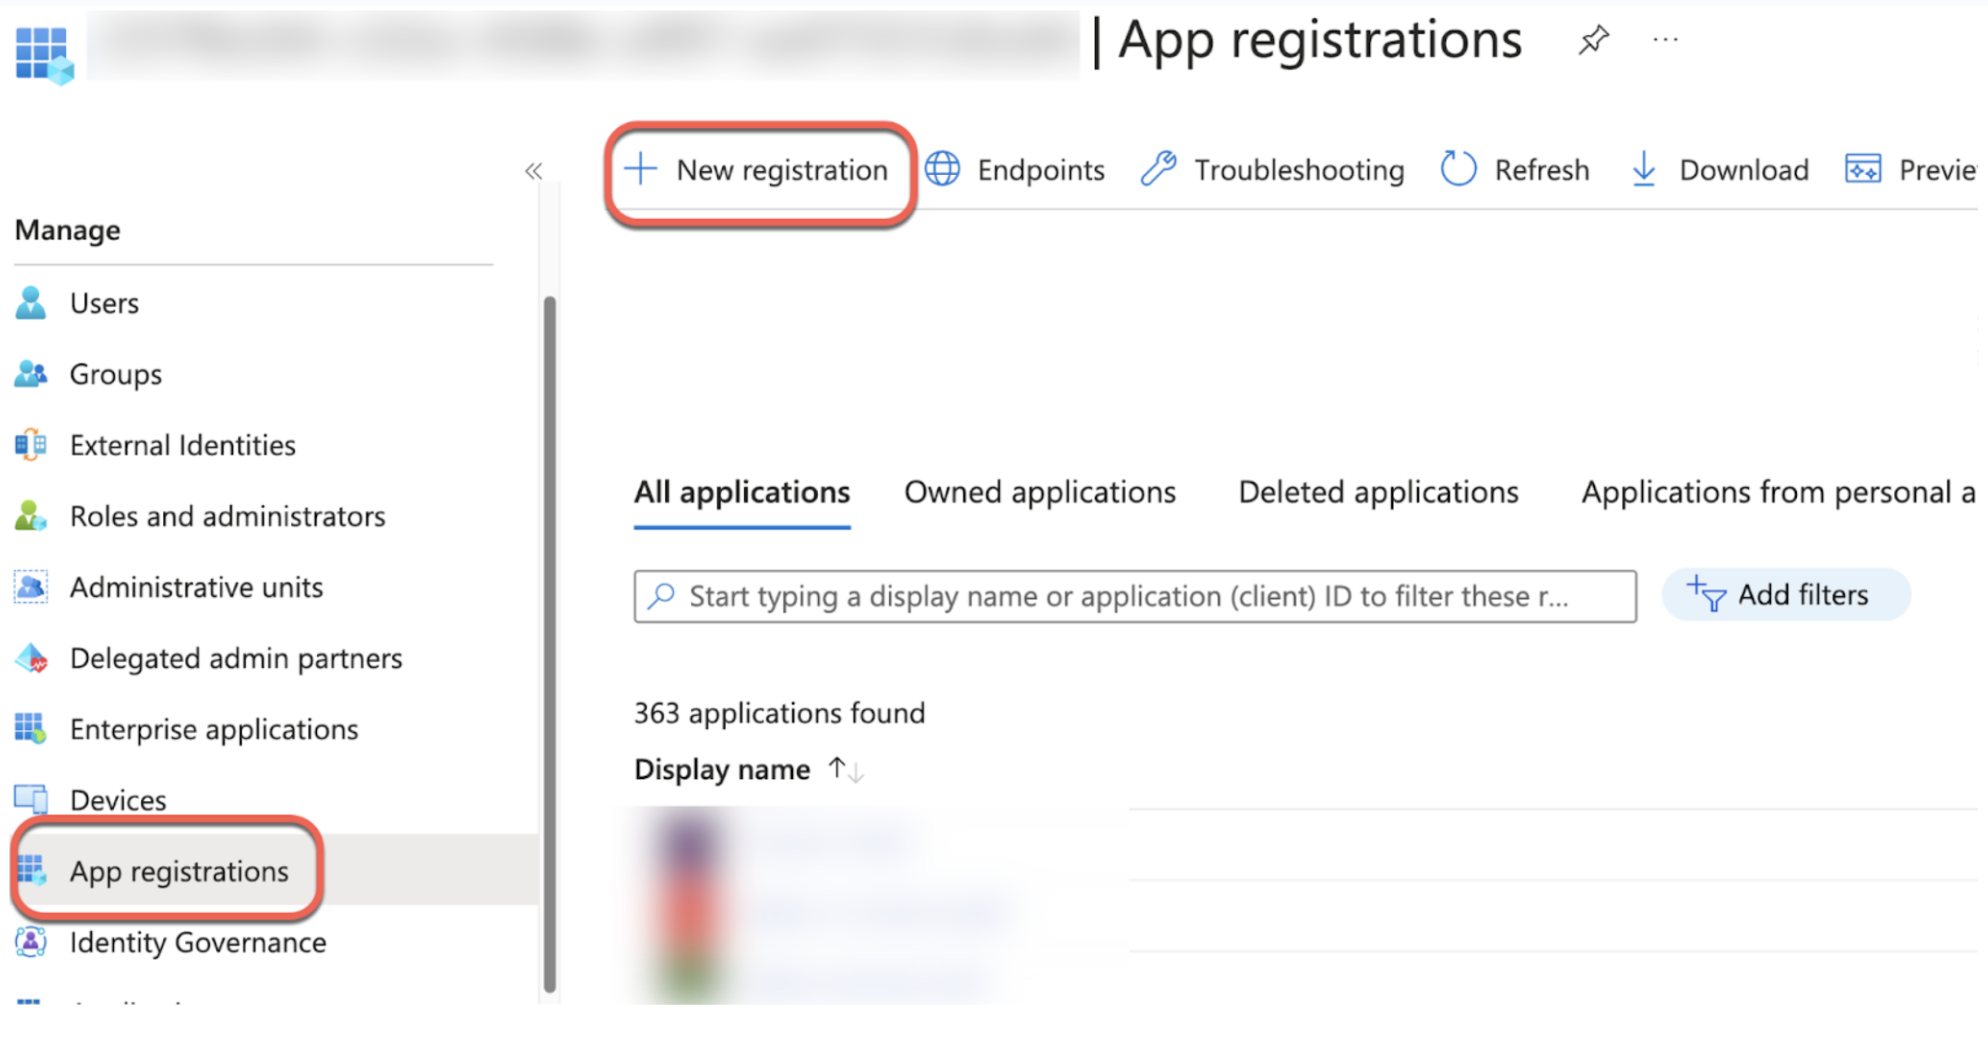
2. Navigate to the Entra ID service and select App Registrations using the sidebar on the left side of the page.

3. From the Applications view, click the + New registration button.
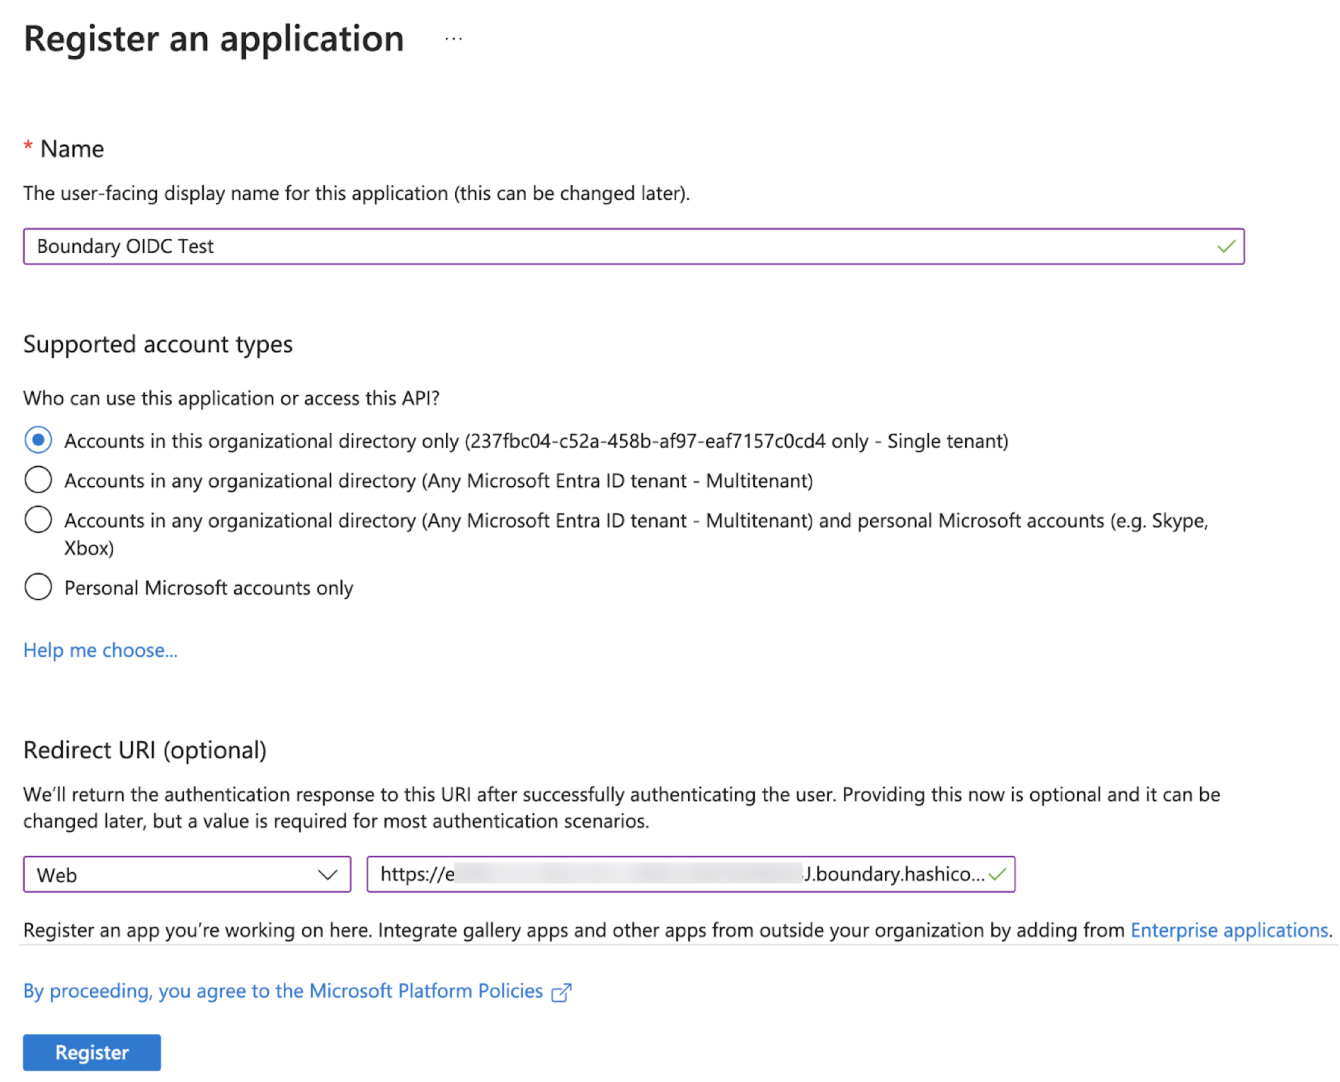
4. On the Register an application page, name your application and select its tenancy model.
-
For this proof-of-concept tutorial, select Single-tenant. In our example, the application is named Boundary OIDC Test.
-
Under Redirect URI select the Web field.
-
Construct a callback URI and paste it under the Redirect URI field. The callback URI is created by appending
/v1/auth-methods/oidc:authenticate:callbackafter your HCP Boundary Cluster URL.
For example:
https://e58fe114-7624-431c-994d-b6670e90b03J.boundary.hashicorp.cloud/v1/auth-methods/oidc:authenticate:callback
- Paste the callback URI in the Web field and click Register.
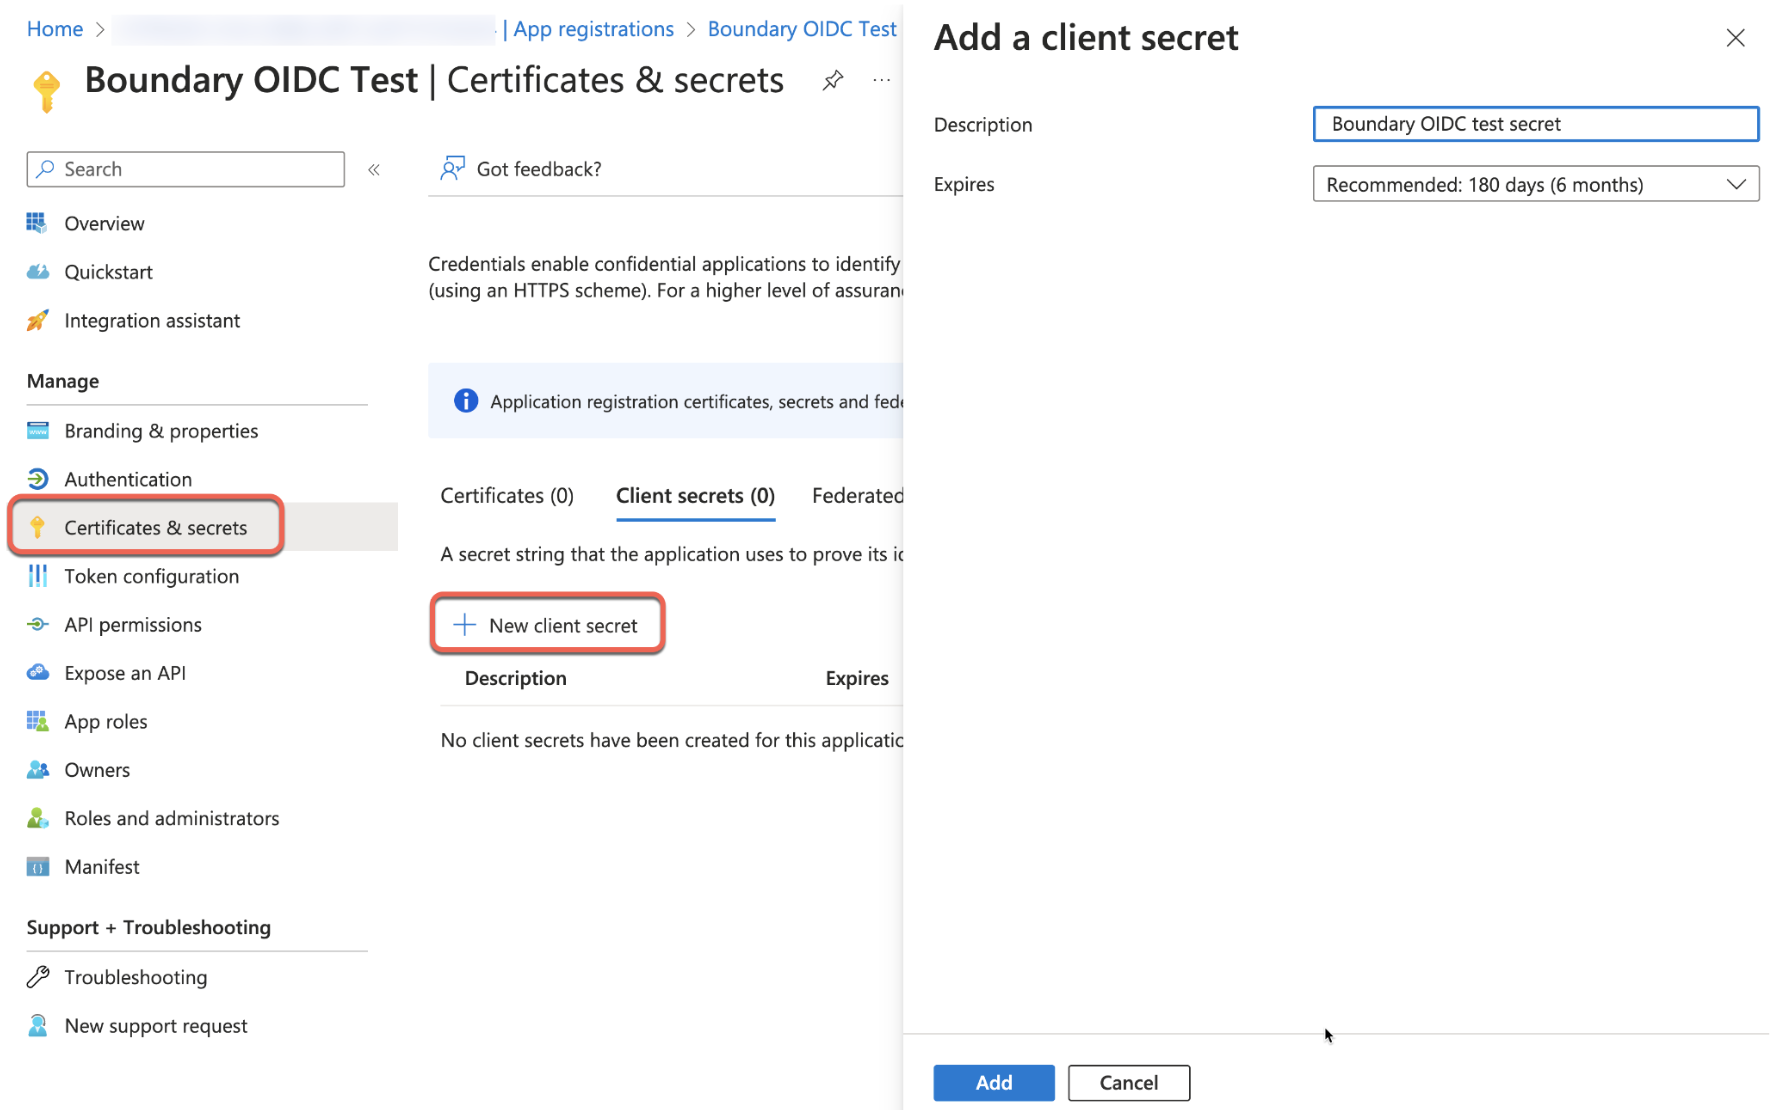
5. Once registered, you will be taken to the Overview page of your new app registration. Select Certificates & Secrets on the left. Click + New client secret and fill out the secret details. Our example describes the secret as Boundary OIDC test secret and leaves the expiry set to the recommended 180 days (6 months). In your environment, you can shorten or elongate this.
Click Add.
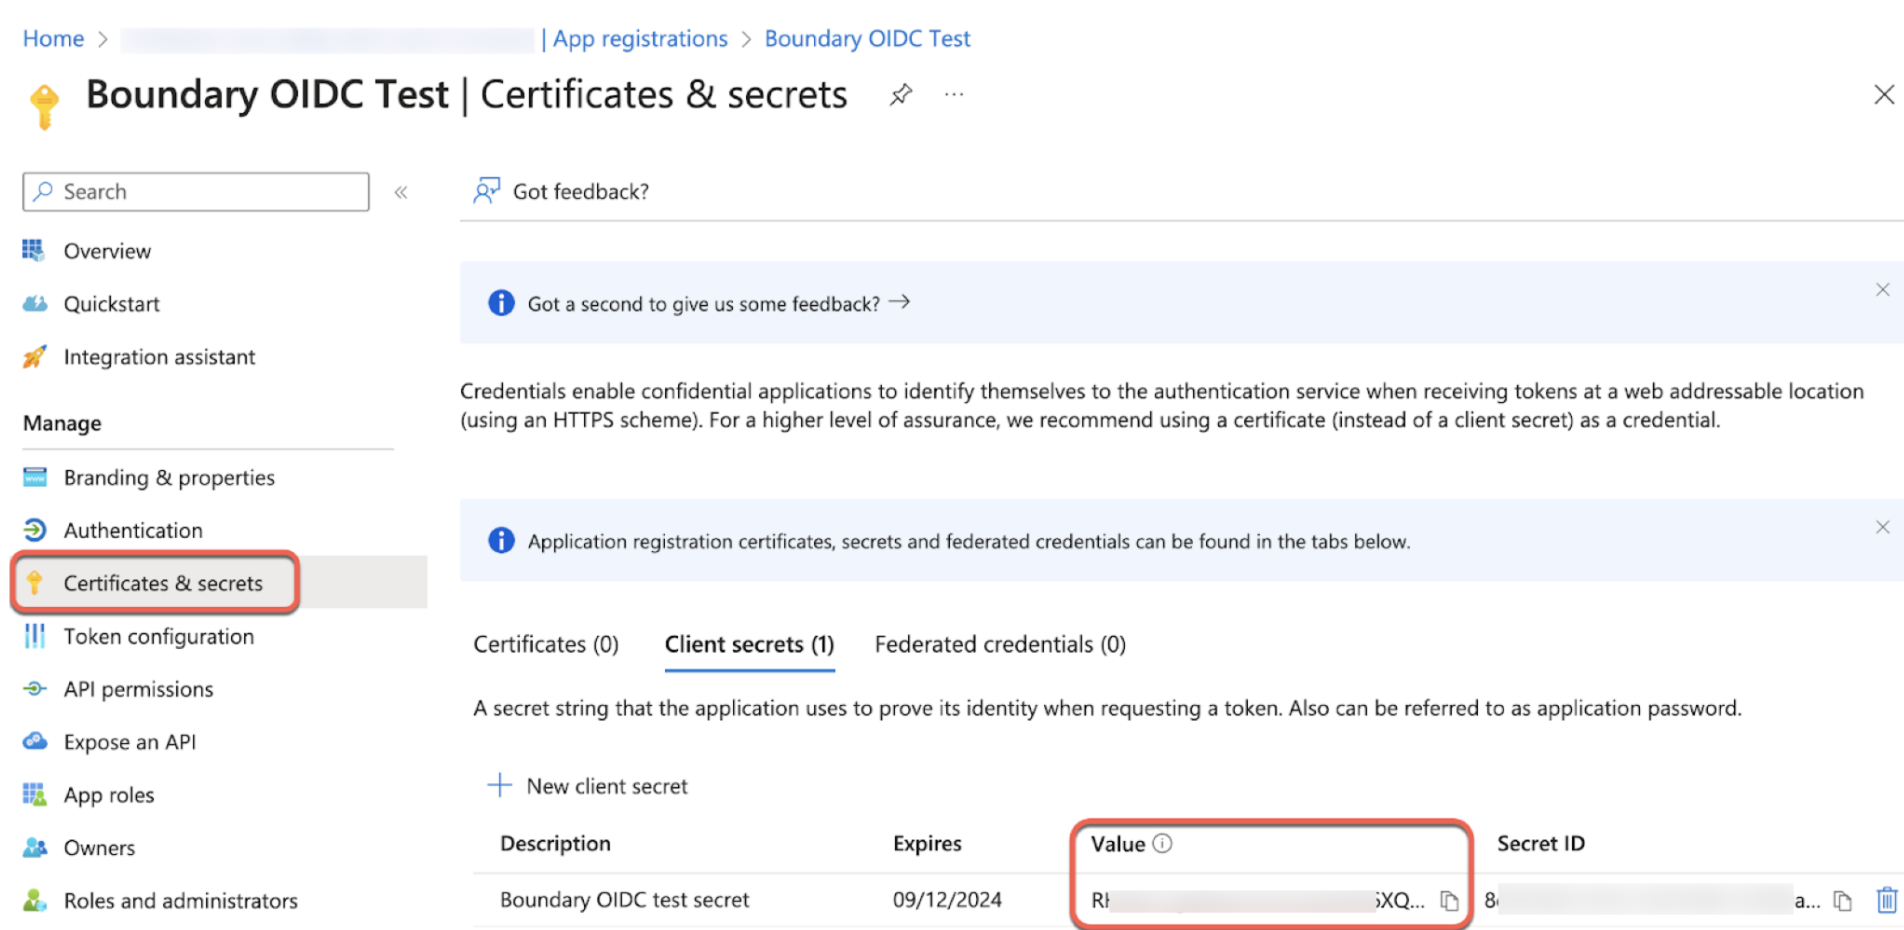
6. Copy the client secret value and store it for use later. Ensure you grab the Value, not the Secret ID.
7. Next, on your Boundary OIDC Test app, navigate to the Authentication tab on the left.
Scroll down to the Front-channel logout URL. This setting covers how session logouts are handled. Construct the logout URL by appending :3000 to the end of your HCP Boundary Cluster URl.
For example: https://e58fe114-7624-431c-994d-b6670e90b03J.boundary.hashicorp.cloud:3000
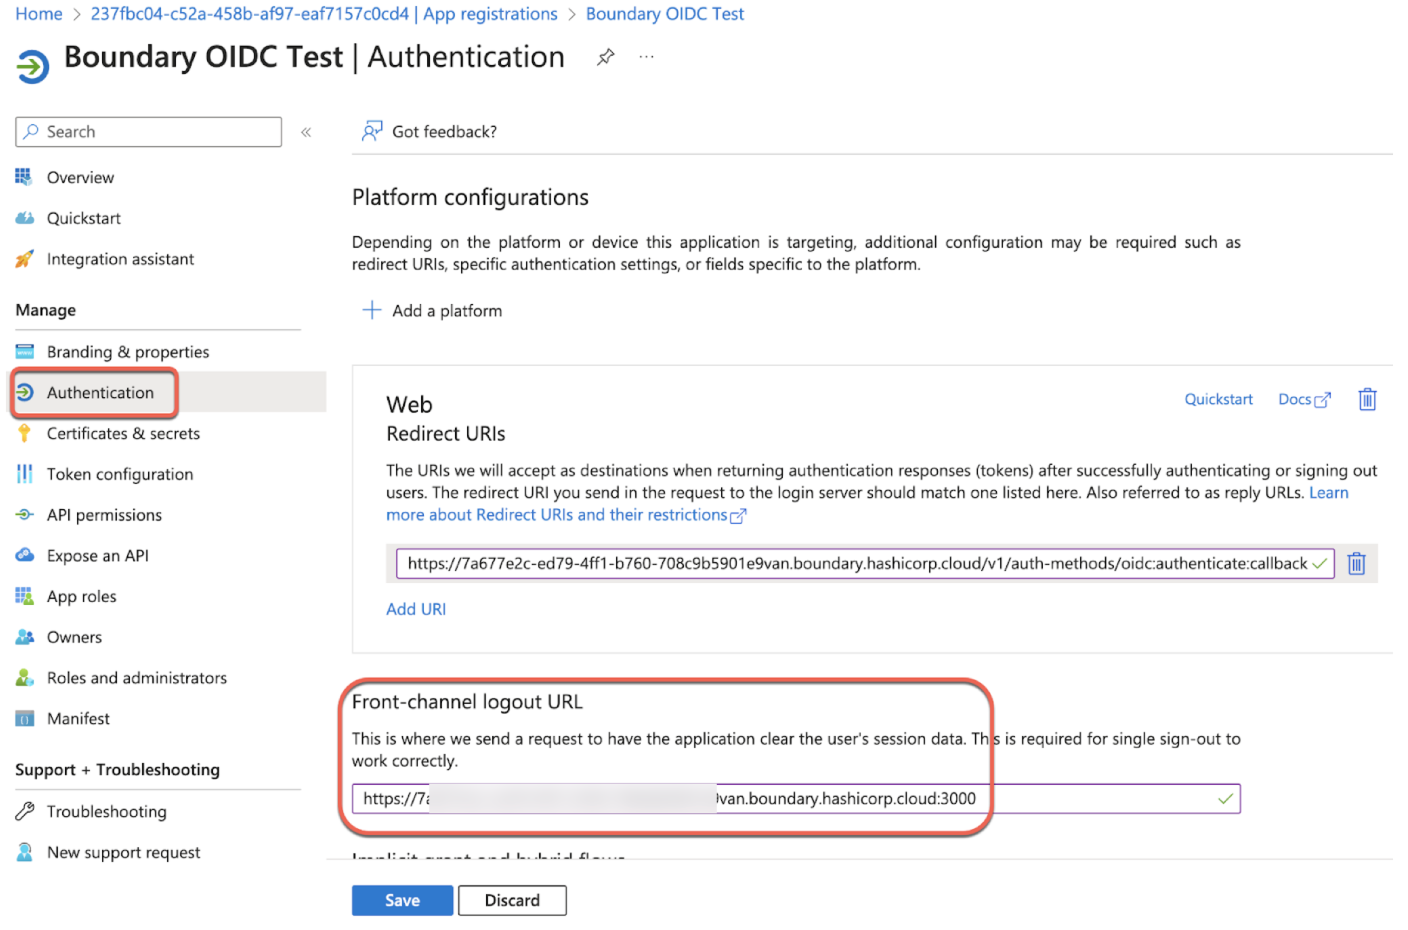
Click Save.
8. Then, on your Boundary OIDC Test _app, navigate to the _Token configuration tab on the left-hand side. Click + Add groups claim. Select Security groups, Directory roles, and Groups assigned to the application.
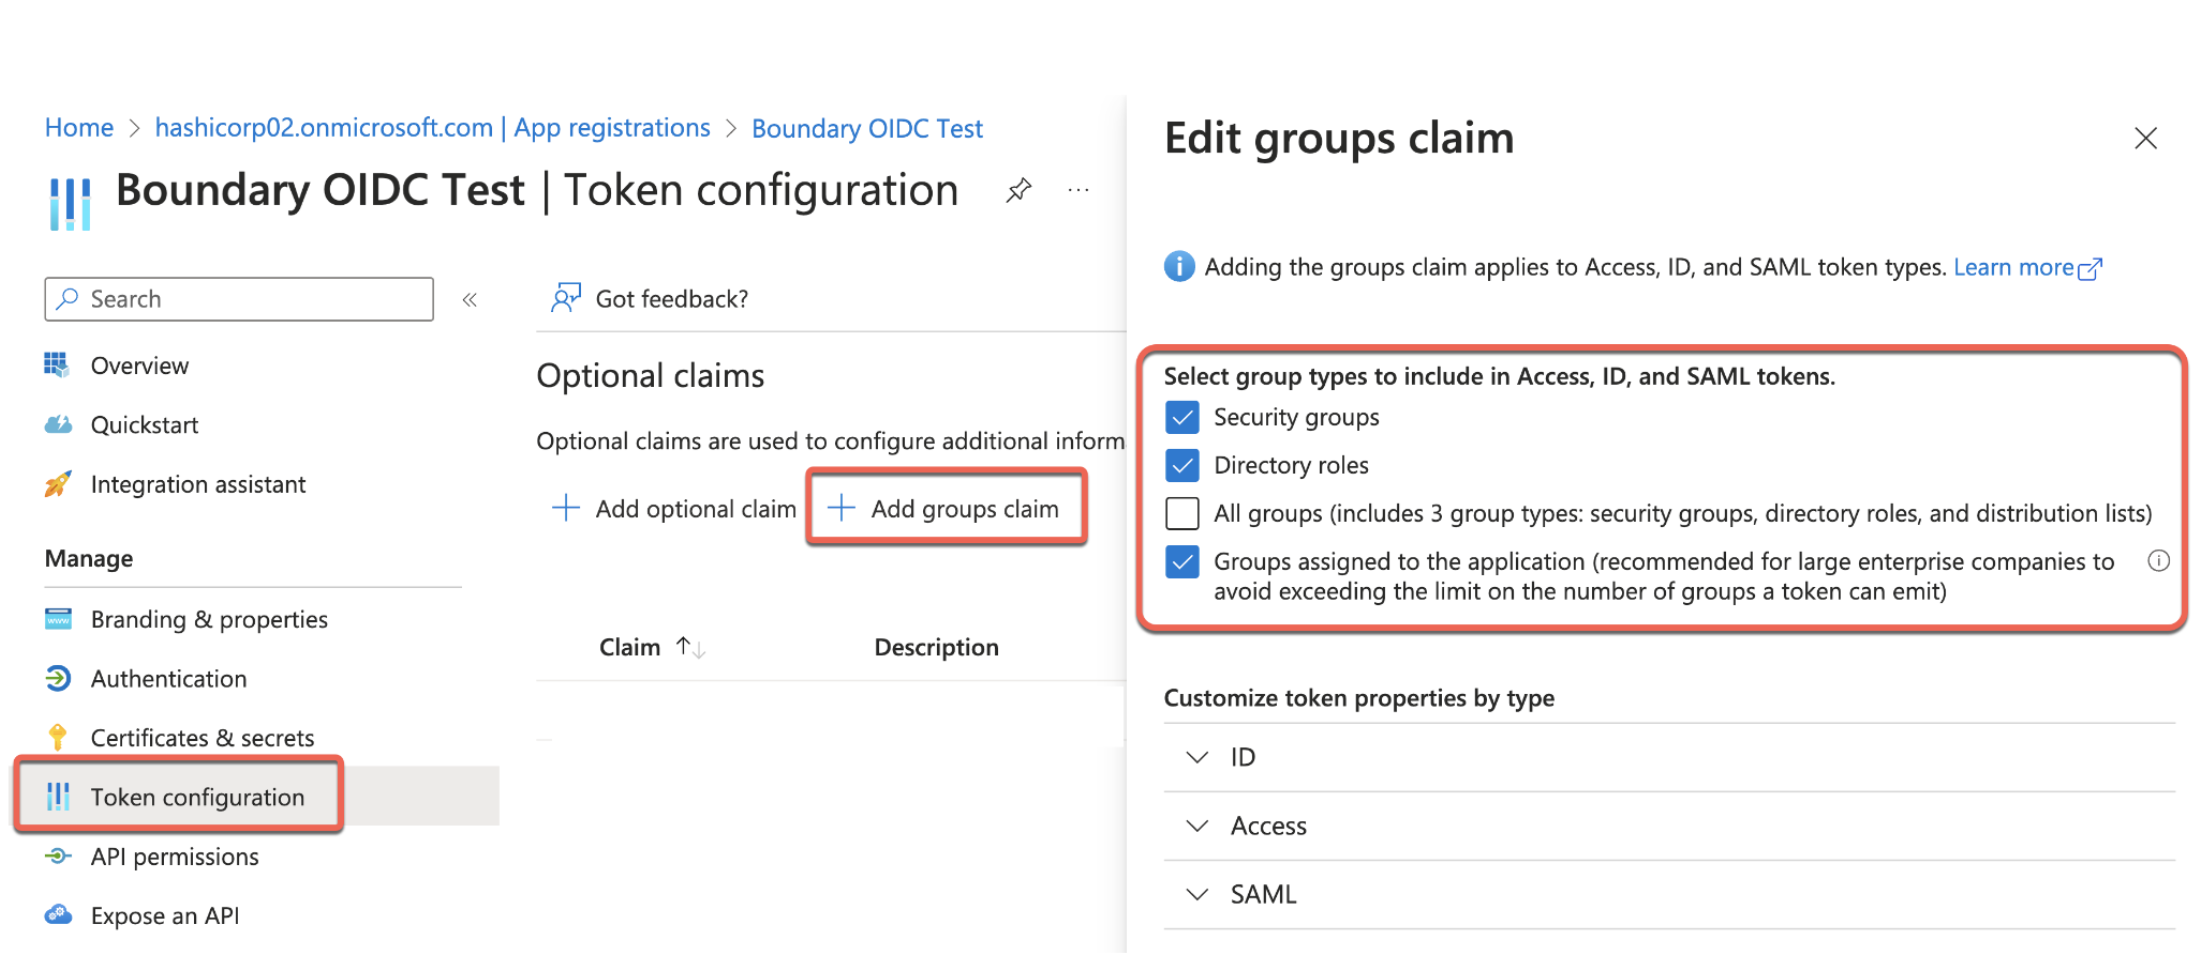
9. Click Add.
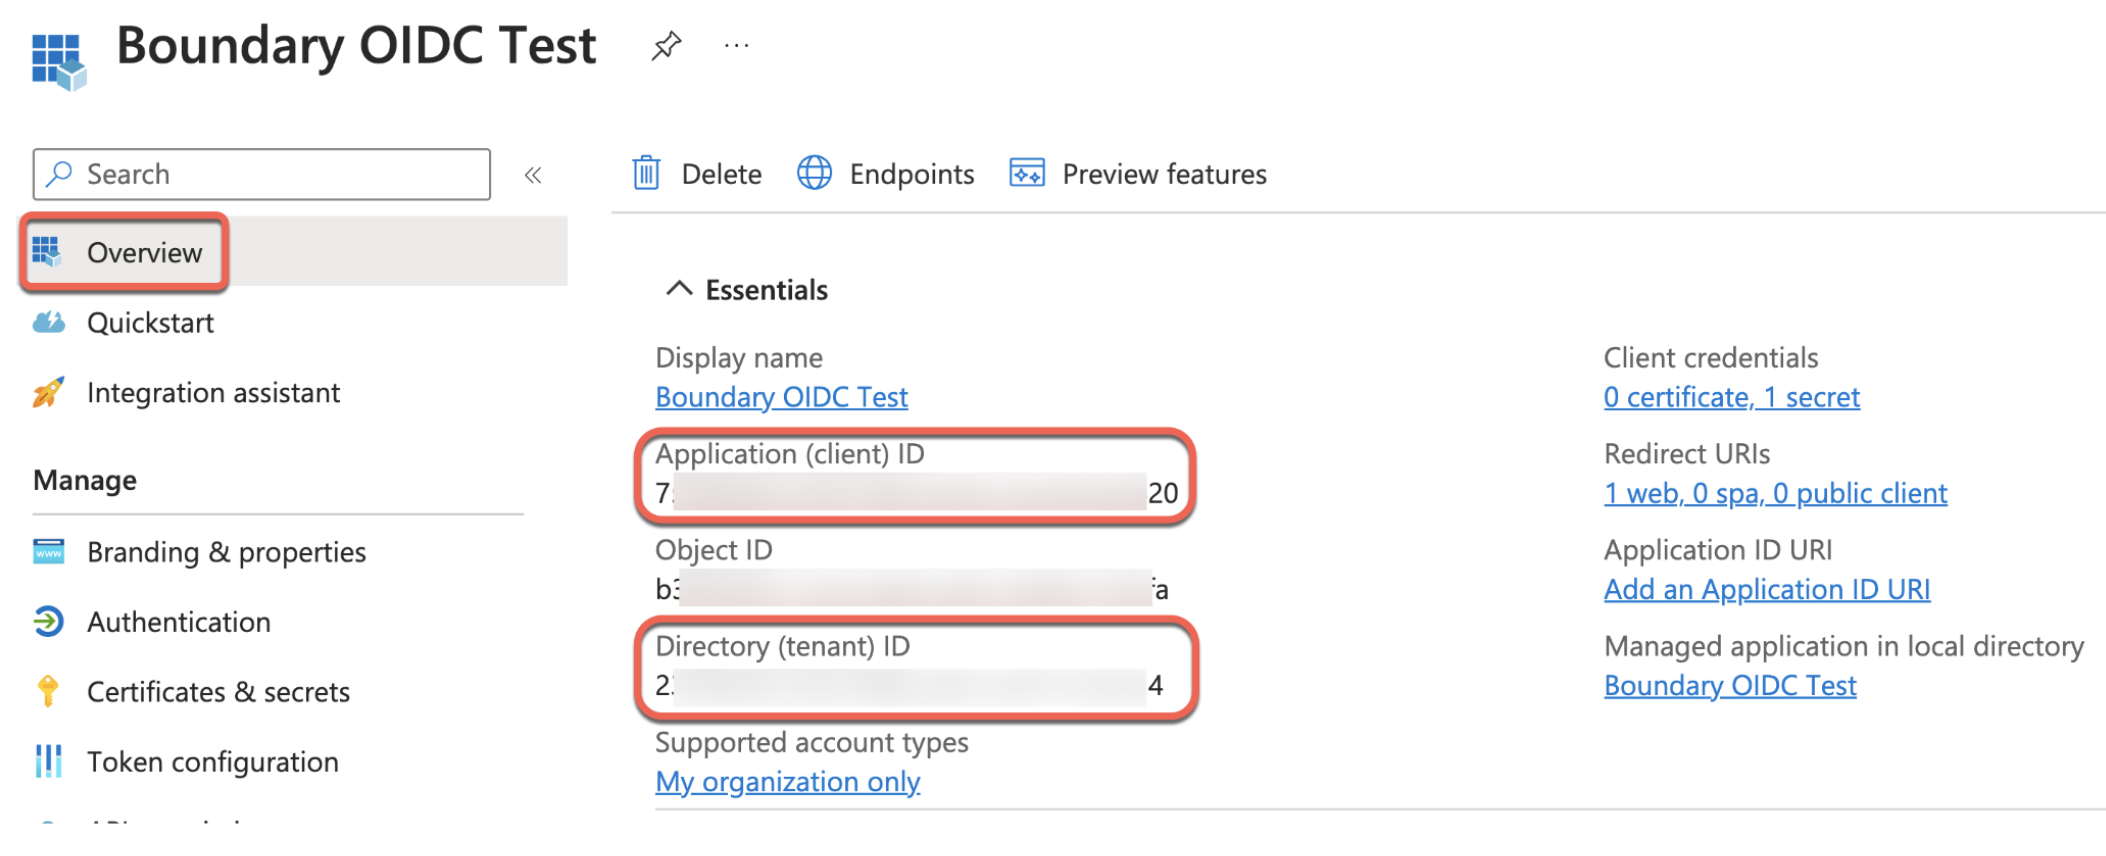
10. Navigate back to the Boundary OIDC Test app's Overview page using the menu on the left. From this view, copy the Directory (Tenant) ID and the Application (client) ID onto a notepad.
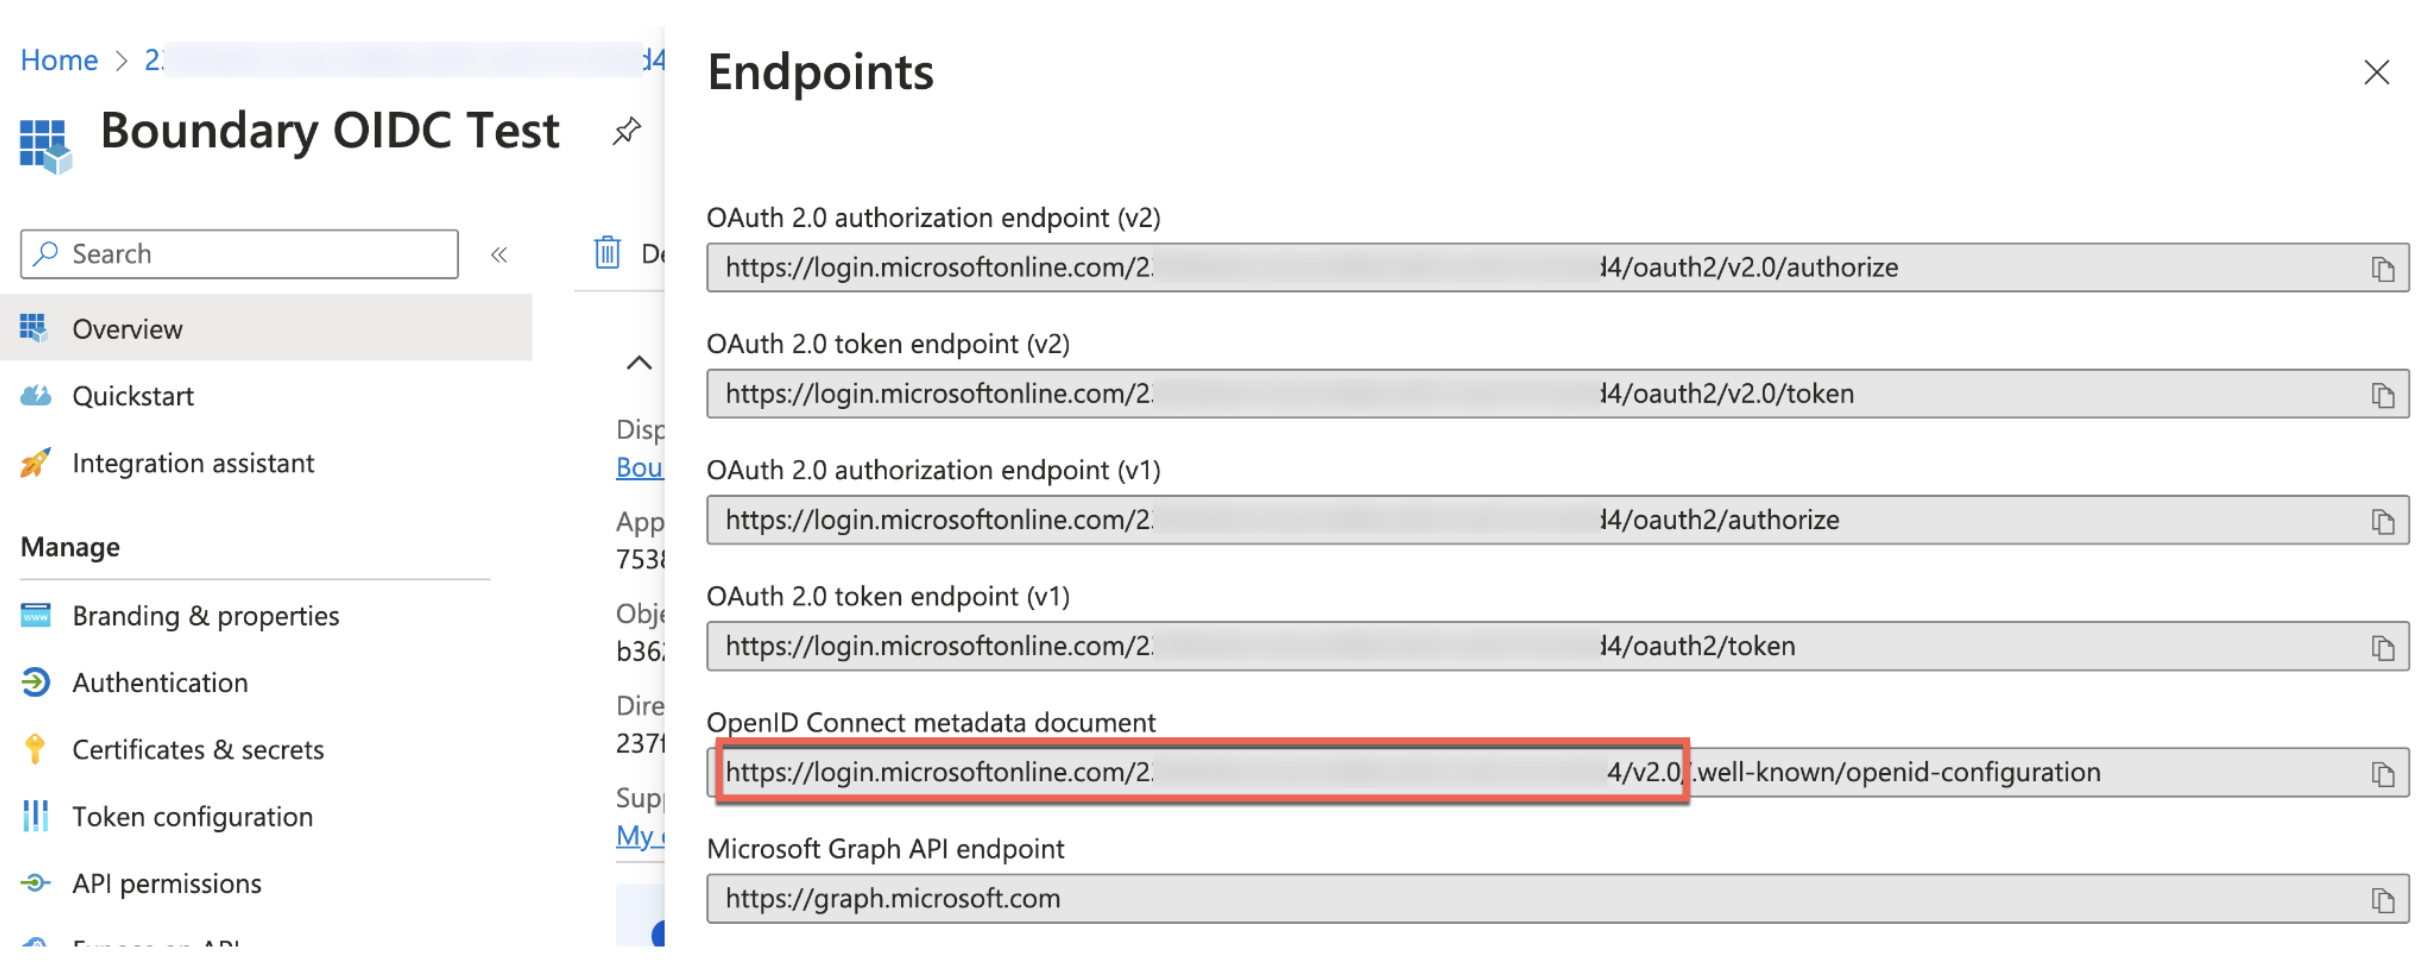
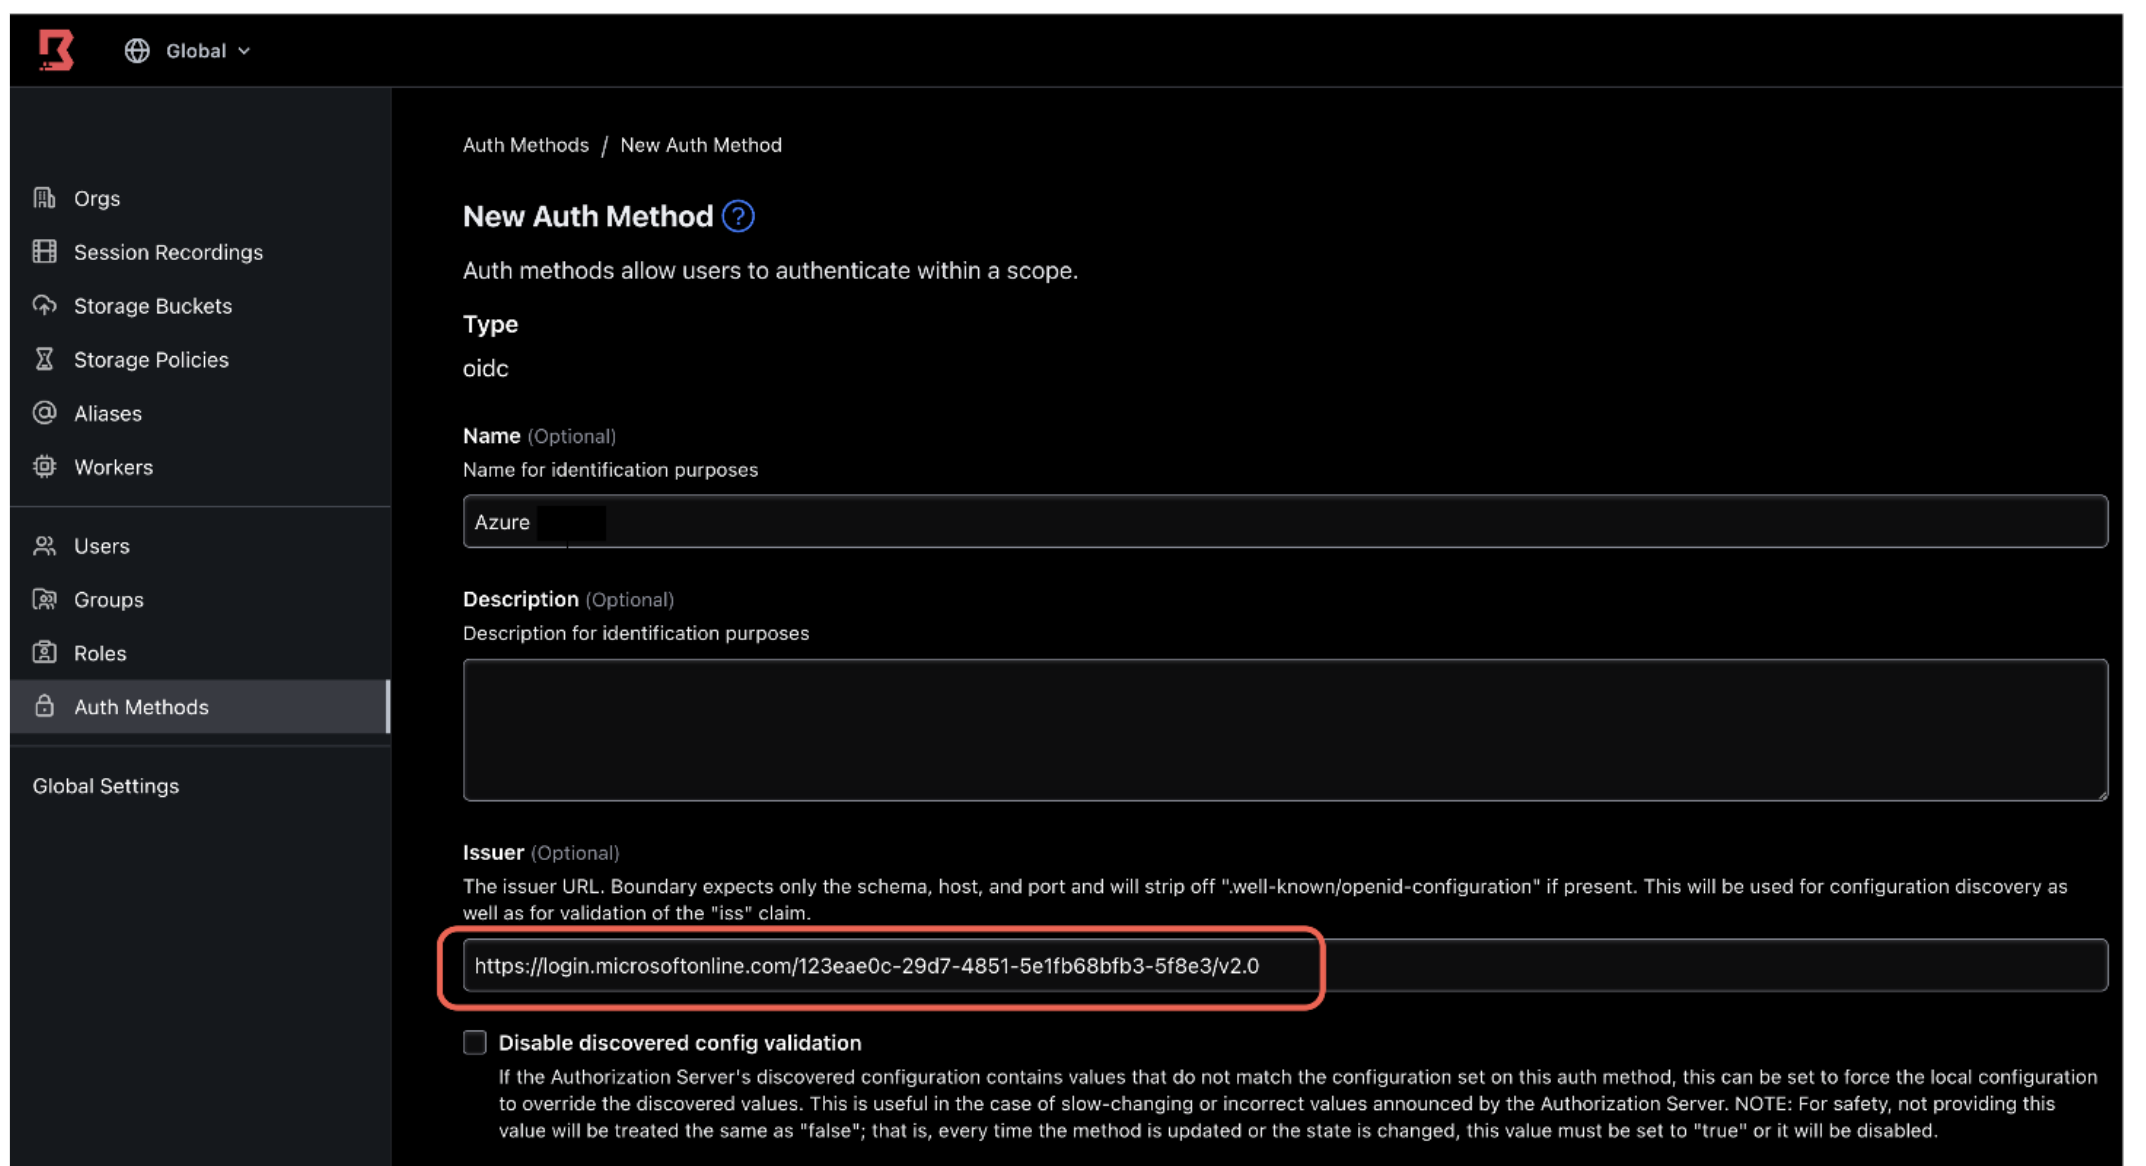
11. You will also need to construct the application Issuer URL.
On the application Overview page, click on Endpoints. Copy the OpenID Connect metadata document value, up to and including the /v2.0.
For example:
https://login.microsoftonline.com/123eae0c-29d7-4851-5e1fb68bfb3-5f8e3/v2.0
Copy and paste this entire URL onto a notepad. This URL will be referred to as the Issuer and will be used to configure the Boundary OIDC auth method in the next section.
A couple things to note:
- Another method to generate the Issuer URL is to plug in your
Tenant_IDinto the following format:https://login.microsoftonline.com/Tenant_ID/v2.0 - You may need to refer to Entra OIDC documentation for the latest OIDC endpoint schemas.
12. Before moving on to the next section, make sure you have the three important values from the previous steps. They are needed for configuring OIDC with Boundary in the next section.
- Issuer:
https://login.microsoftonline.com/Tenant_ID/v2.0- Example:
https://login.microsoftonline.com/123eae0c-29d7-4851-5e1fb68bfb3-5f8e3/v2.0
- Example:
- Client ID: Application (client) ID
- Client secret: Client secret value
Connect the HCP Boundary cluster to Azure using OIDC
1. On your browser, log onto your Boundary cluster Admin UI as an administrator.
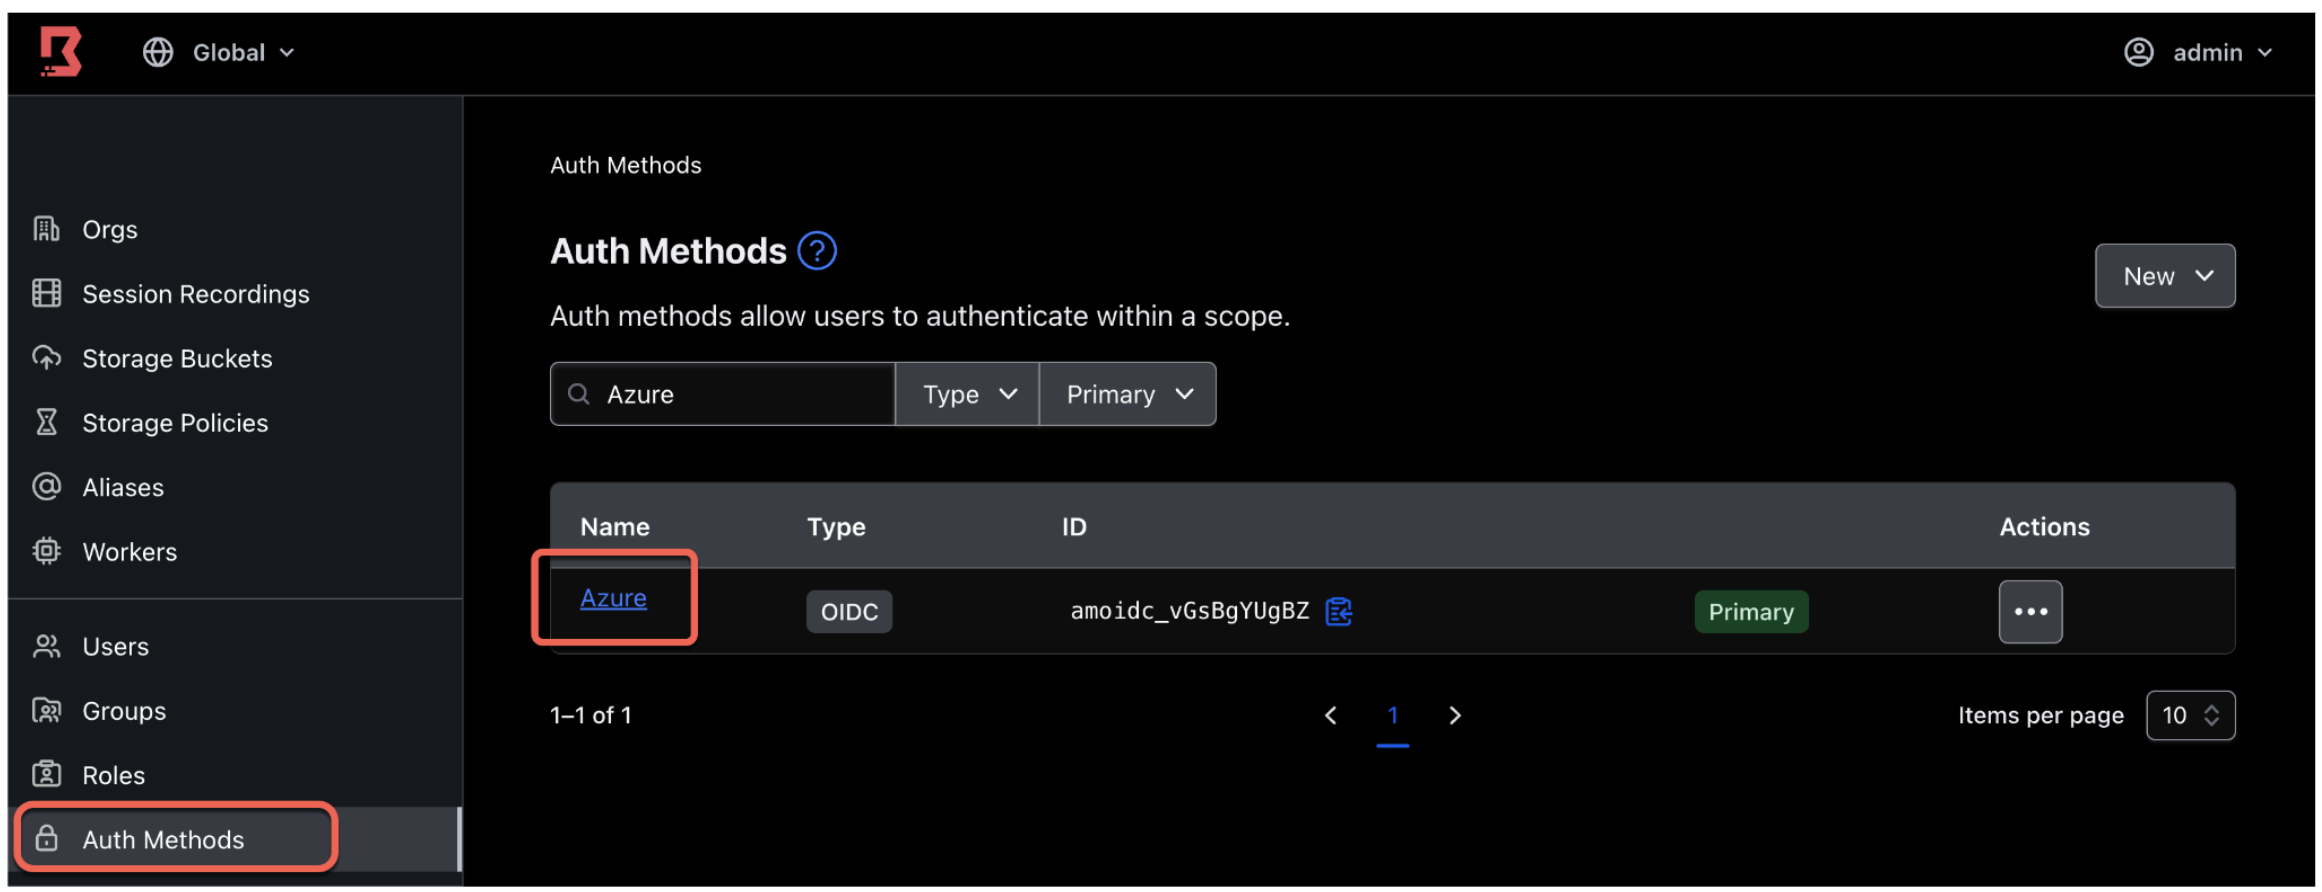
2. While in the global scope, click Auth Methods on the left side tab. Click New, and select OIDC.
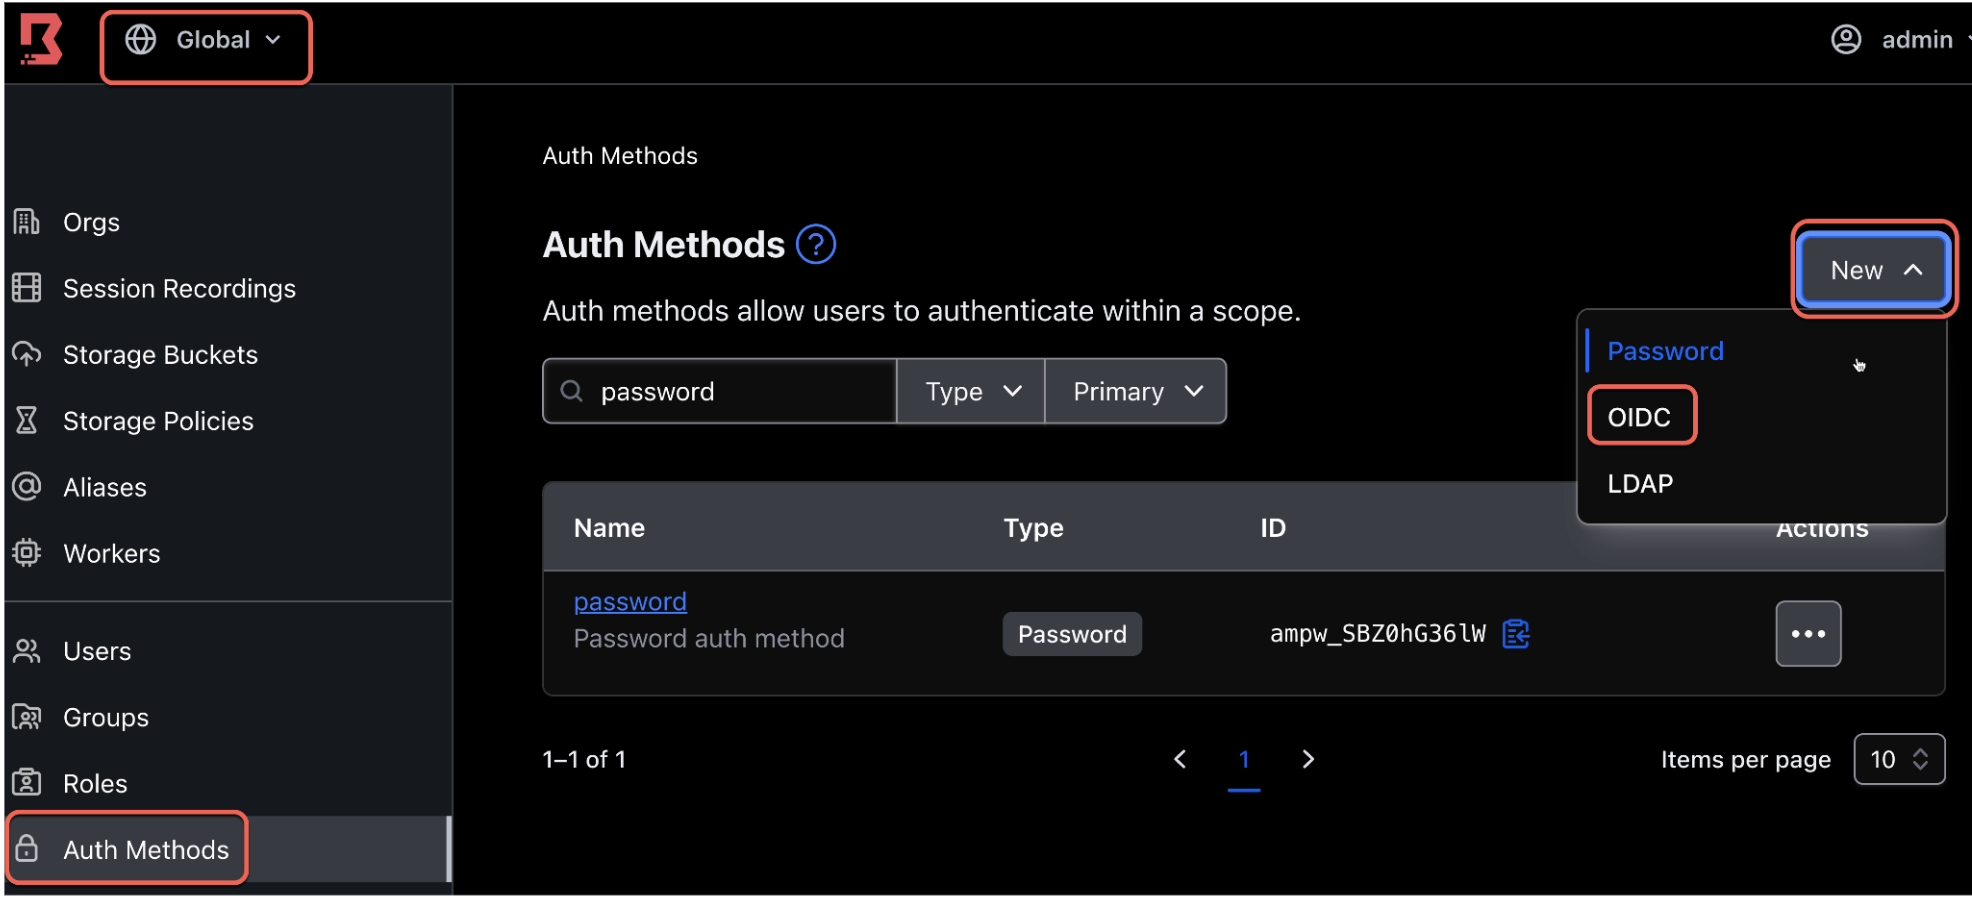
3. Fill out the form details using the settings gathered from the previous section.
These include:
- Name (Example: Azure)
- Issuer (Example:
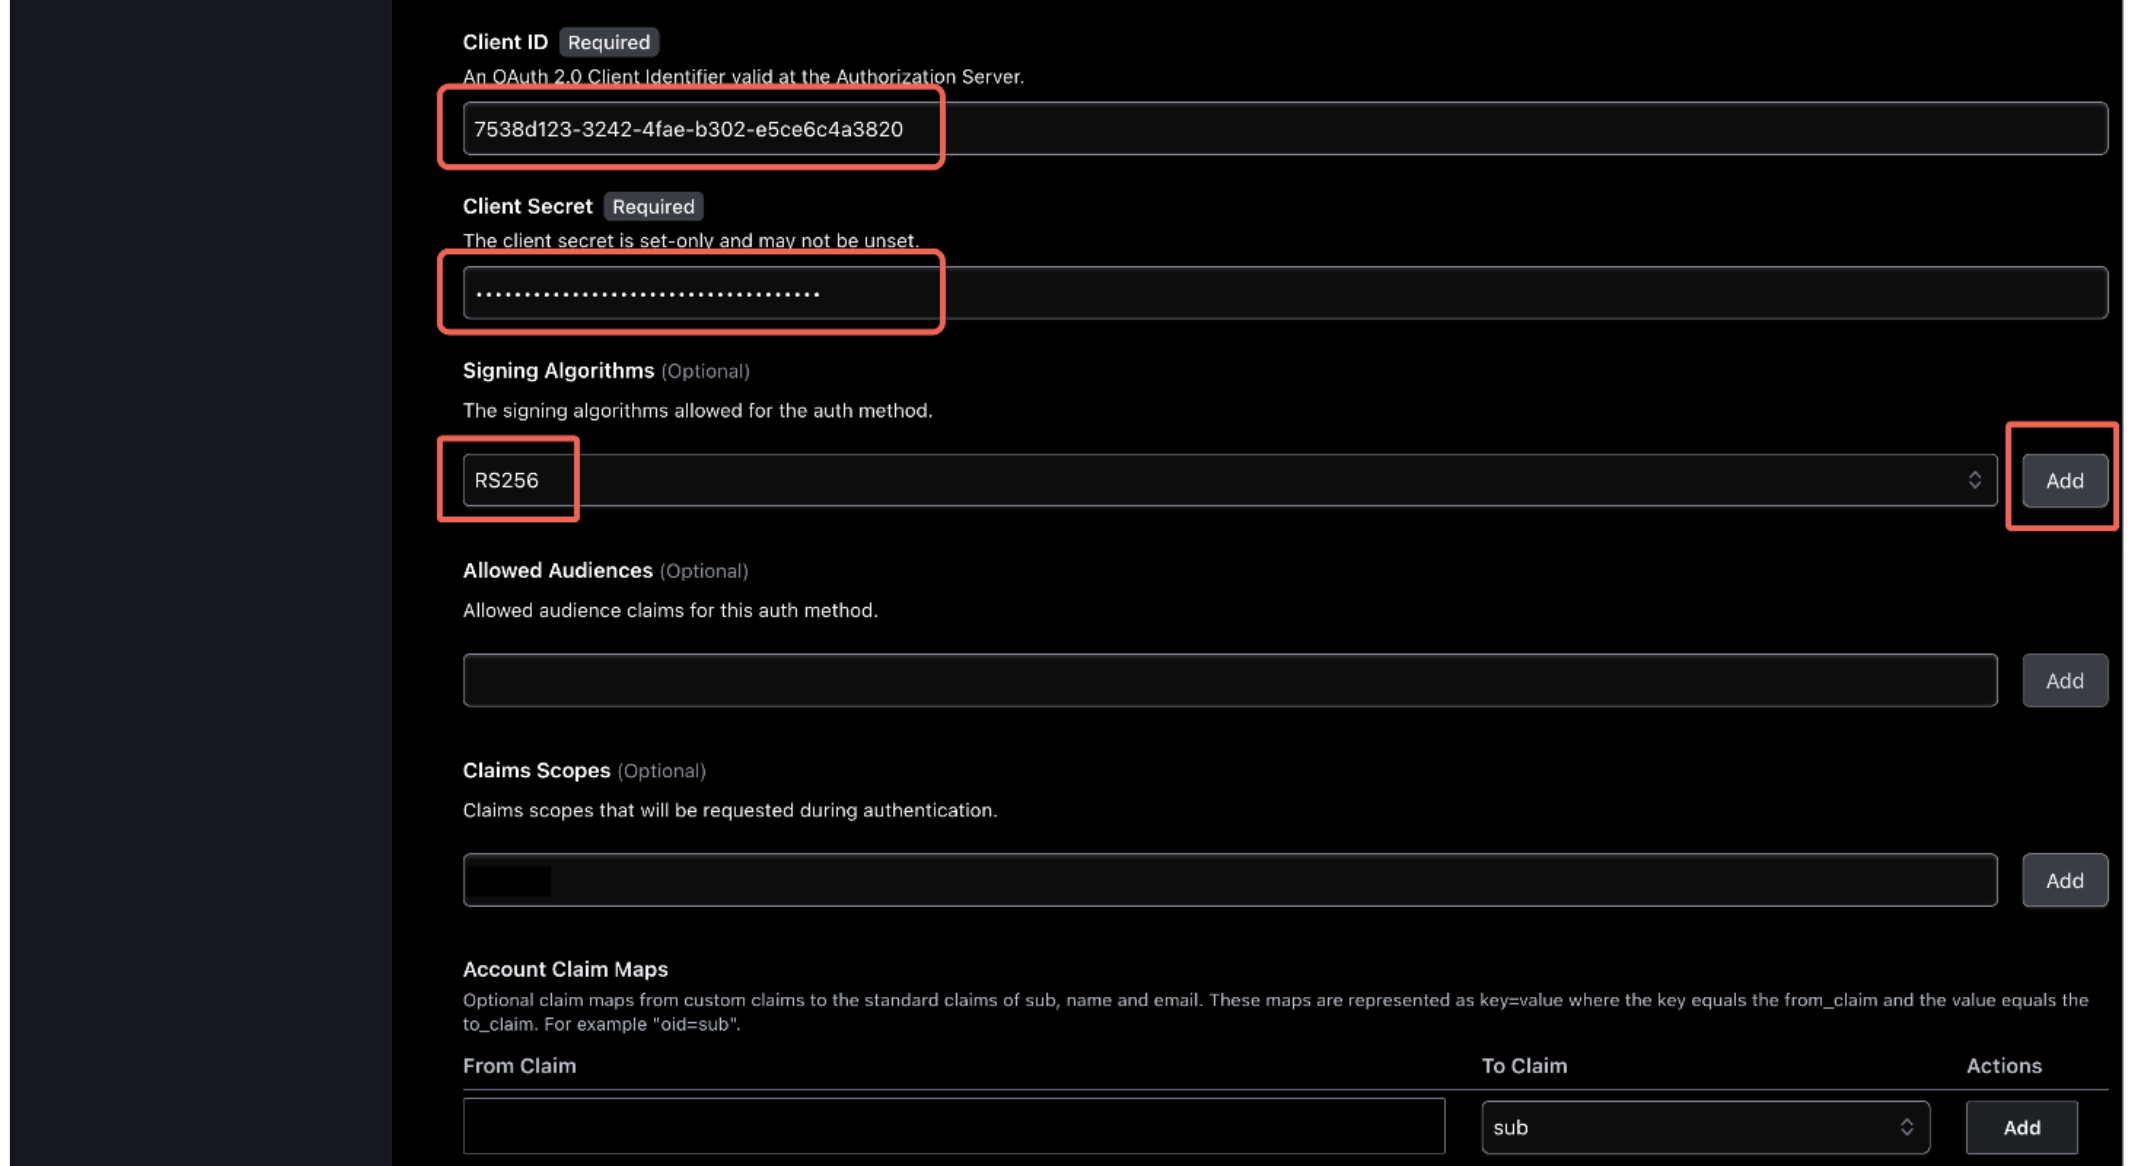
https://login.microsoftonline.com/123eae0c-29d7-4851-5e1fb68bfb3-5f8e3/v2.0) - Client ID (Example:
a4d21a76-e08c-4d8d-8c47-e1c423ee4d11) - Client Secret (Example:
X9u~u58--~rWLR4Q9i1-PtdZOi_s04~91-) - Signing Algorithm
- Set to RS256
- Click Add
- API URL prefix. The API URL prefix is set to the HCP Boundary cluster URL
Note: Make sure there is no trailing / at the end of the URL.
(Example: https://e58fe114-7624-431c-994d-b6670e90b03J.boundary.hashicorp.cloud)
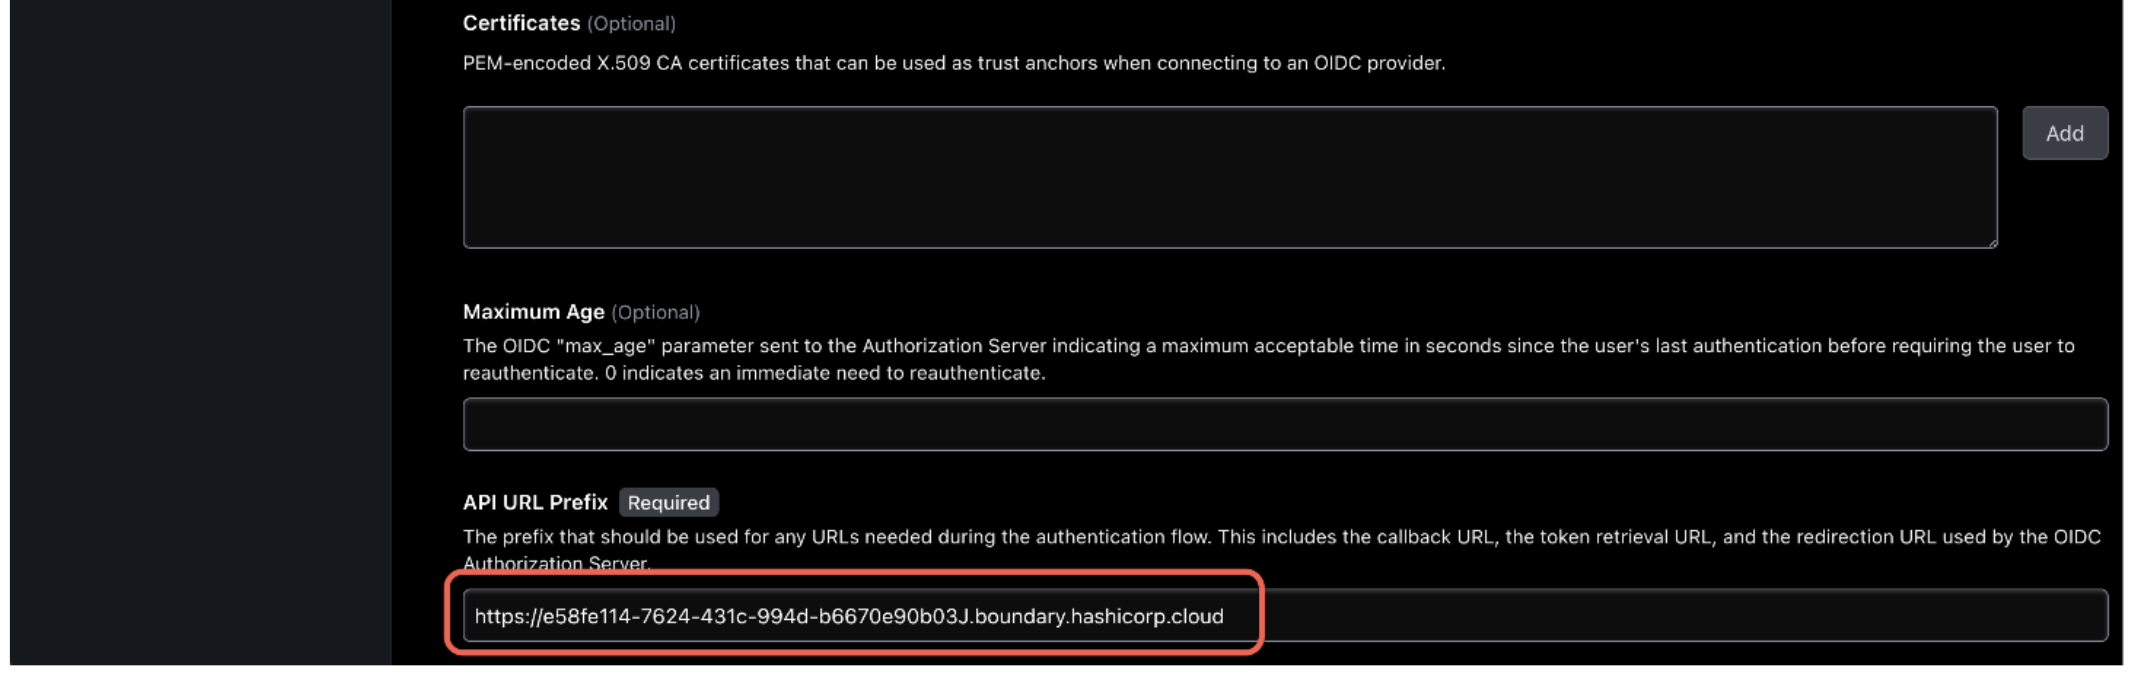
Once the form is completed, click Save.
Troubleshooting: If you are unable to save the auth method, check that the Issuer is prefixed by https:// and does not have a trailing / at the end of the URL.
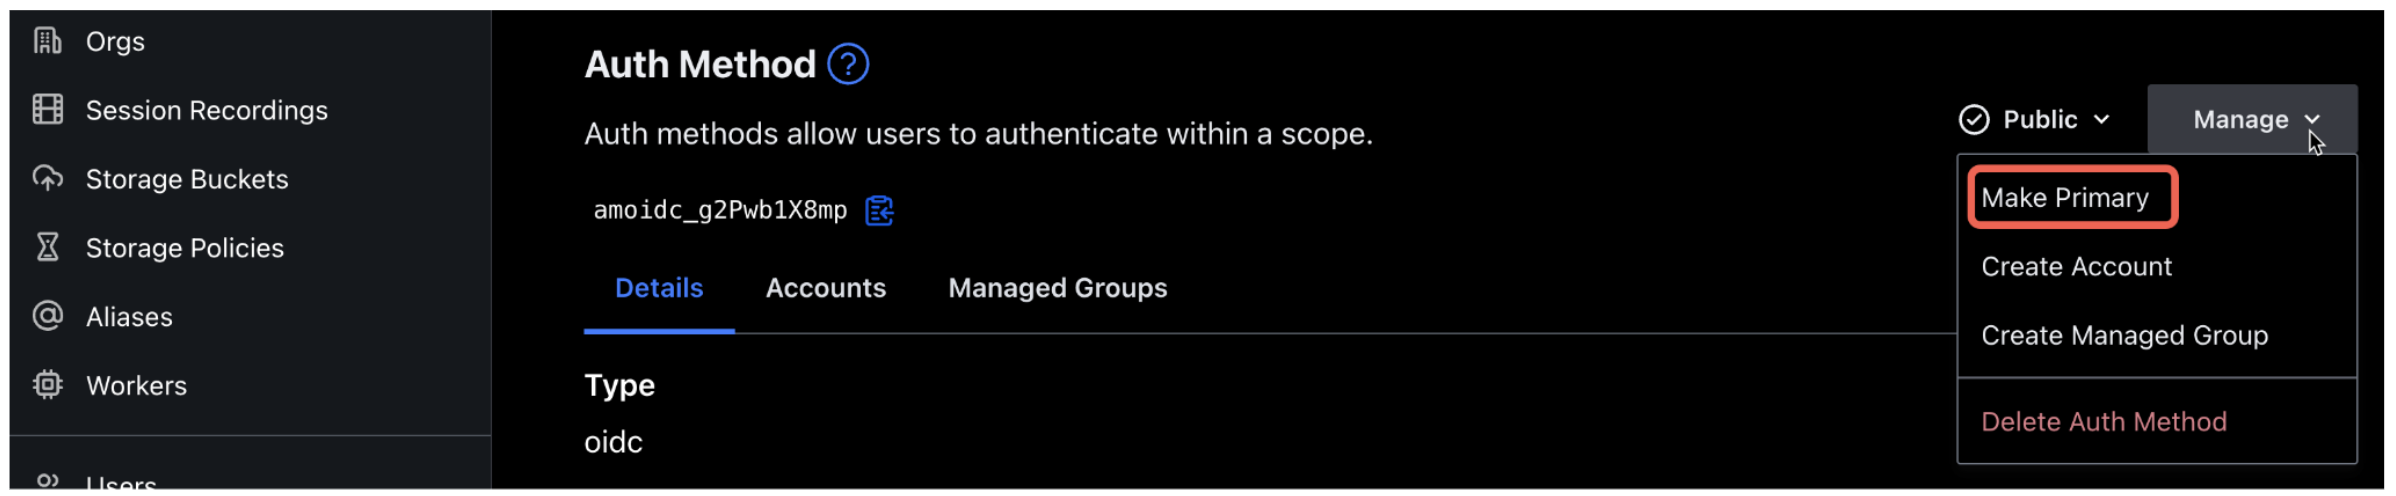
4. Once created, in the upper right corner, set the state of your auth method to Public.

5. Click Manage in the upper right corner and select Make Primary.
Verify Boundary login with Azure
1. Make sure you are logged onto your Azure subscription in your browser.
2. Using the Boundary Admin UI (via browser) or Boundary Desktop client, select your Azure auth method and click Sign In.
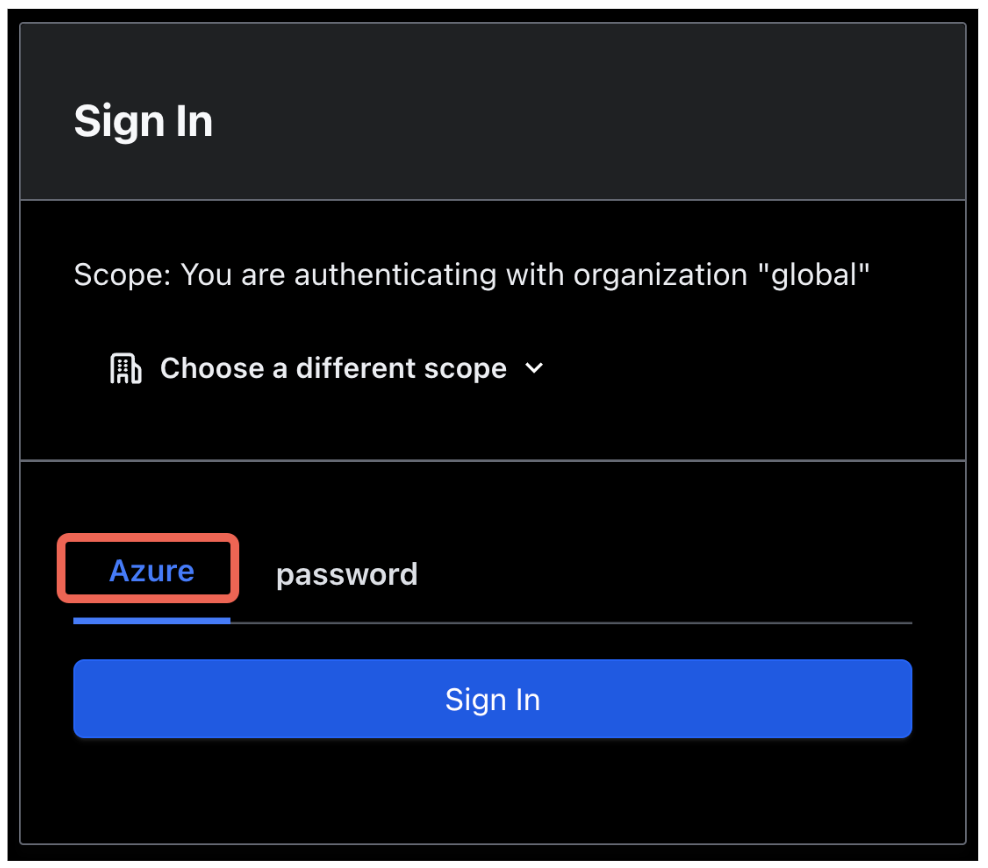
3. That opens a new tab in your browser and validates authentication with your Azure account.

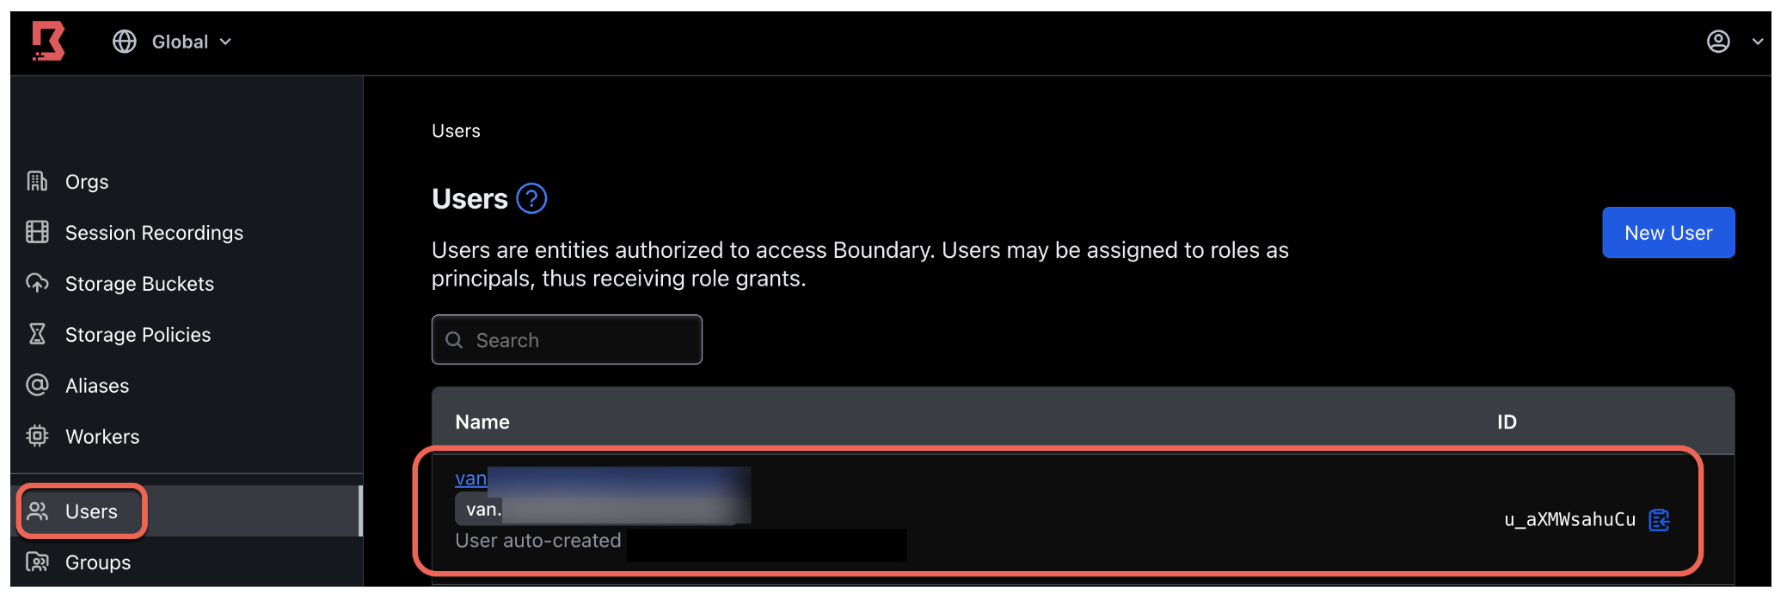
4. Upon successful login, you will notice three things:
- A new account was auto-created in your Azure auth method. This Boundary user account corresponds to your Azure user account. The name of the account defaults to the account ID.
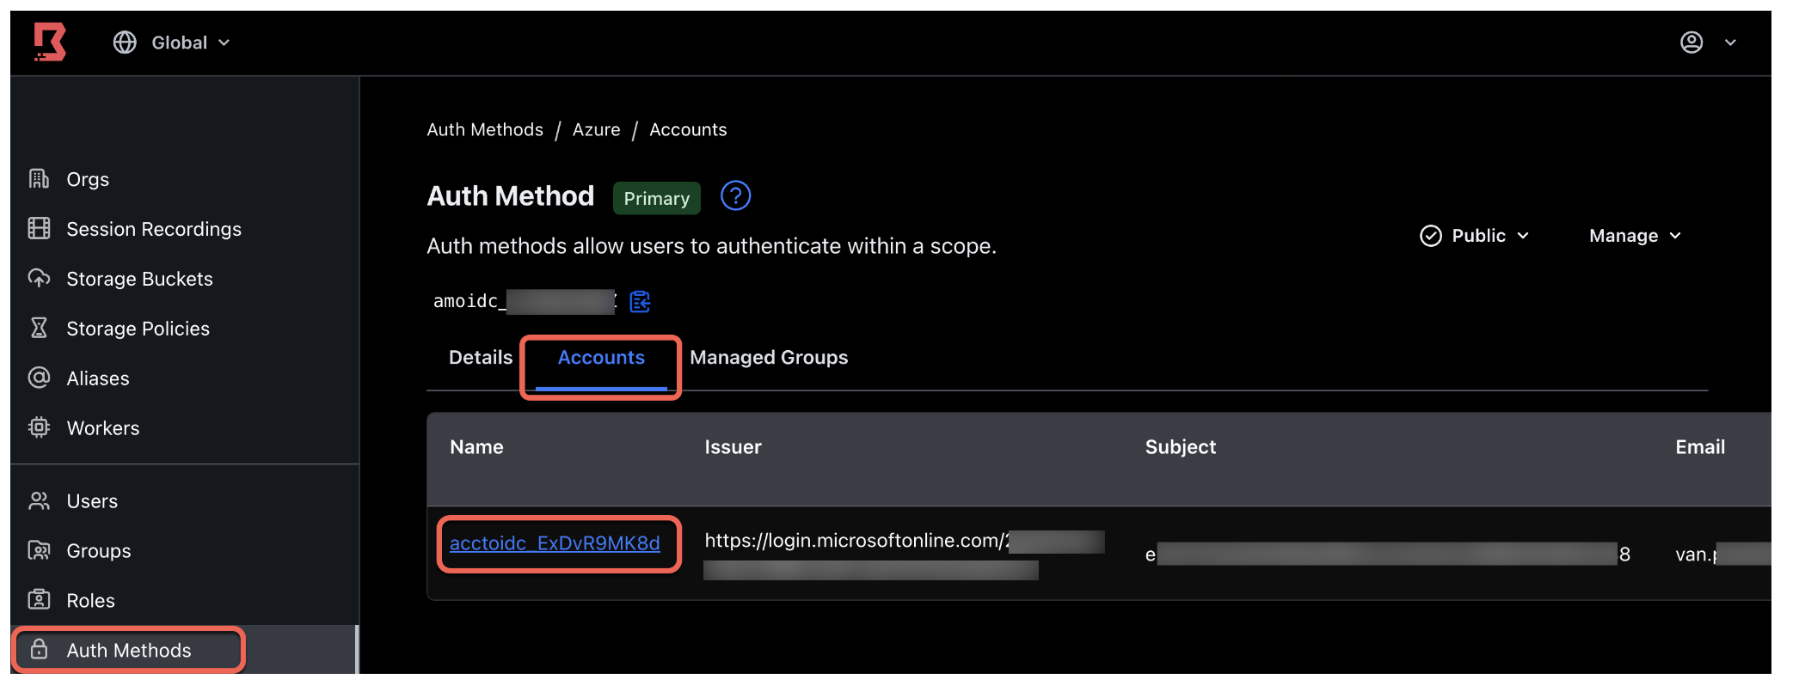
- A new user was created and associated with the new account.
- If you log onto Boundary using the CLI and run
boundary accounts read -id <ACCOUNT_ID>, you may find existing Entra ID group IDs already associated with this account. In the next section, we will create a new Entra ID group for this user account.
Configure groups on Azure
This section shows how to create an Azure group in Entra ID. This group maps to a Boundary managed group with permissions to access a test target. Any Boundary user in the managed group inherits the same permissions given to the managed group.
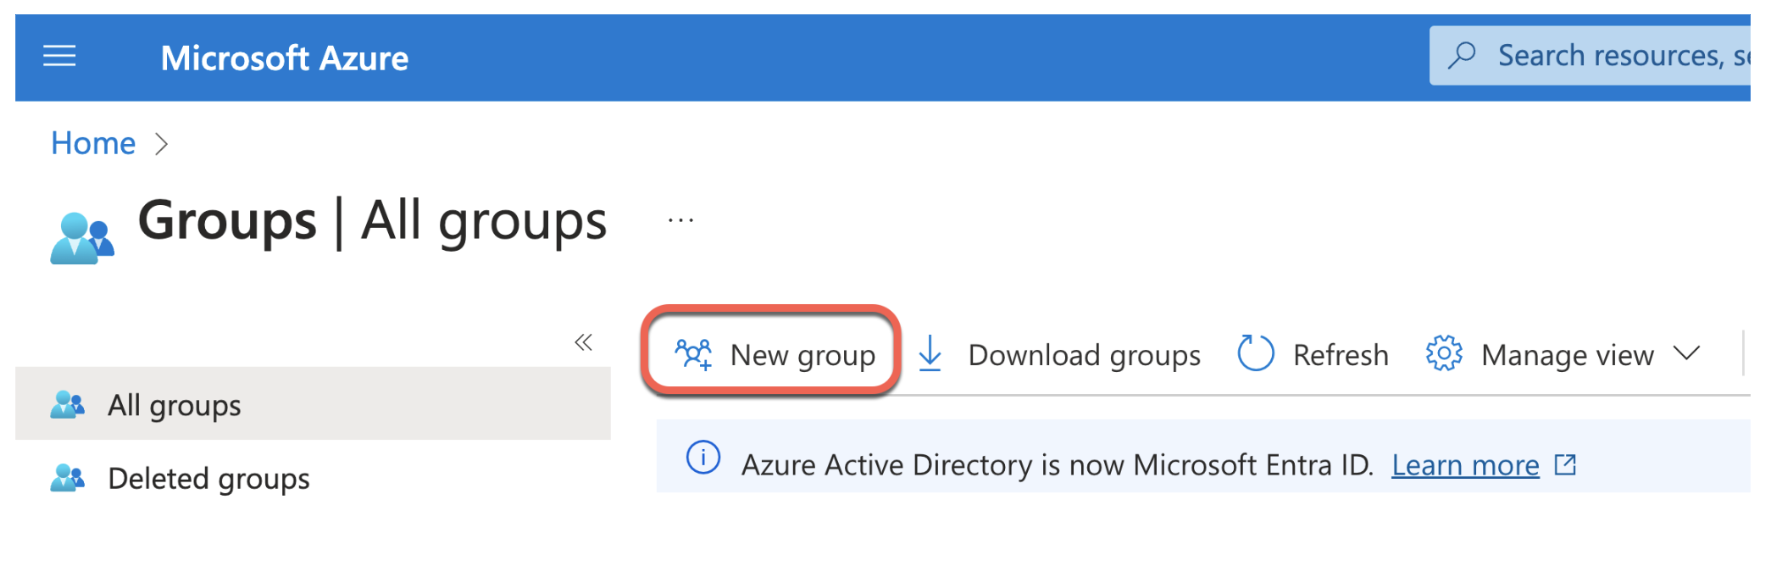
1. Log into Azure, navigate to Entra ID.
2. Click Groups on the left side tab and click New group.
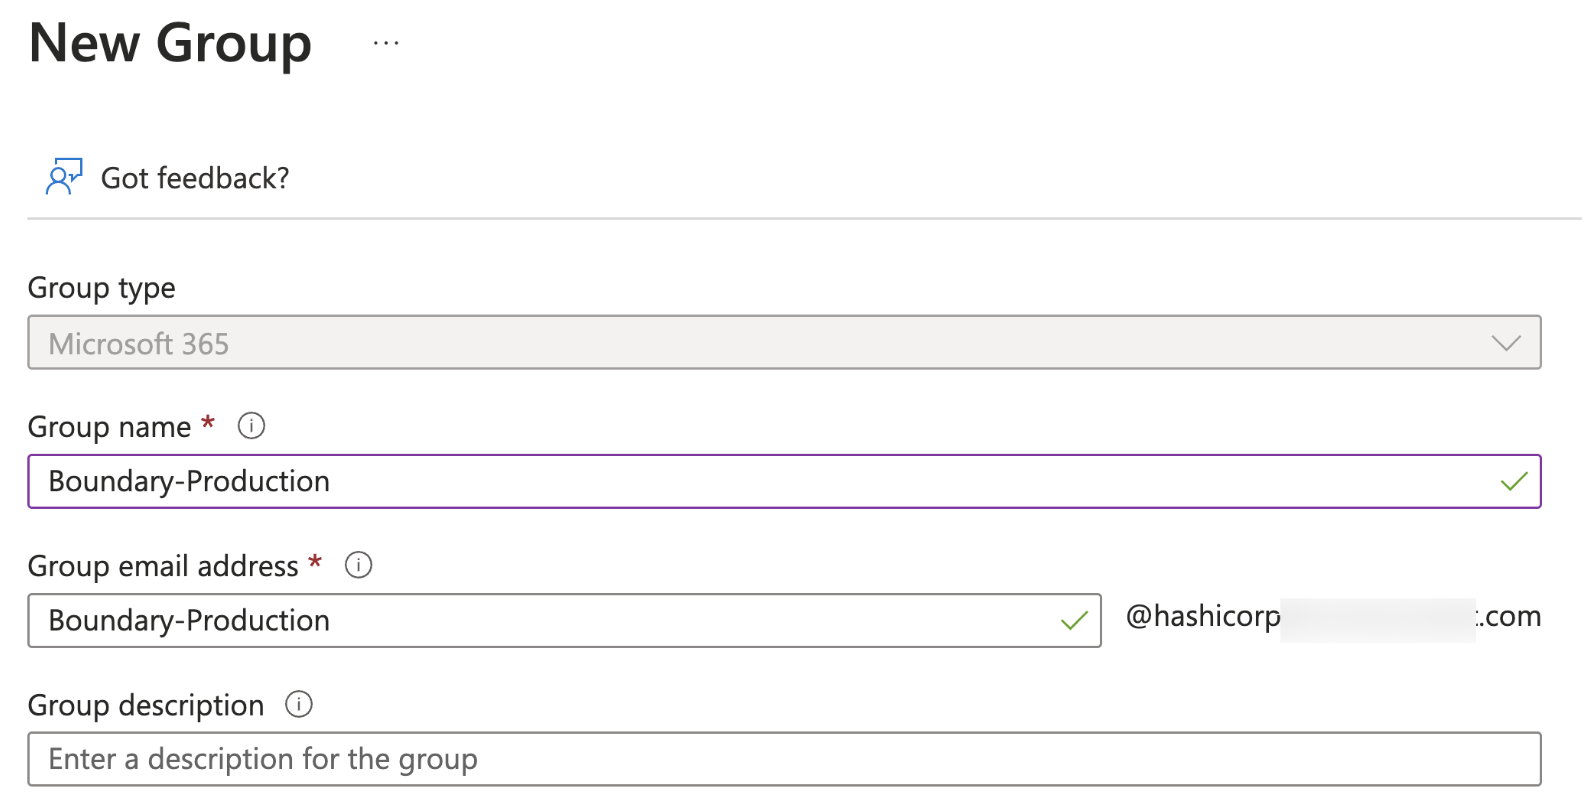
3. Set group type to Microsoft 365 and name the group Boundary-Production. The Membership type is Assigned.
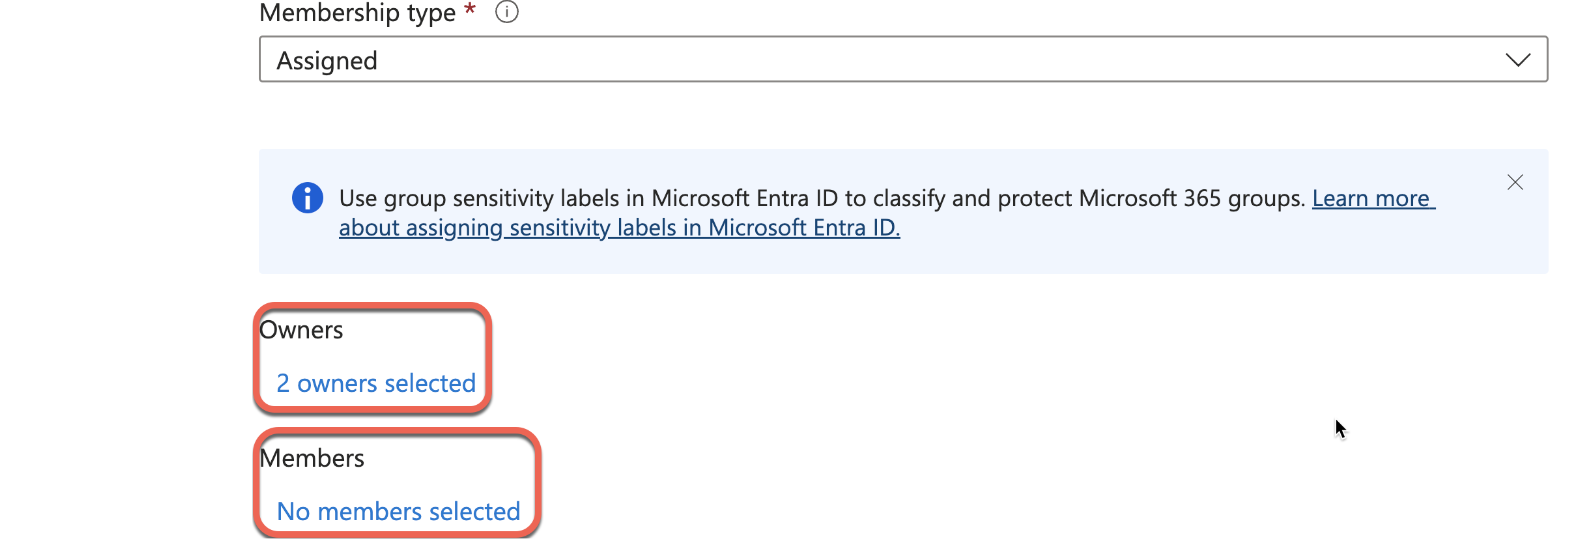
- Set yourself as the owner
- Set the user who will be the approver as an additional owner.
- Do not add any members to the group.
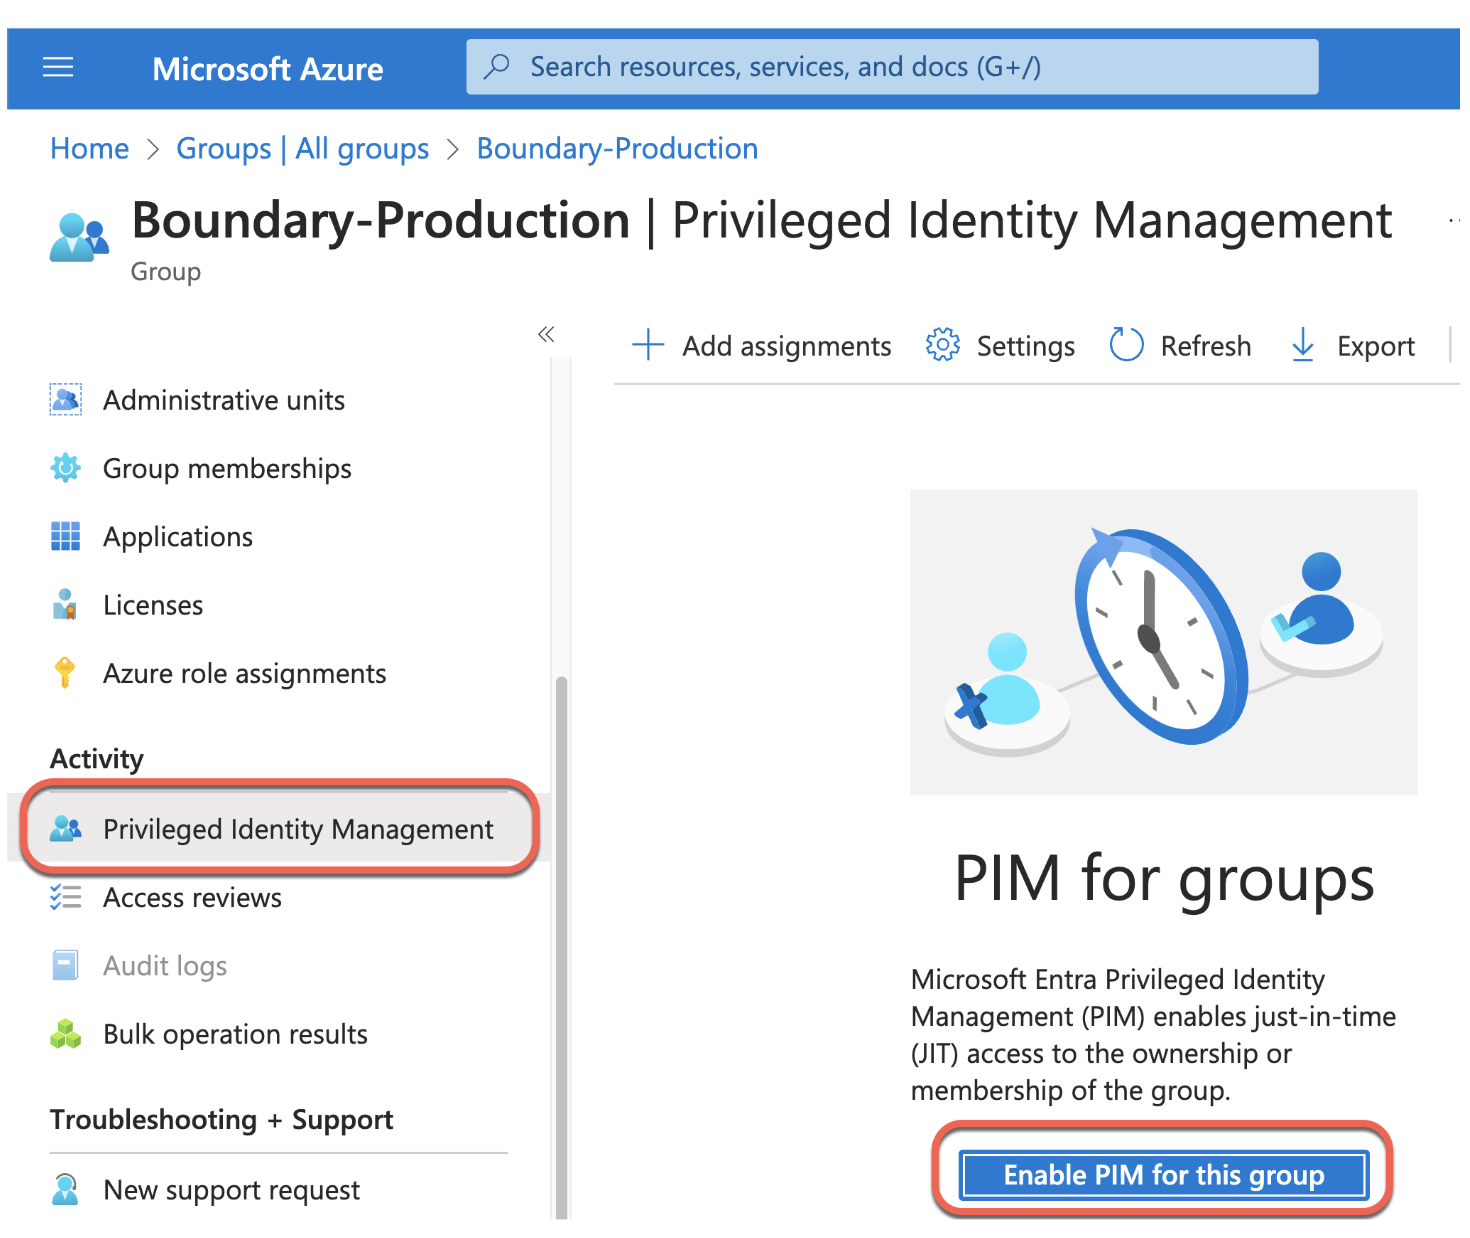
4. Once created, go into the Boundary-Production group. Scroll down the left side tabs and select Privileged Identity Management. Click Enable PIM for this group.
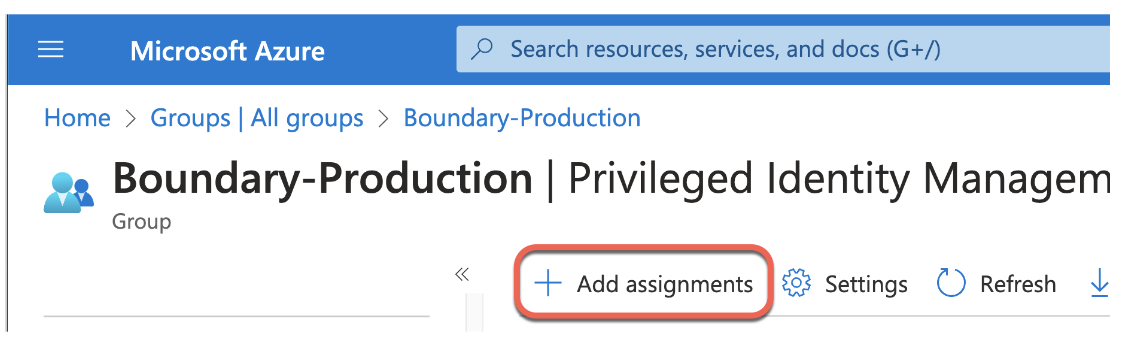
5. Then click Add assignments.
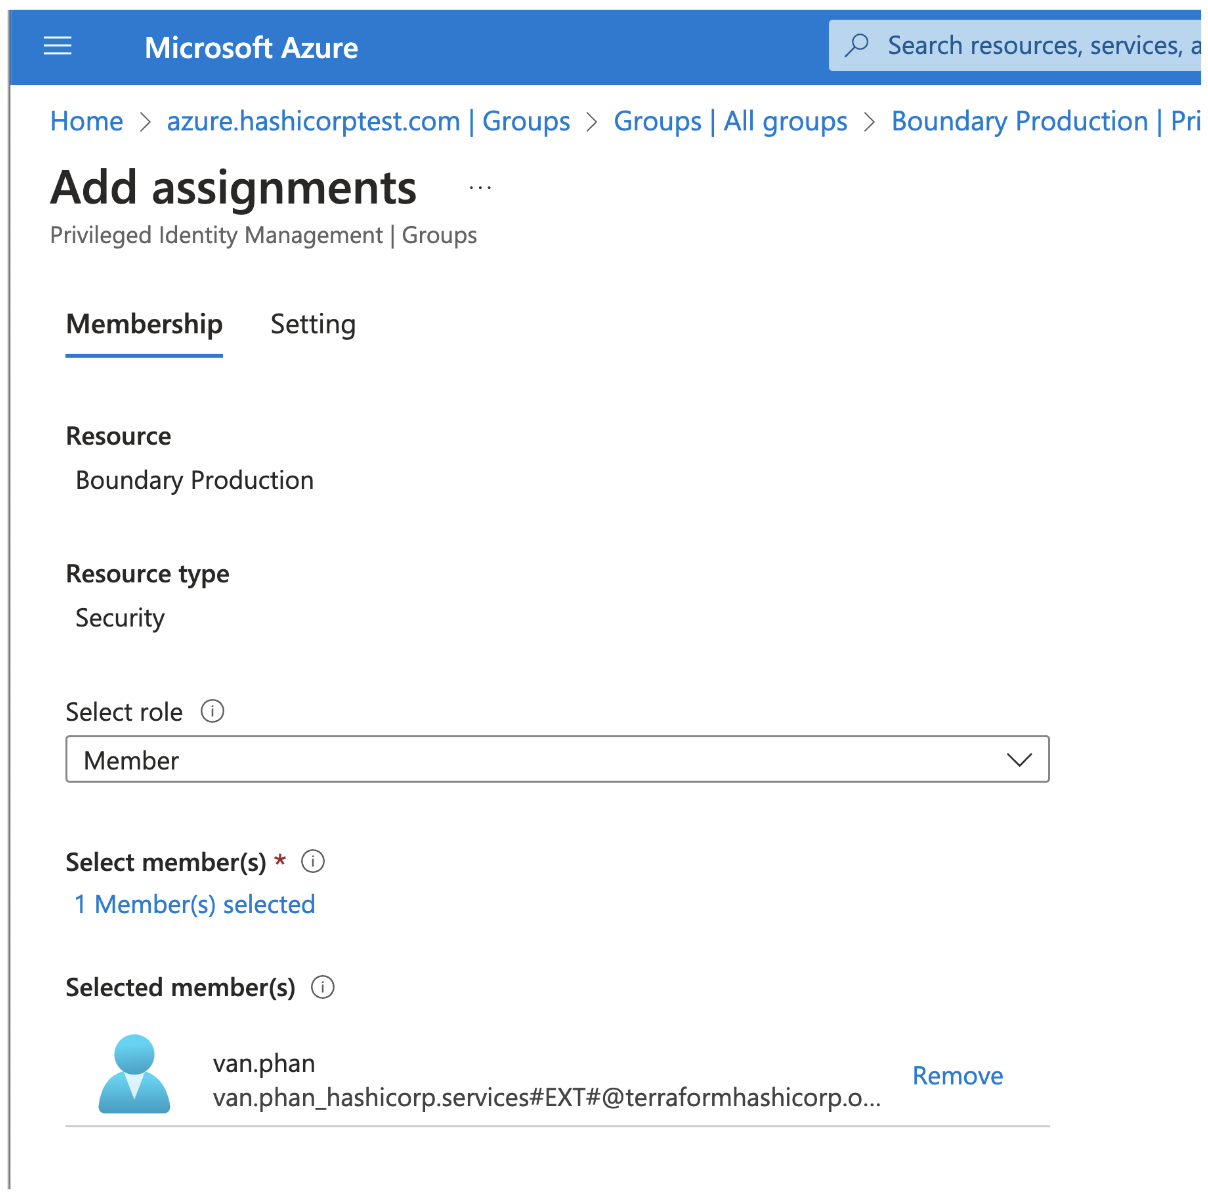
6. Select Member role, and choose a user to be a member. This user will act as the requester. Click Next.
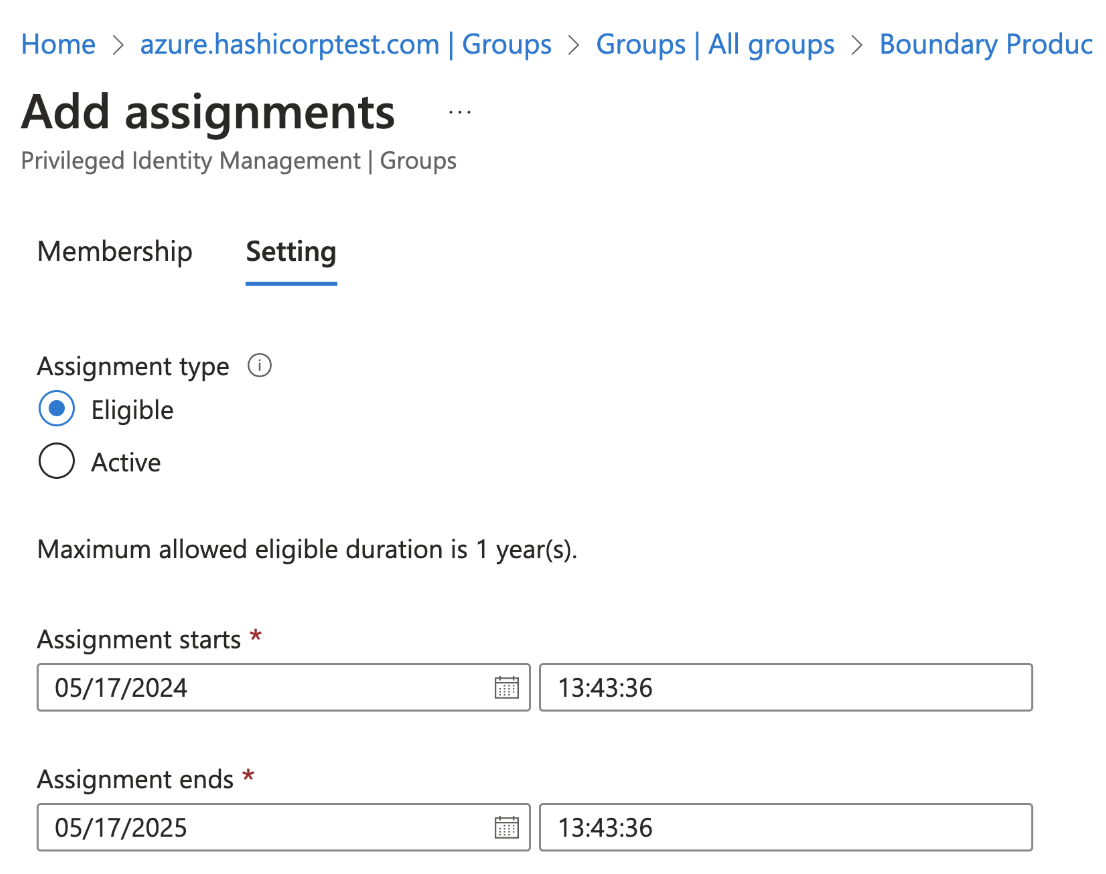
7. Select Eligible, and set duration as desired. The default of one year is fine. Click Assign.
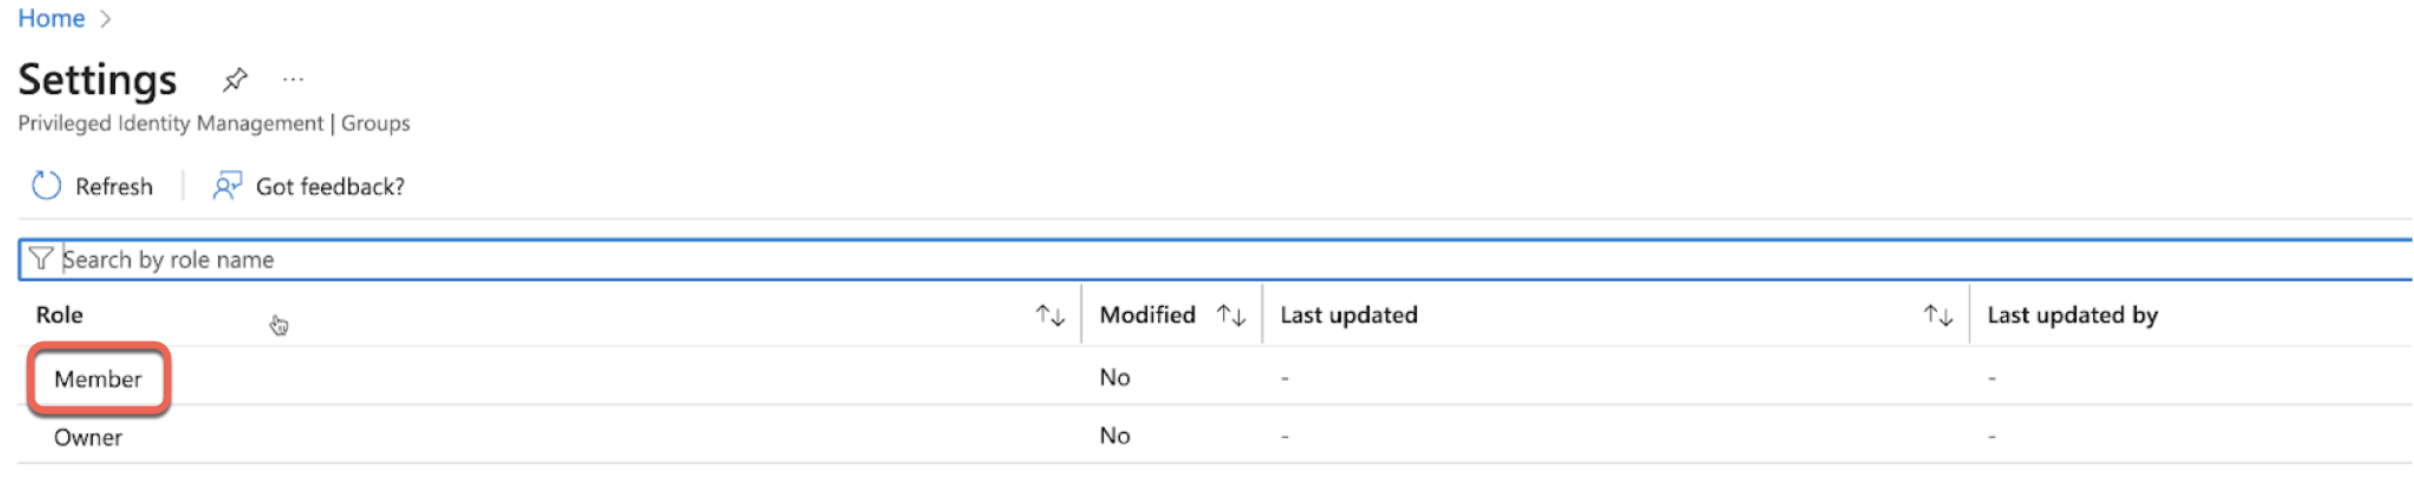
8. Form the Privileged Identity Management side tab, and click Settings.
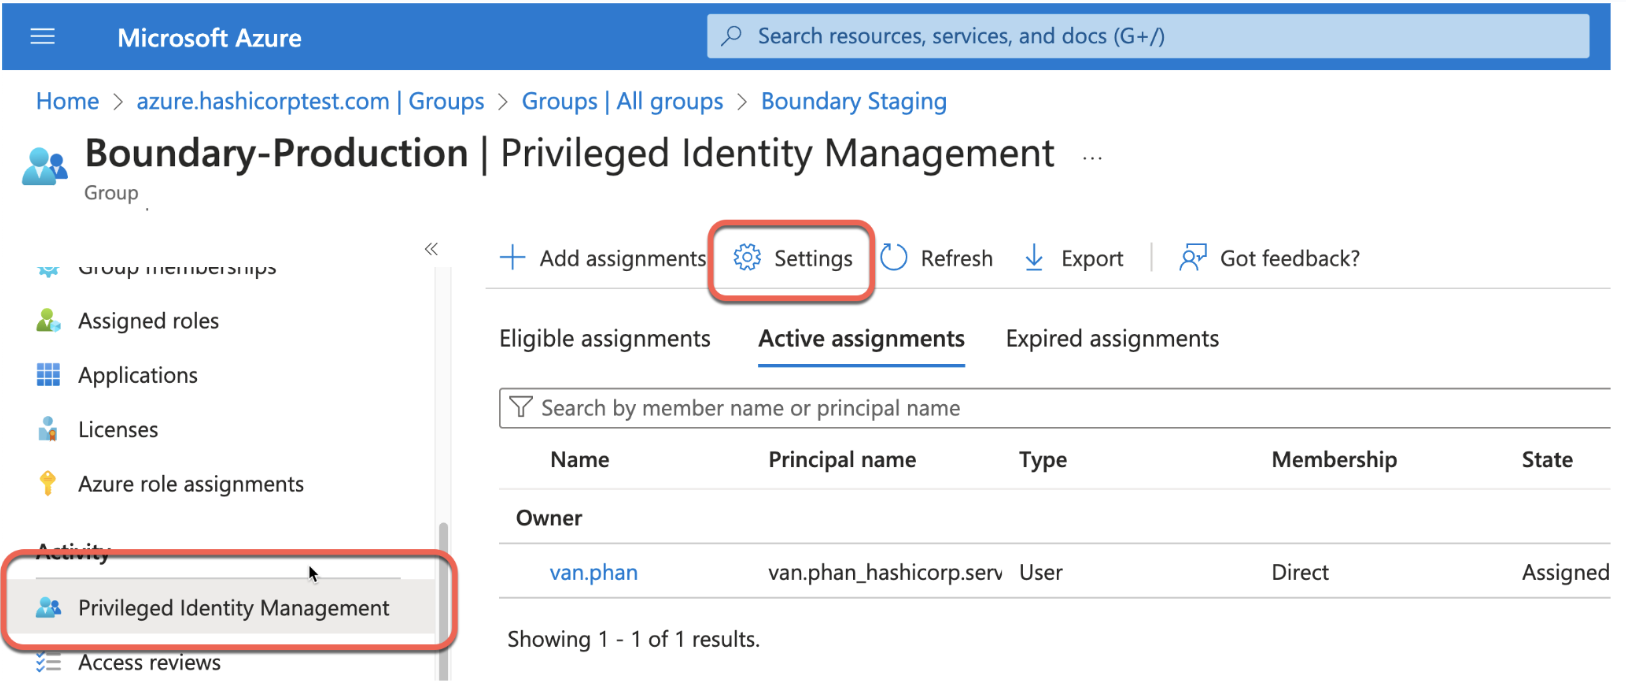
9. Click Member.
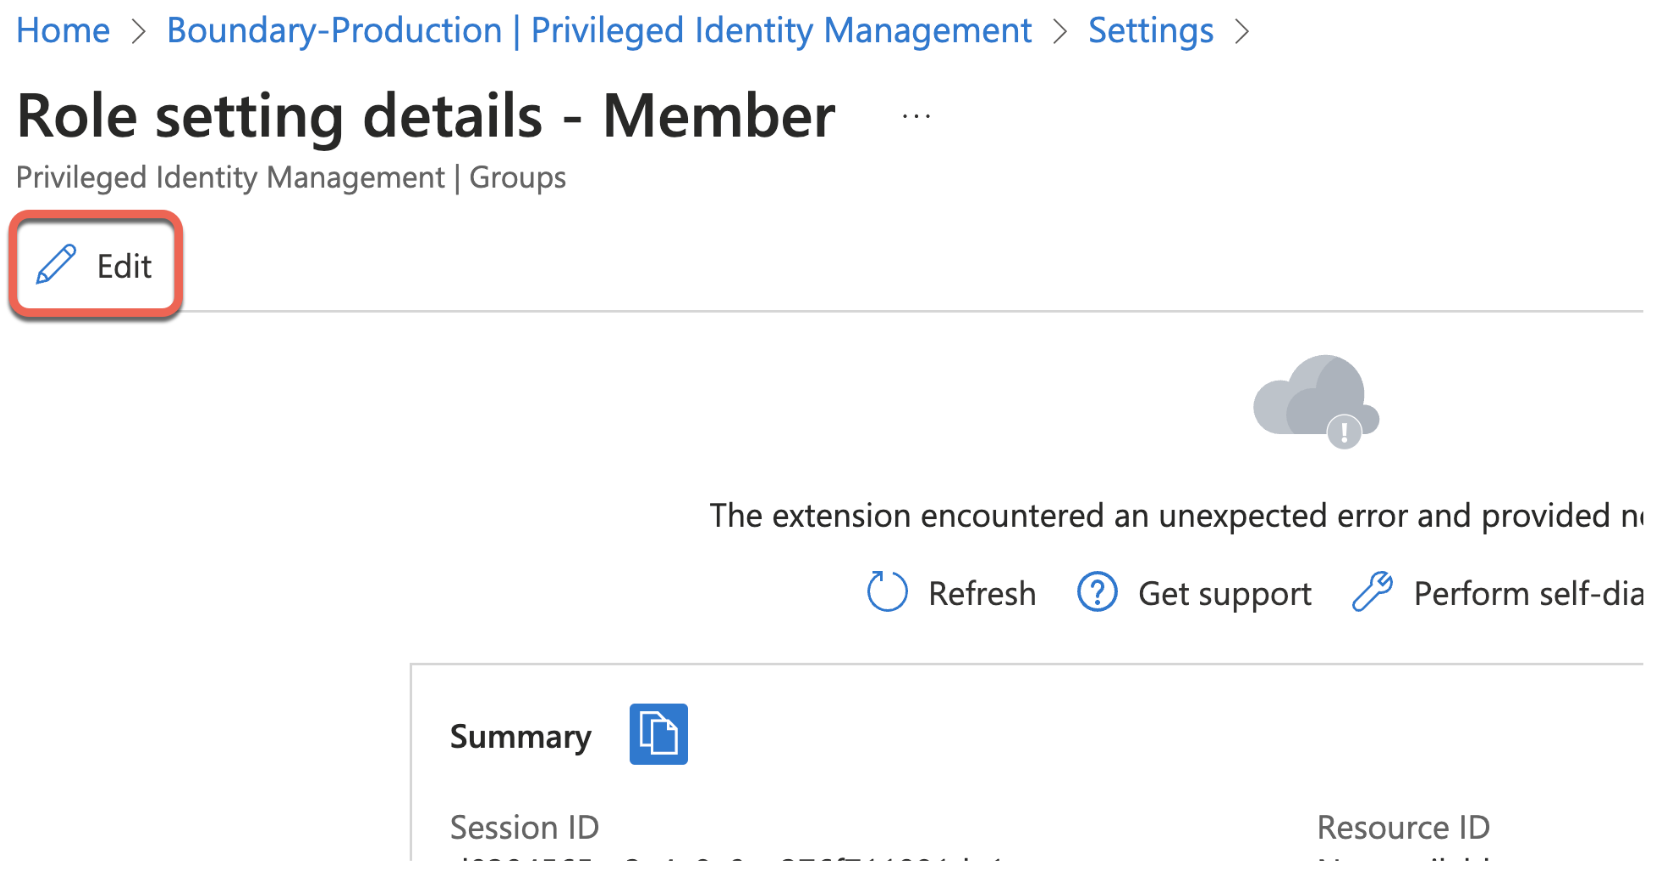
10. Click Edit.
11. Set approval parameters, including:
- 3-hour activation maximum duration (This determines how long the user gets access if approved)
- Require justification on activation
- Require approval to activate
- Select an Azure user as the approver. This user must be different from the requester.
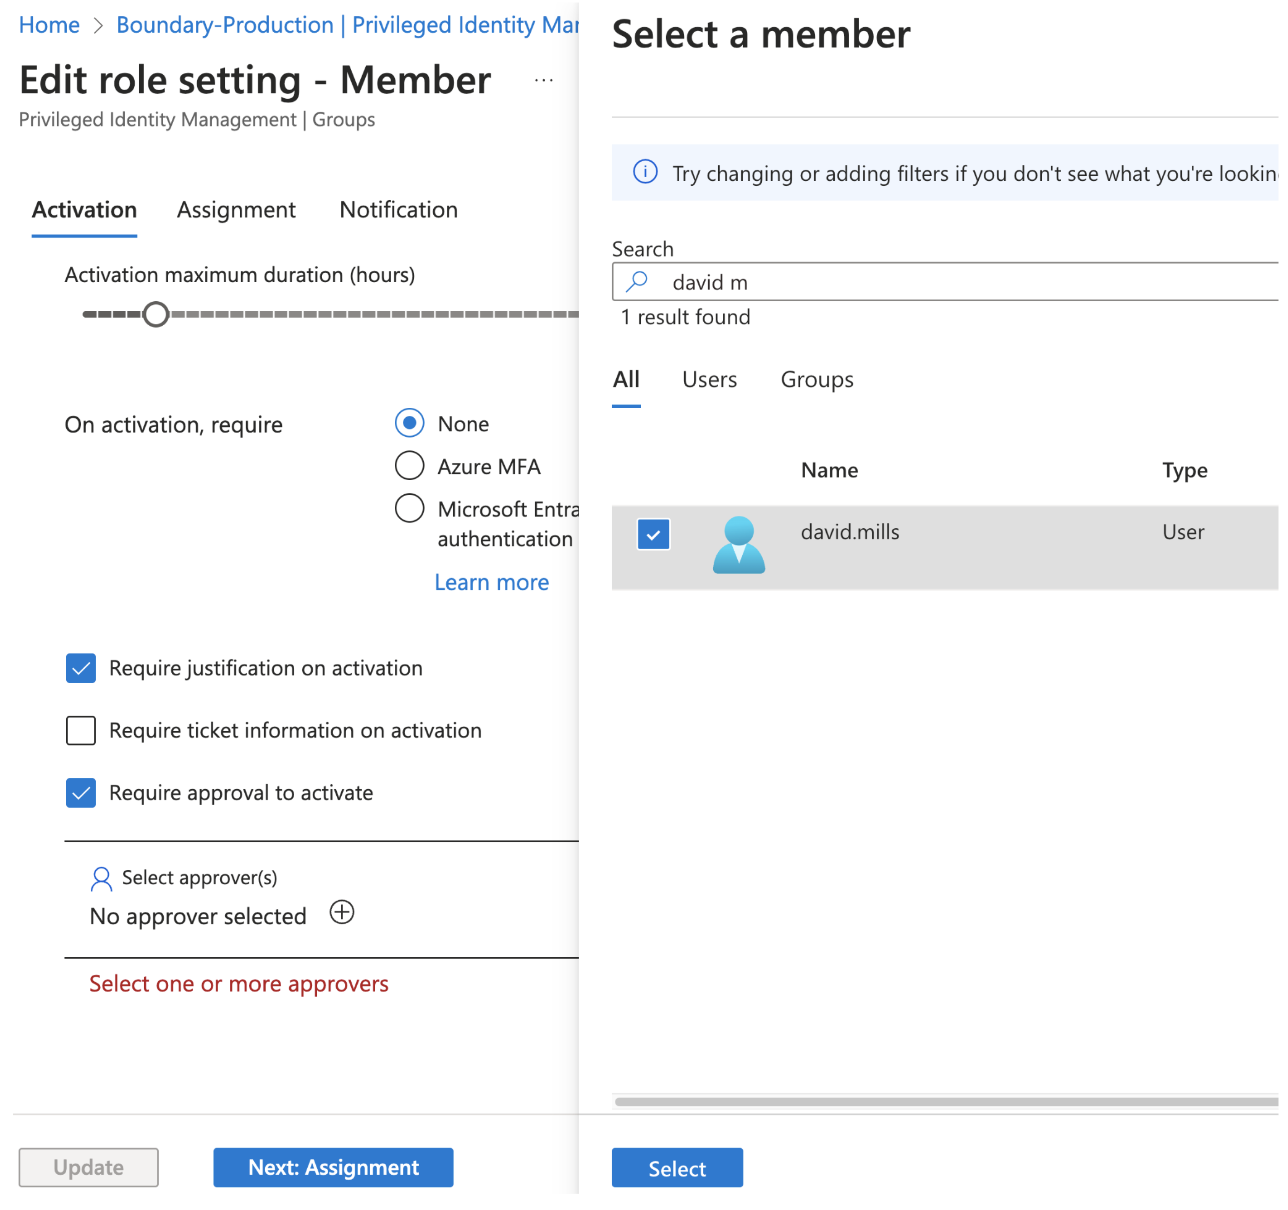
12. Click Next: Assignment.
13. Leave default values. Click Next: Notification.
14. Add notification email if desired. Click Update.
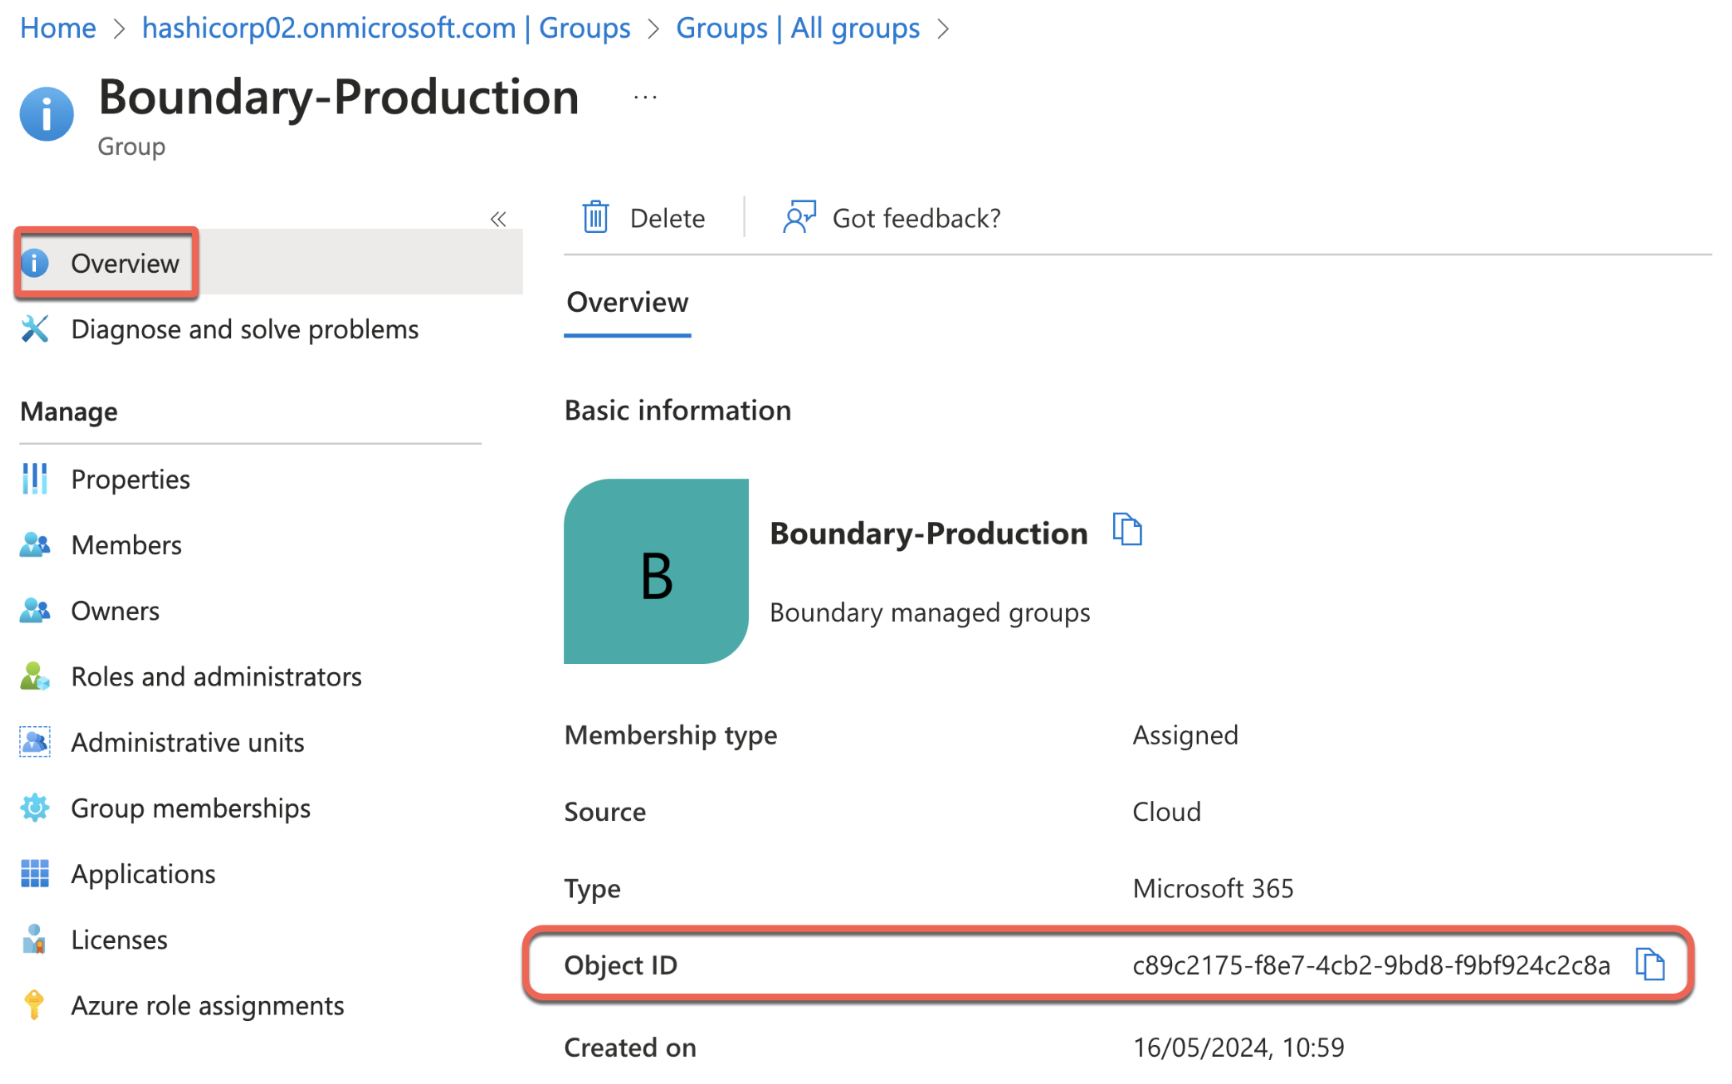
15. In your Boundary-Production group, navigate to the overview tab and make a note of the group Object ID. That will be used in the next section to configure Boundary managed groups.
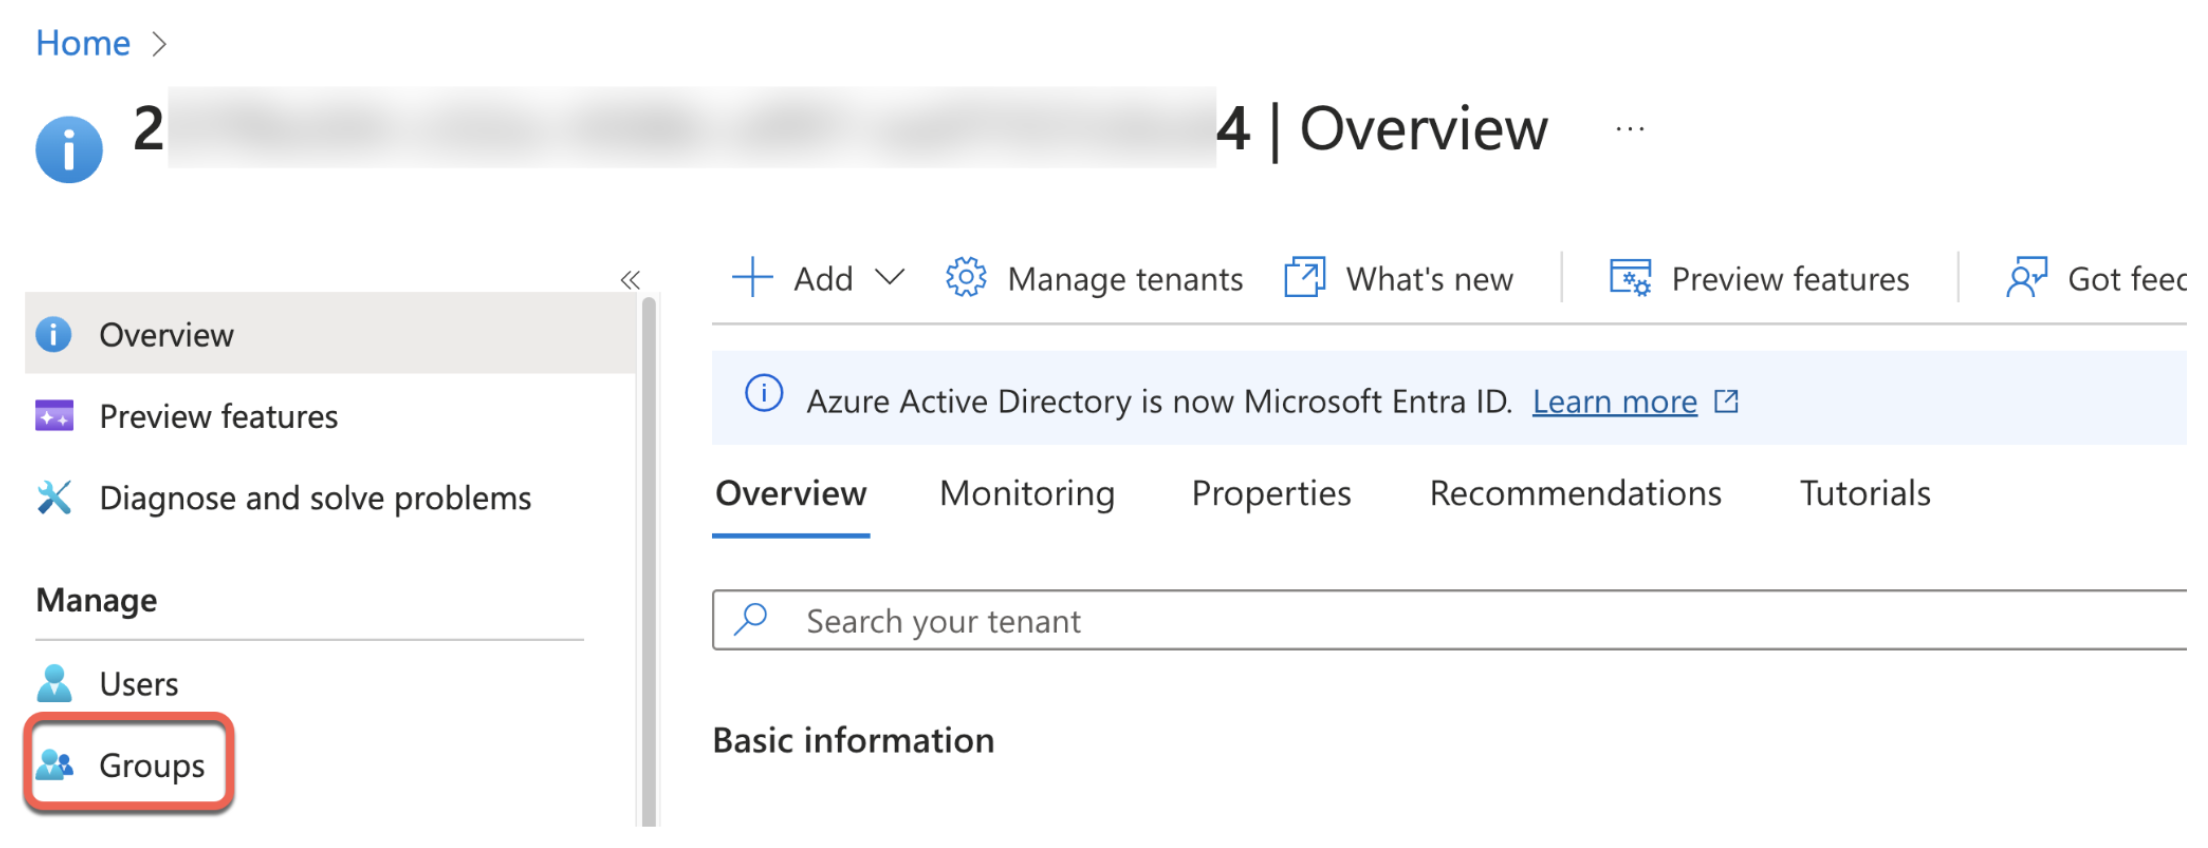
16. Go to the Entra ID main page and click Groups.
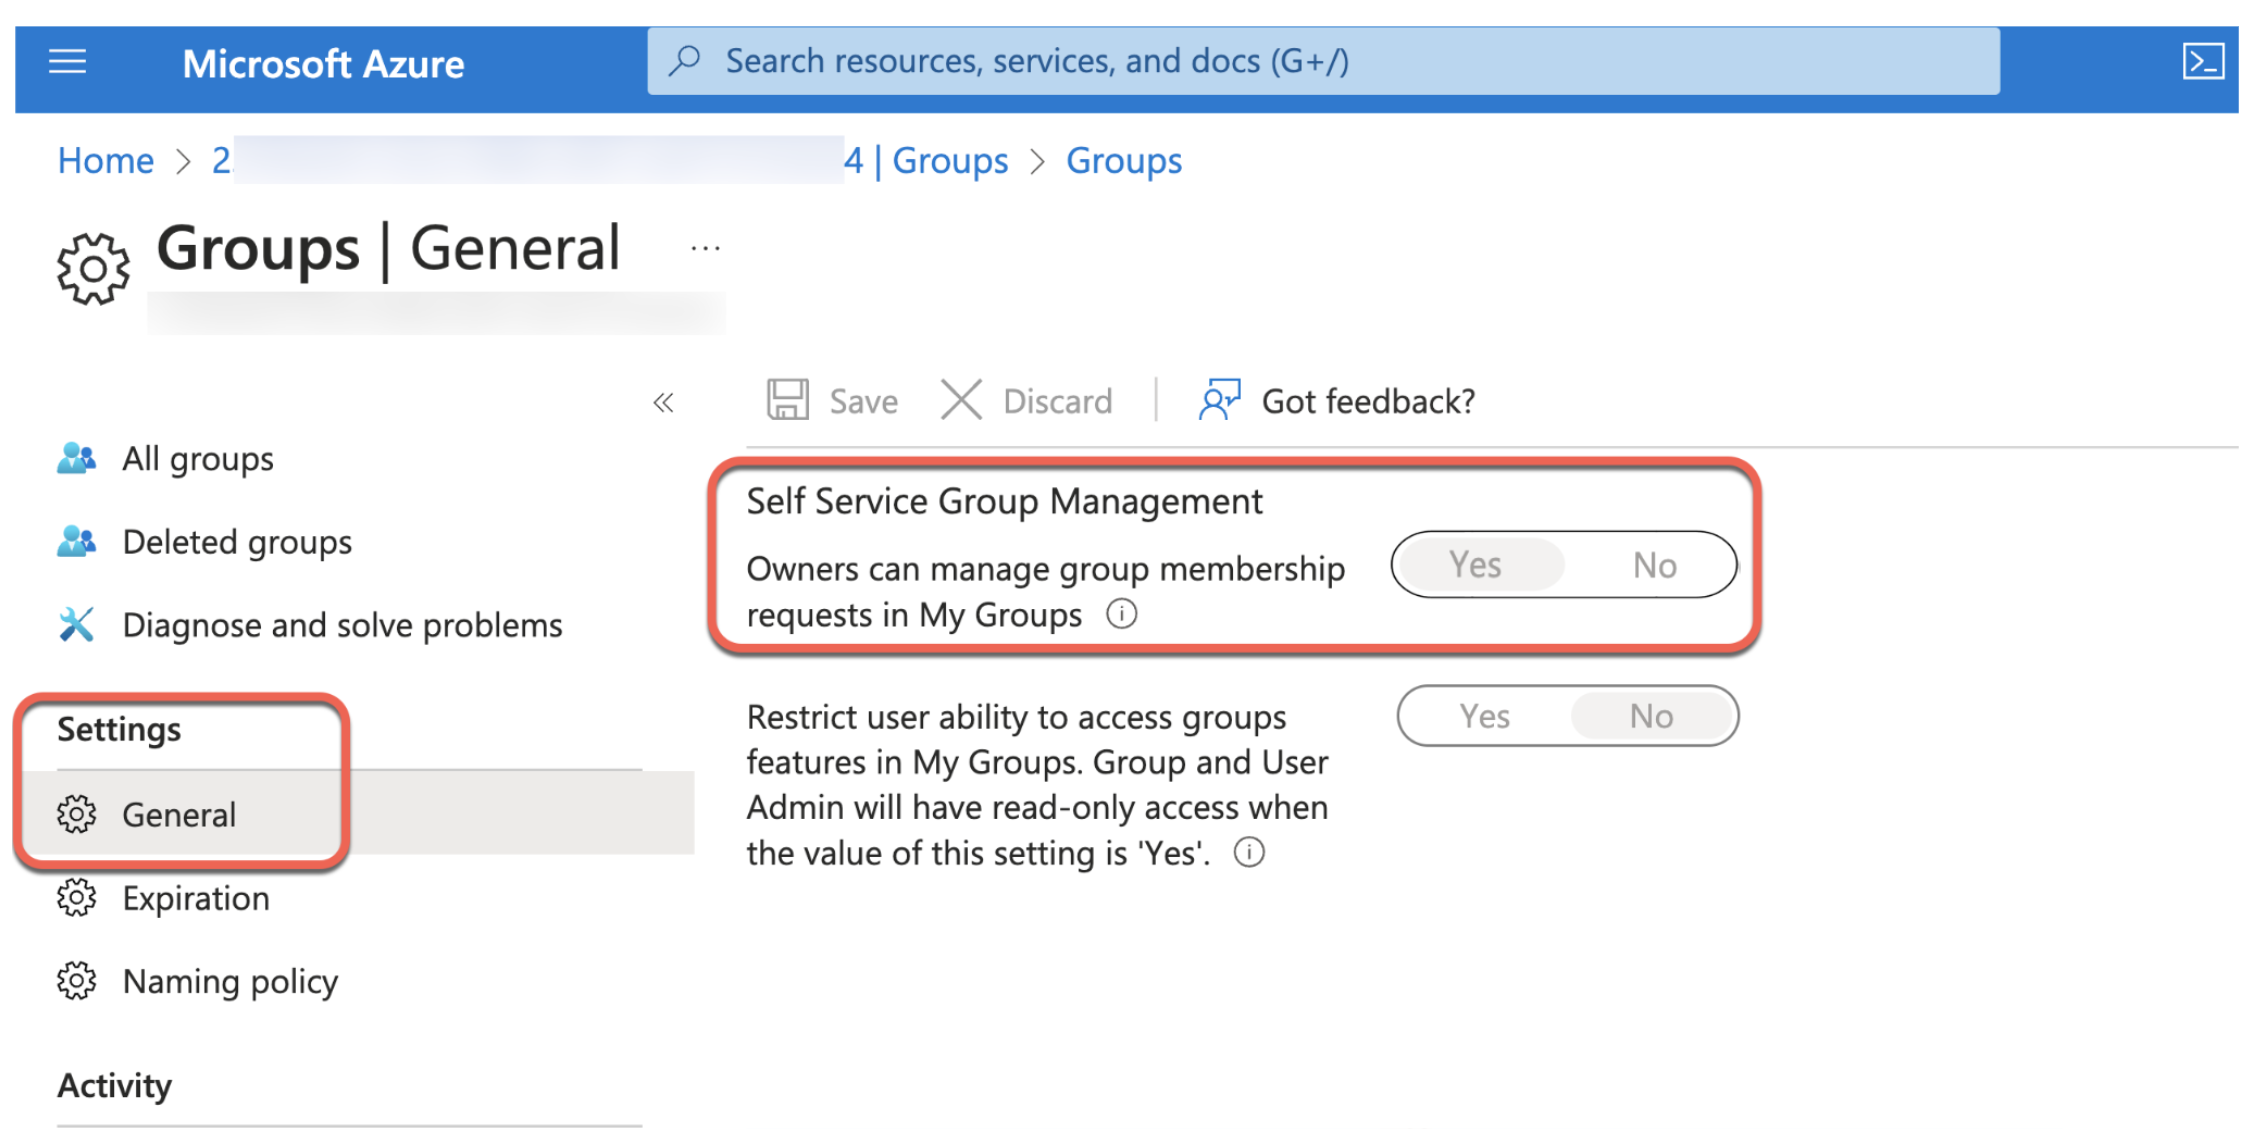
17. Click the General side tab and set the Self Service Group Management option to Yes.
Configure managed groups on Boundary
This section maps an Entra ID group to a Boundary managed group. This automatically places users in an Entra ID group in a corresponding Boundary managed group.
1. From your browser, log onto the Boundary Admin UI as an administrator.
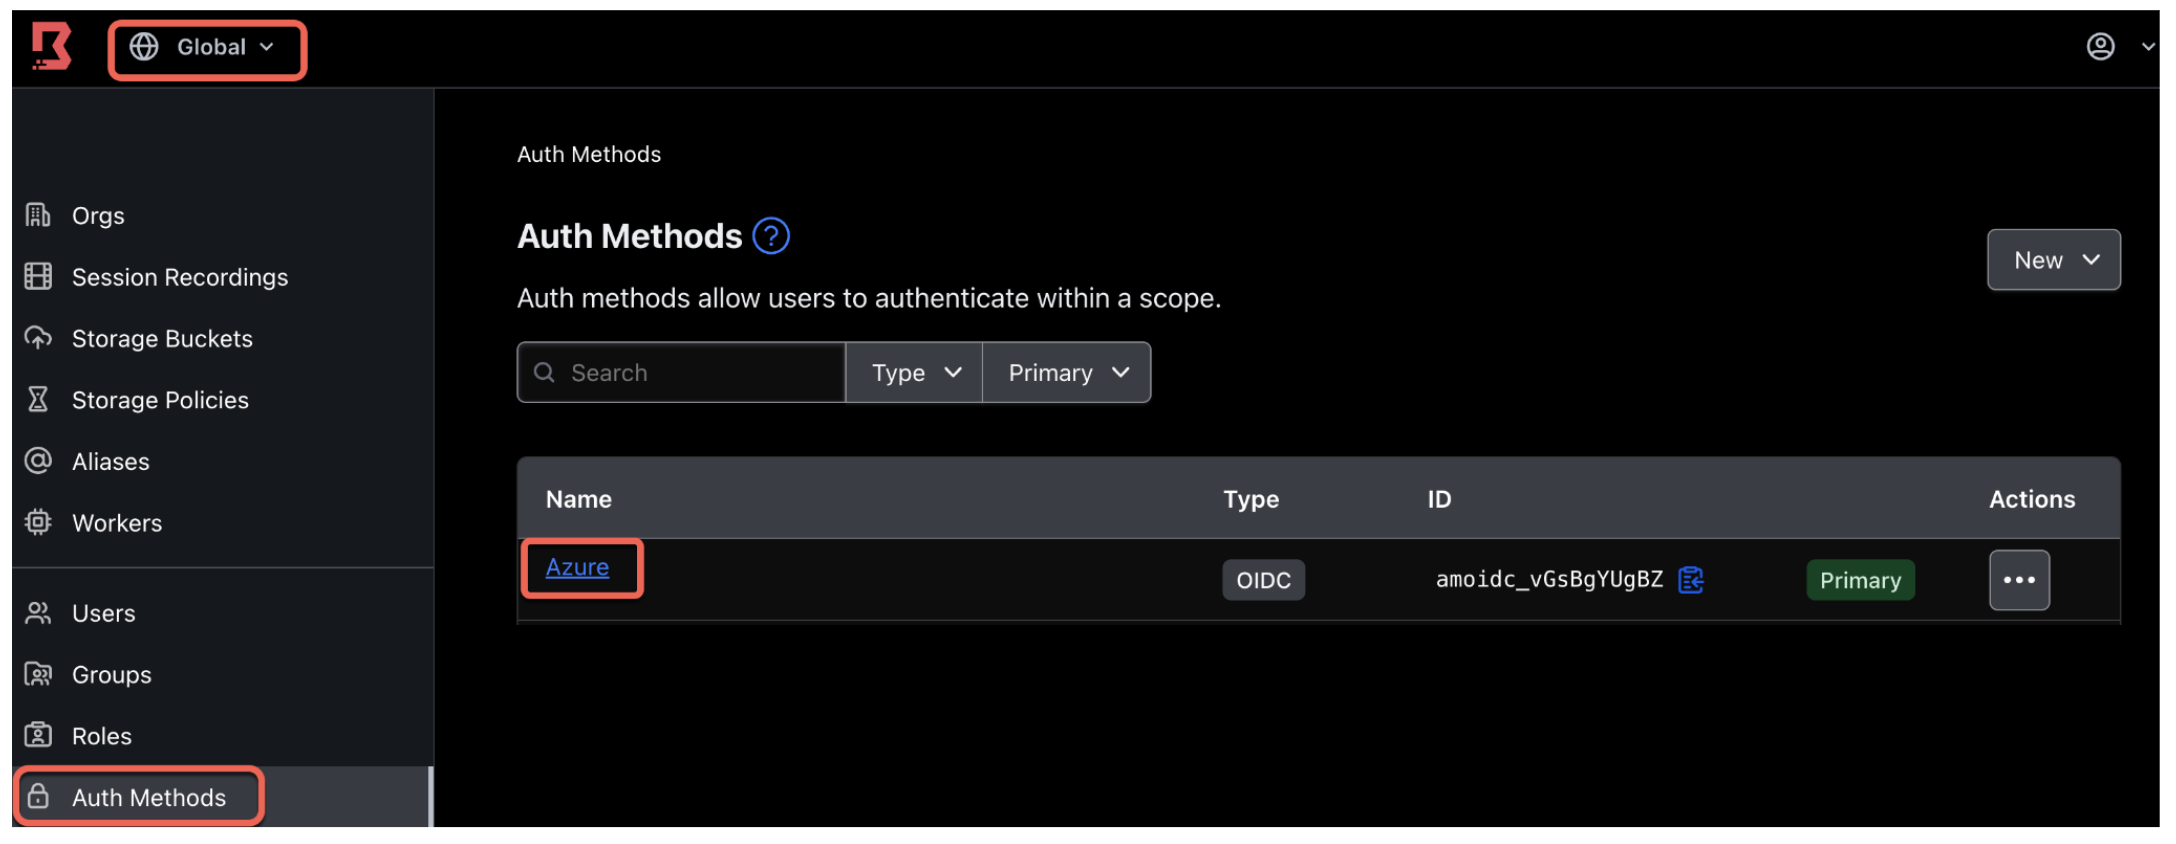
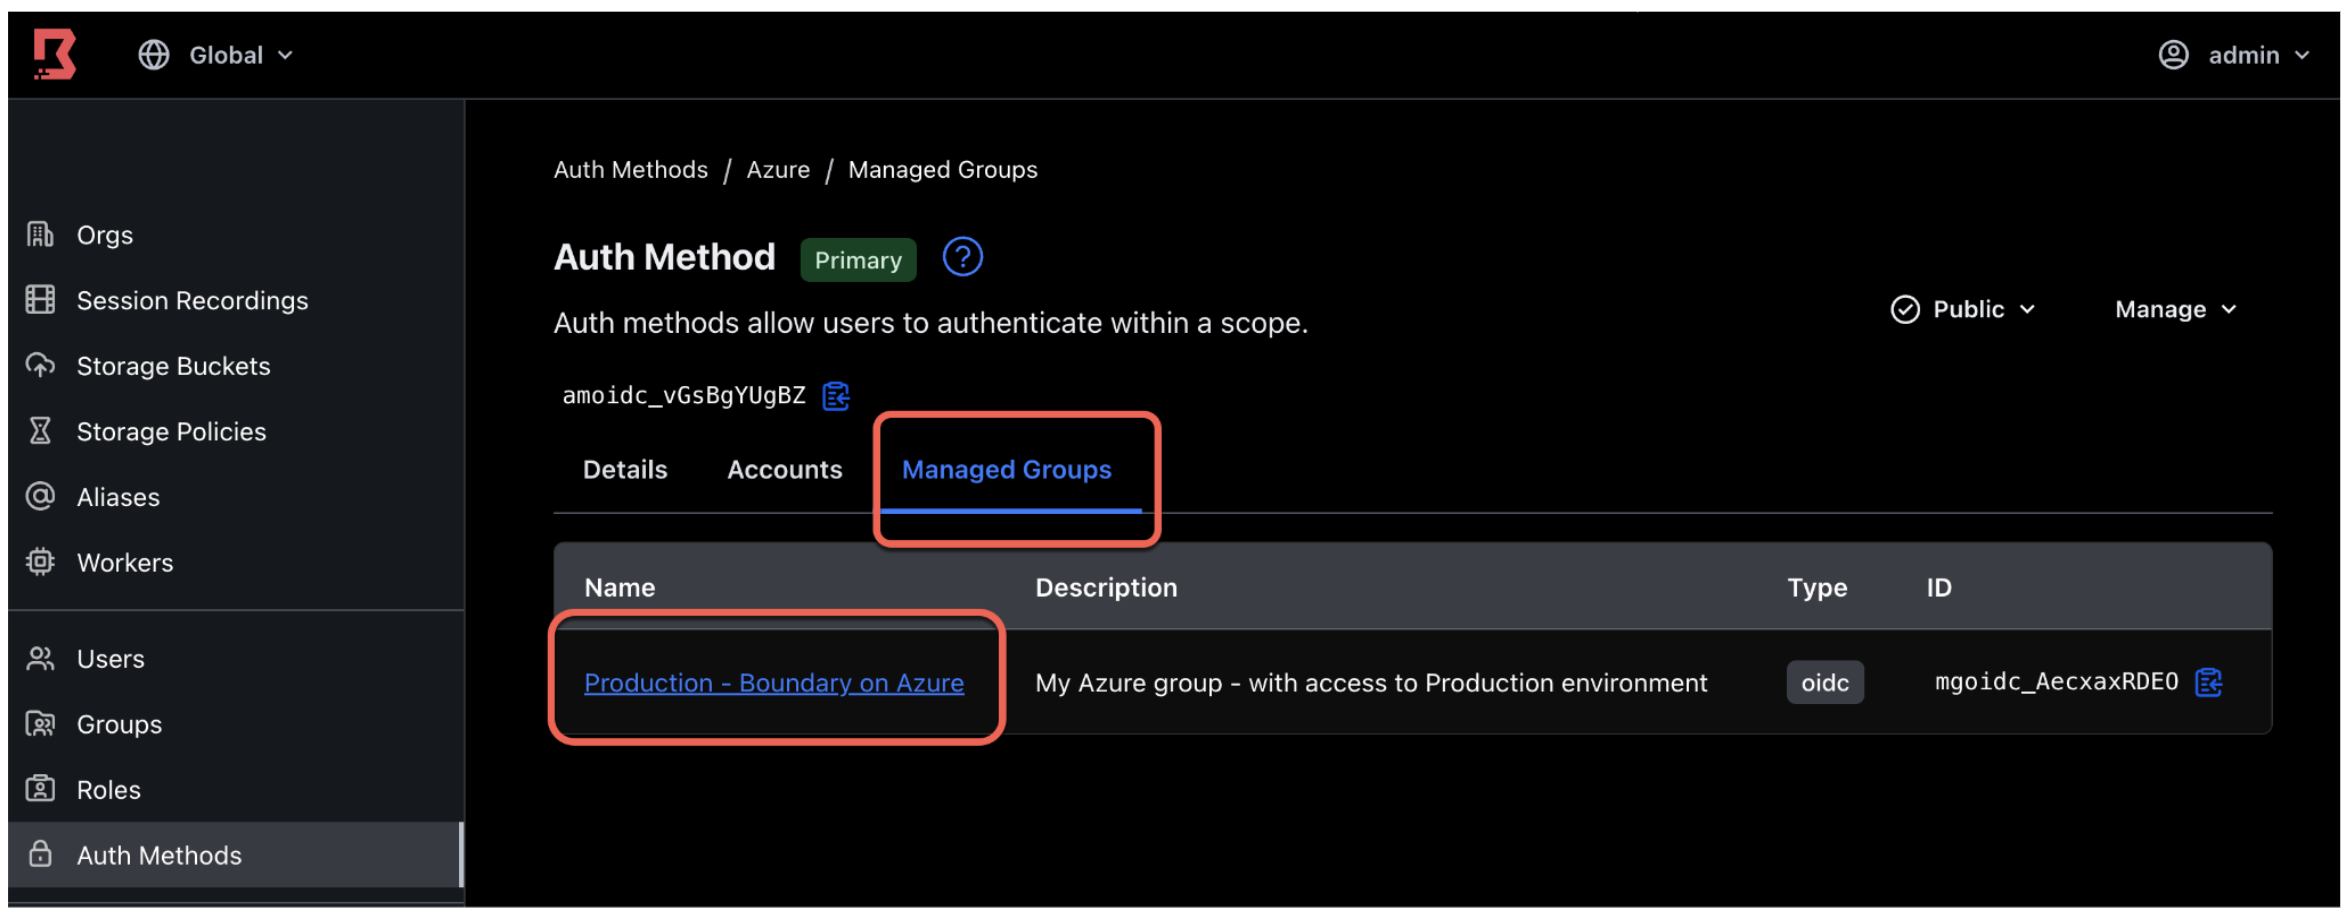
2. While in the global scope, navigate to the Auth method on the left side and click on the Azure auth method you created earlier.
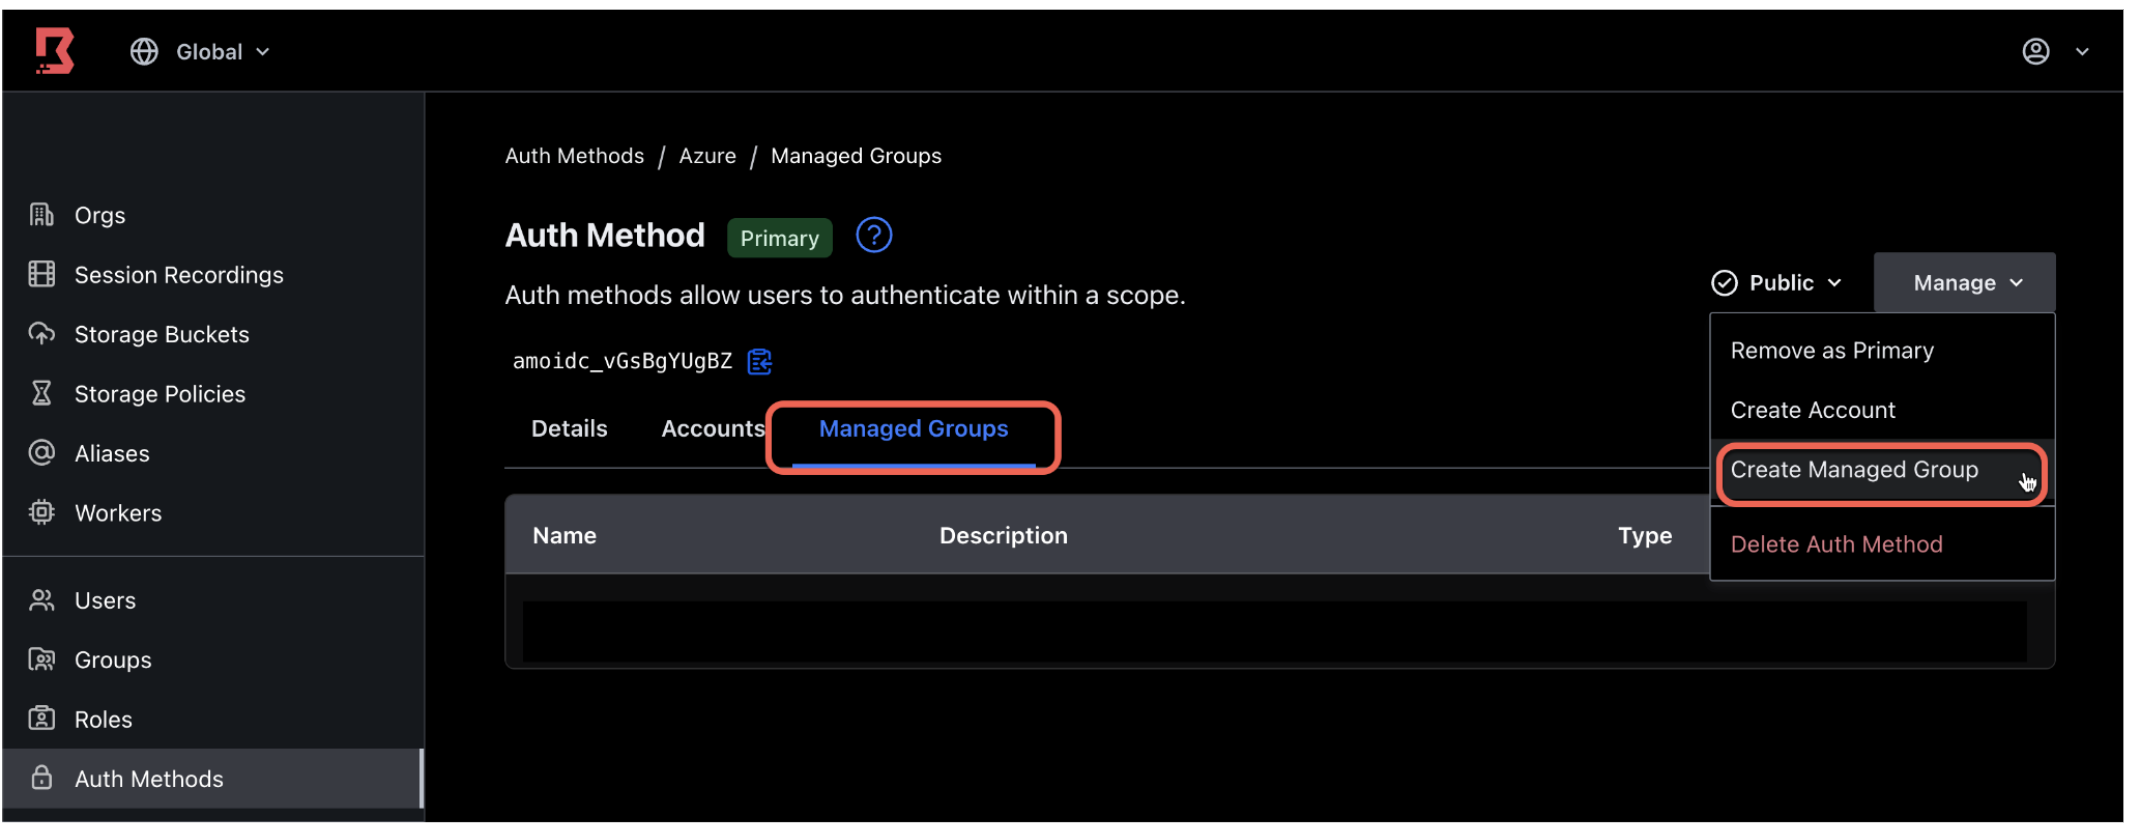
3. Select the Managed Groups sub-tab. Click Manage in the upper right corner and select Create Managed Group.
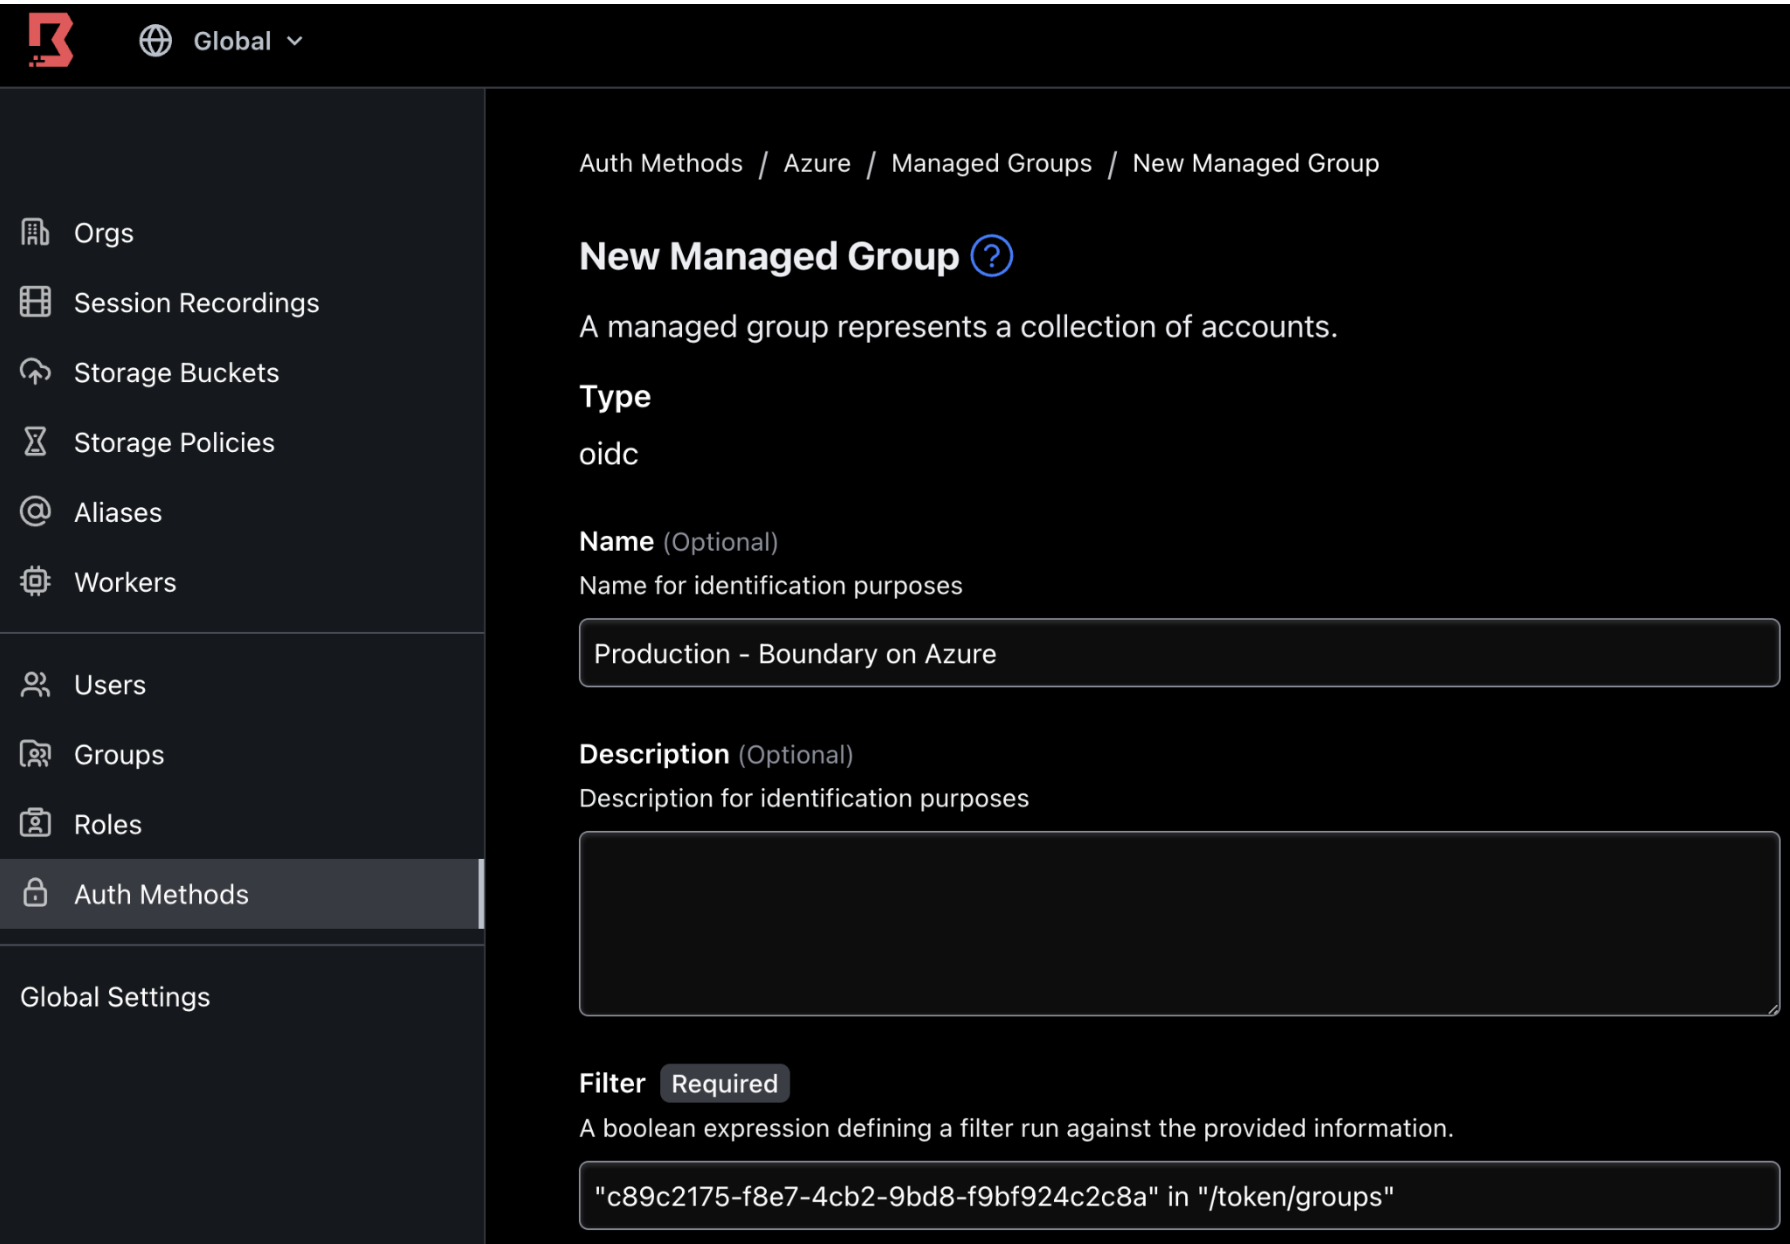
4. Provide a name: Production - Boundary on Azure. In the Filter field, provide the group Object ID corresponding to the Boundary-Production Azure group in the previous section. Use the following format:
"AZURE_OBJECT_ID" in "/token/groups"
Example:
"c89c2175-f8e7-4cb2-9bd8-f9bf924c2c8a" in "/token/groups"
5. Click Save.
6. Next, authorize this managed group with the permissions to access a test target. You can use an existing target or create a new test target.
Note: Make sure this test target is currently not accessible by your user account. In other words, when you log onto the Boundary Desktop client using the Azure auth method, you should not be able to see or access your test target. We want to create a role where only members of the managed group can access the target. So you may want to update or remove any roles in your Boundary project that allow your user account to access your test target.
Navigate to the Boundary Org and Project where your test target resides. Click on Roles on the left sidebar. Then click New Roles on the right side of the screen.
The example image below shows Azure org and East US scope.
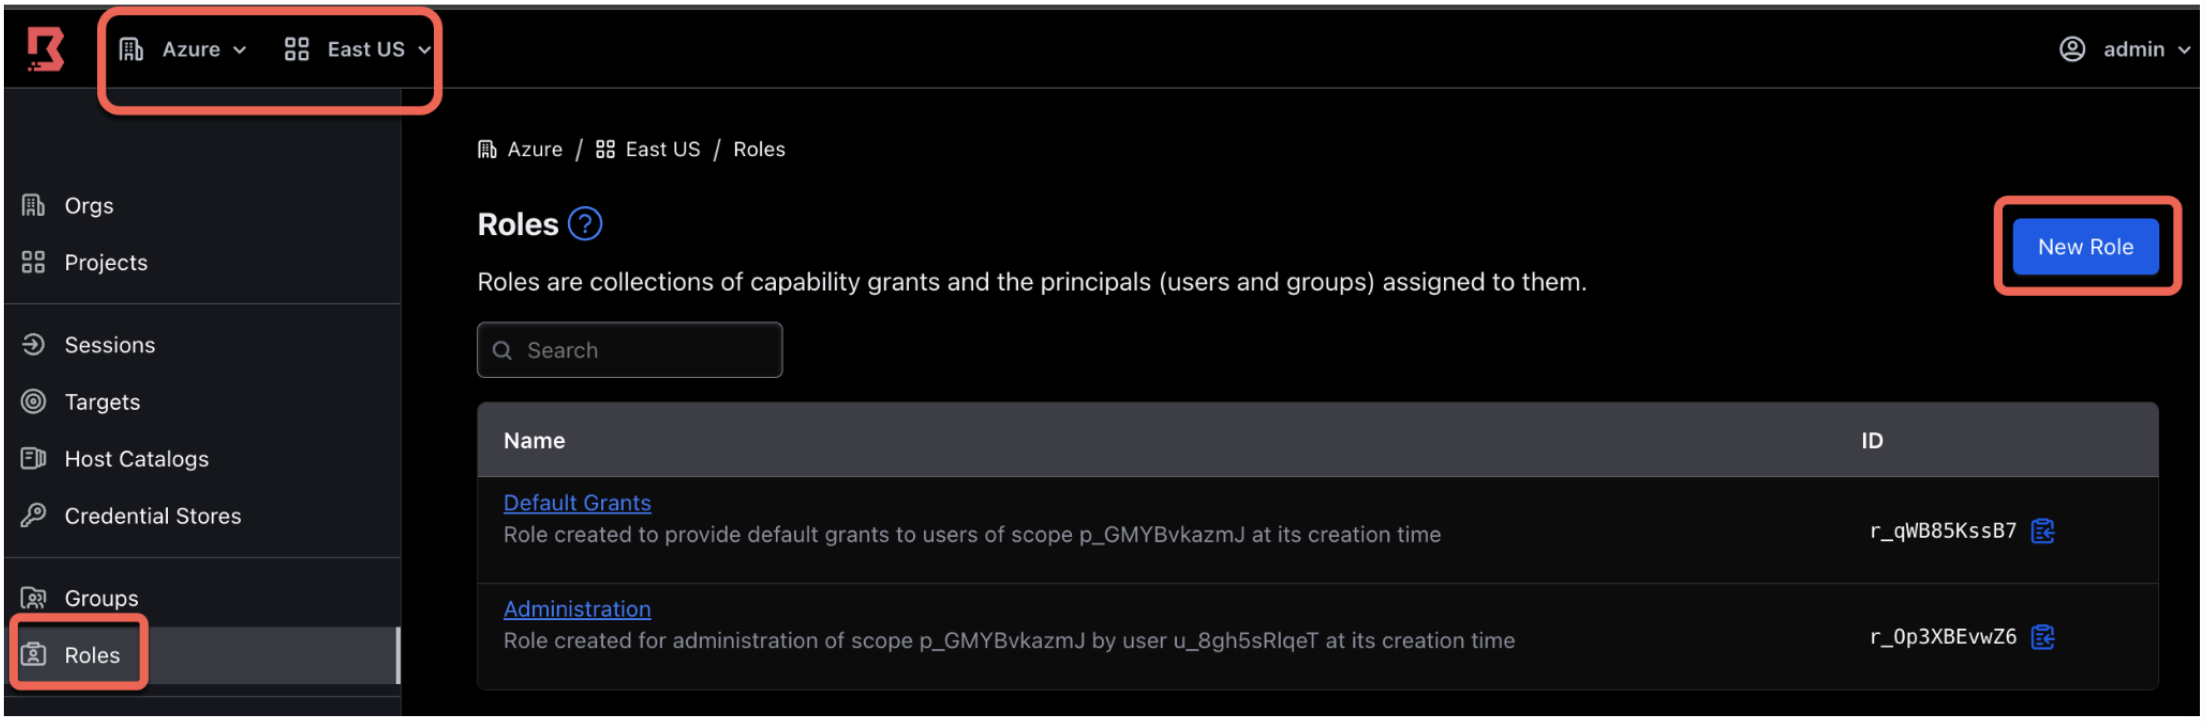
7. Provide the name Azure Production Access for the role. Click Save.
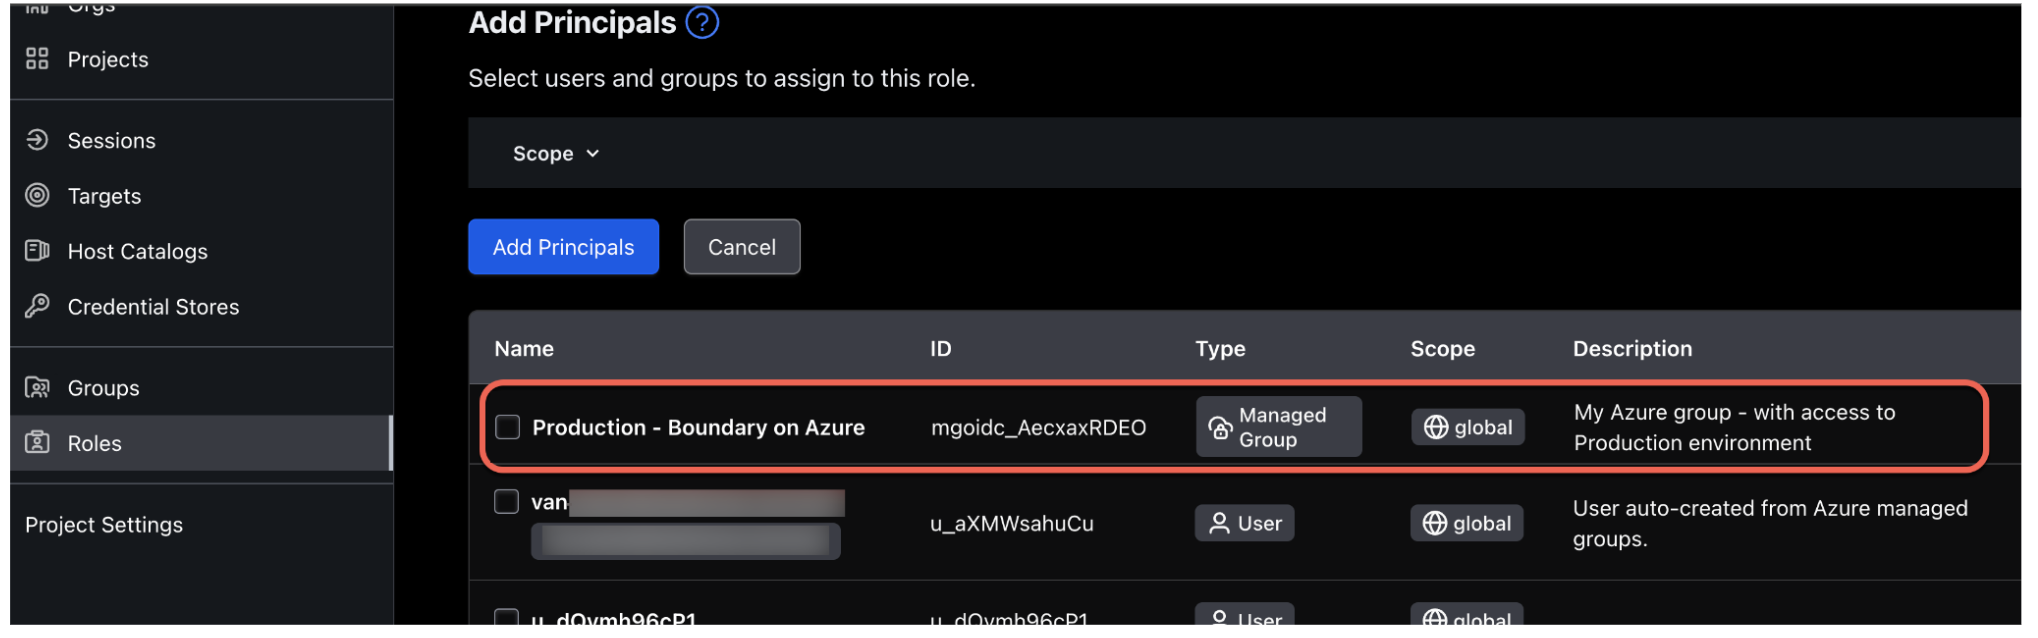
8. Once created, click on the Principles sub tab and click Add Principles.
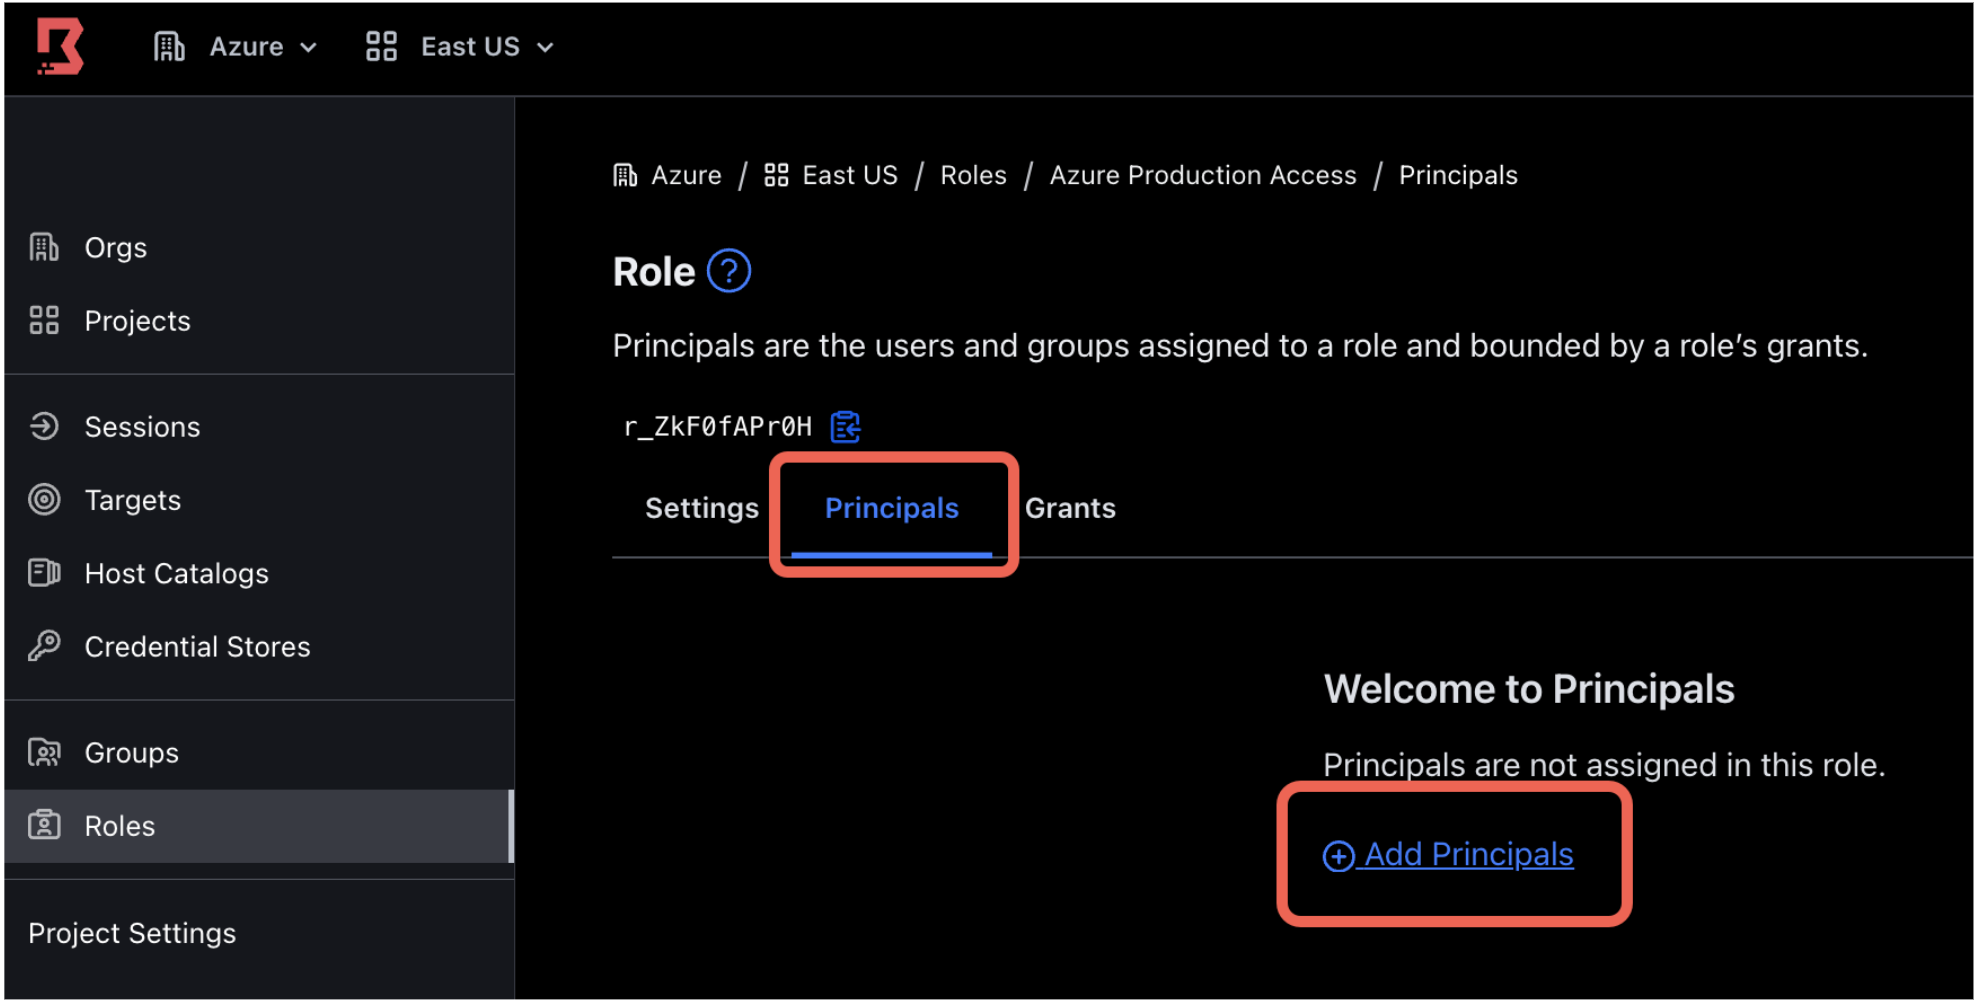
9. Select the Production - Boundary on Azure managed group and click Add Principles.
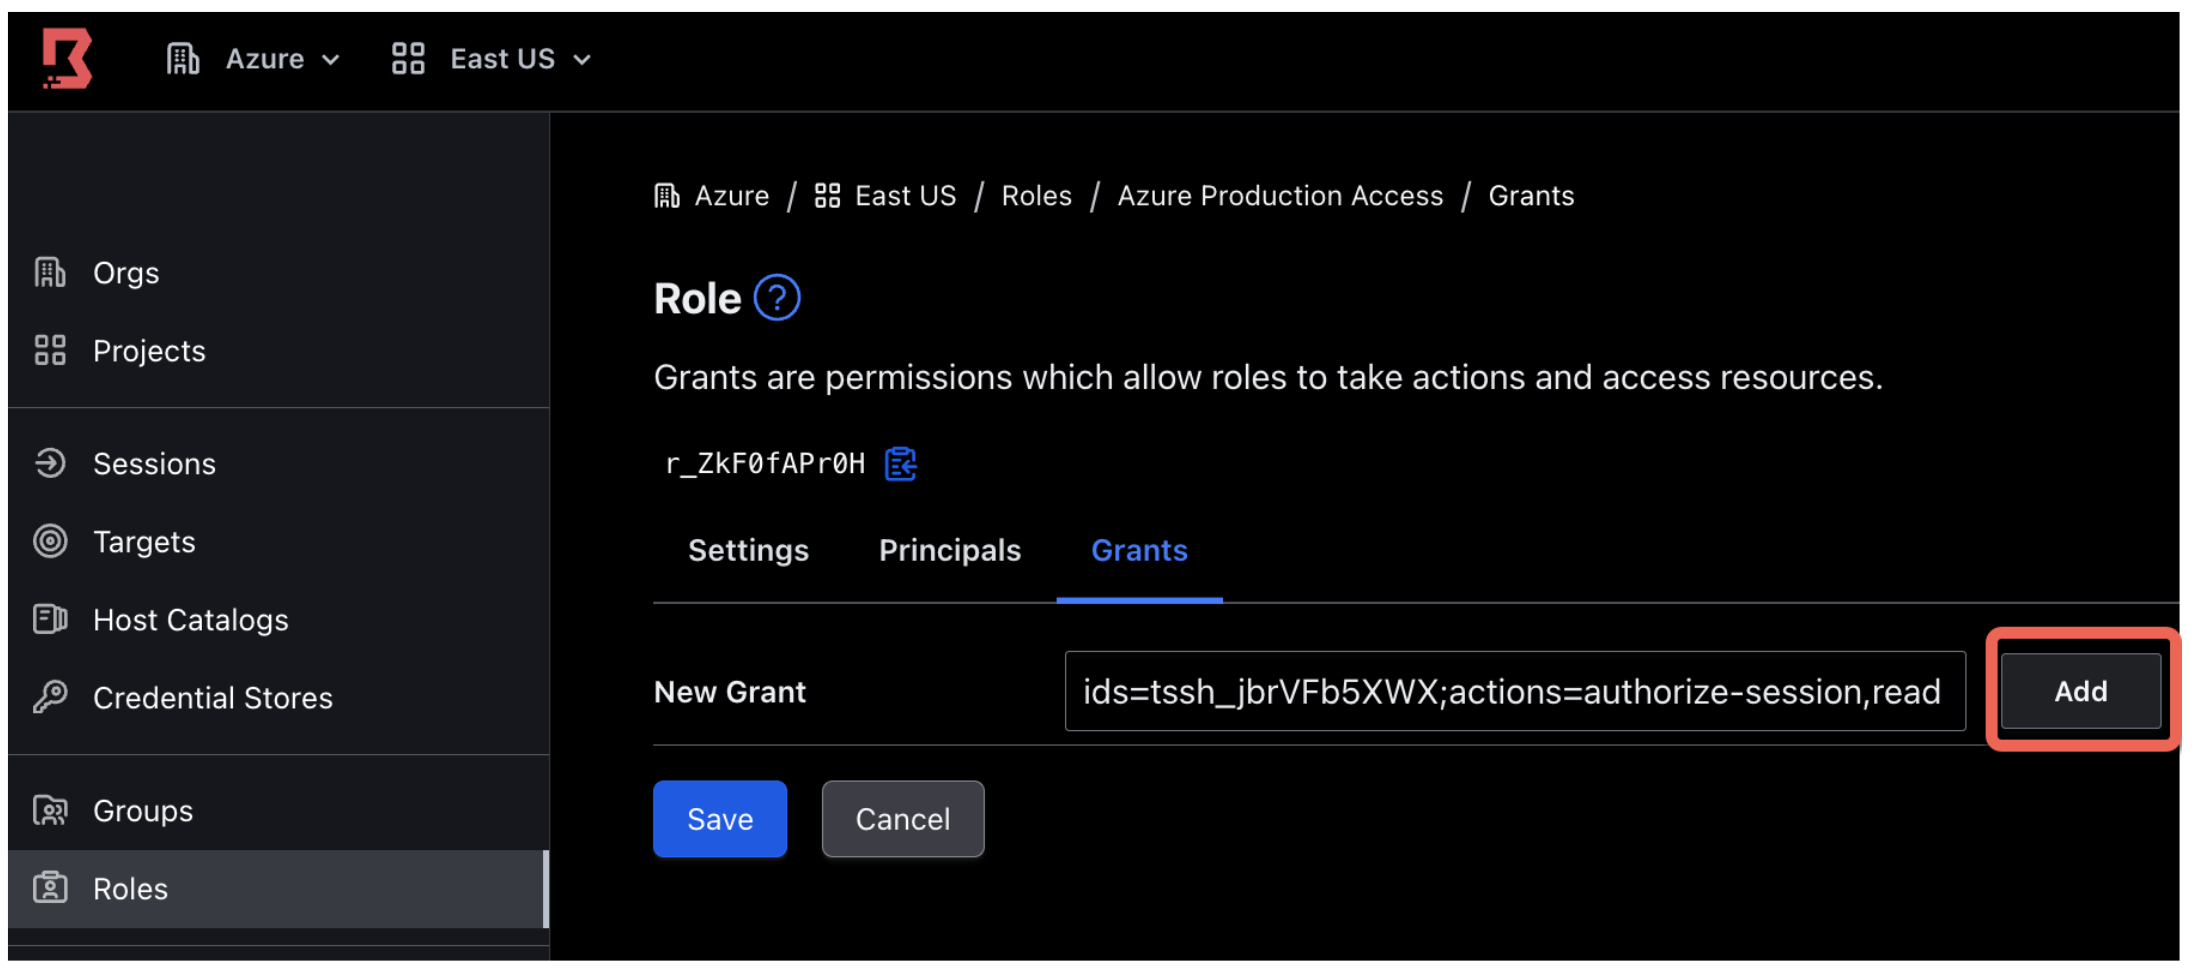
10. You will now add a new grant, which will give permission to any user in this role to access your test target. In the role you just created, click on the Grants sub tab. Add the grant shown below. Make sure you replace <TARGET_ID> with the target ID of your test target.
ids=<TARGET_ID>;actions=authorize-session,read
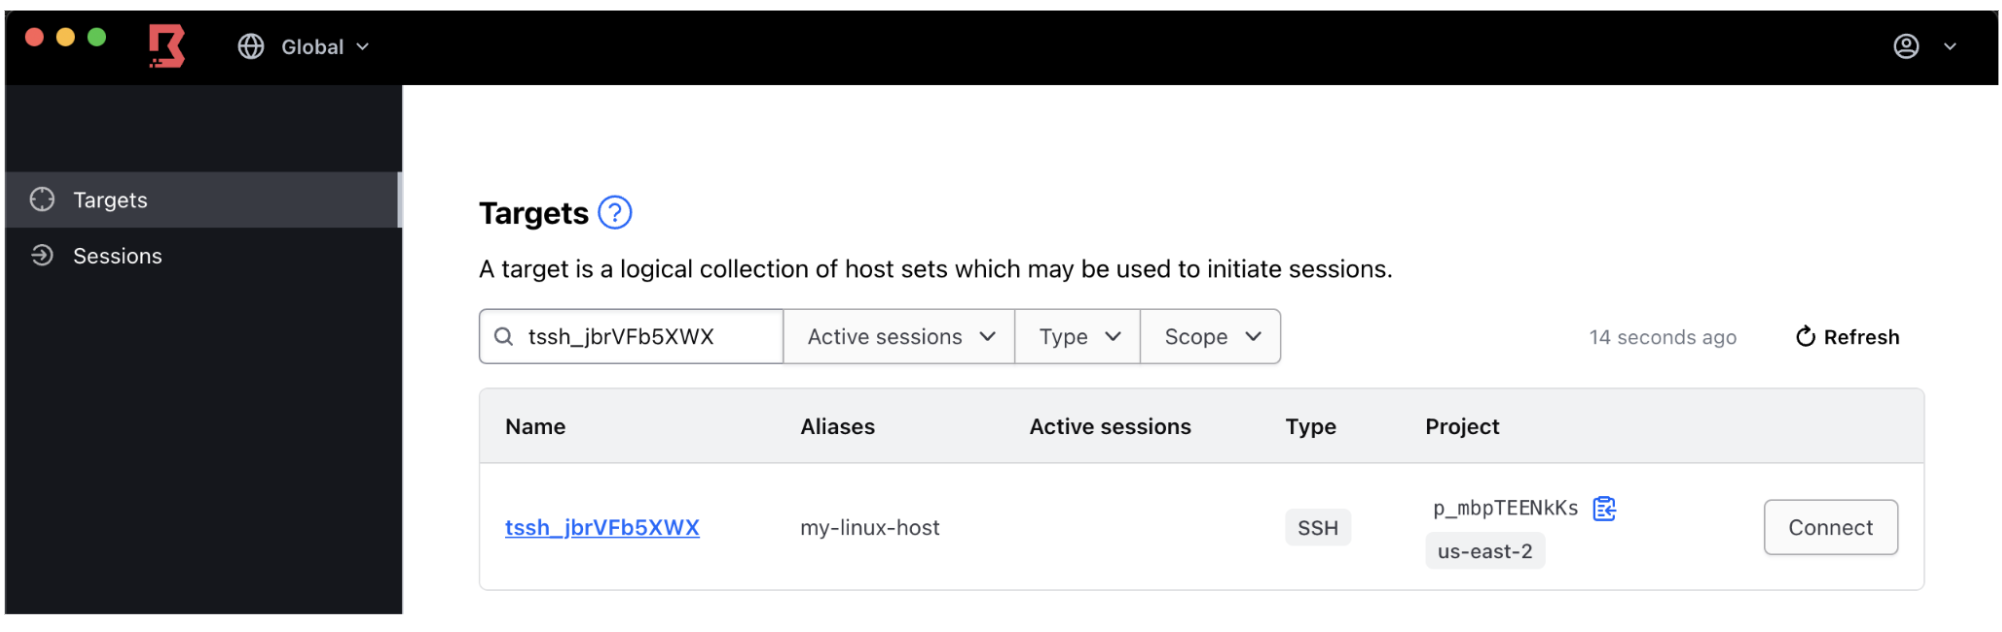
Note: You can retrieve the test target’s ID by navigating to the Target sidebar on the left. The Targets sidebar will show a list of targets and their corresponding target IDs.
Click Add and then Save.
Test end-to-end workflow
The next step is to confirm that you do not yet have access to the test target when you log on using the Azure auth method. Once confirmed, you can test the end-to-end approval process.
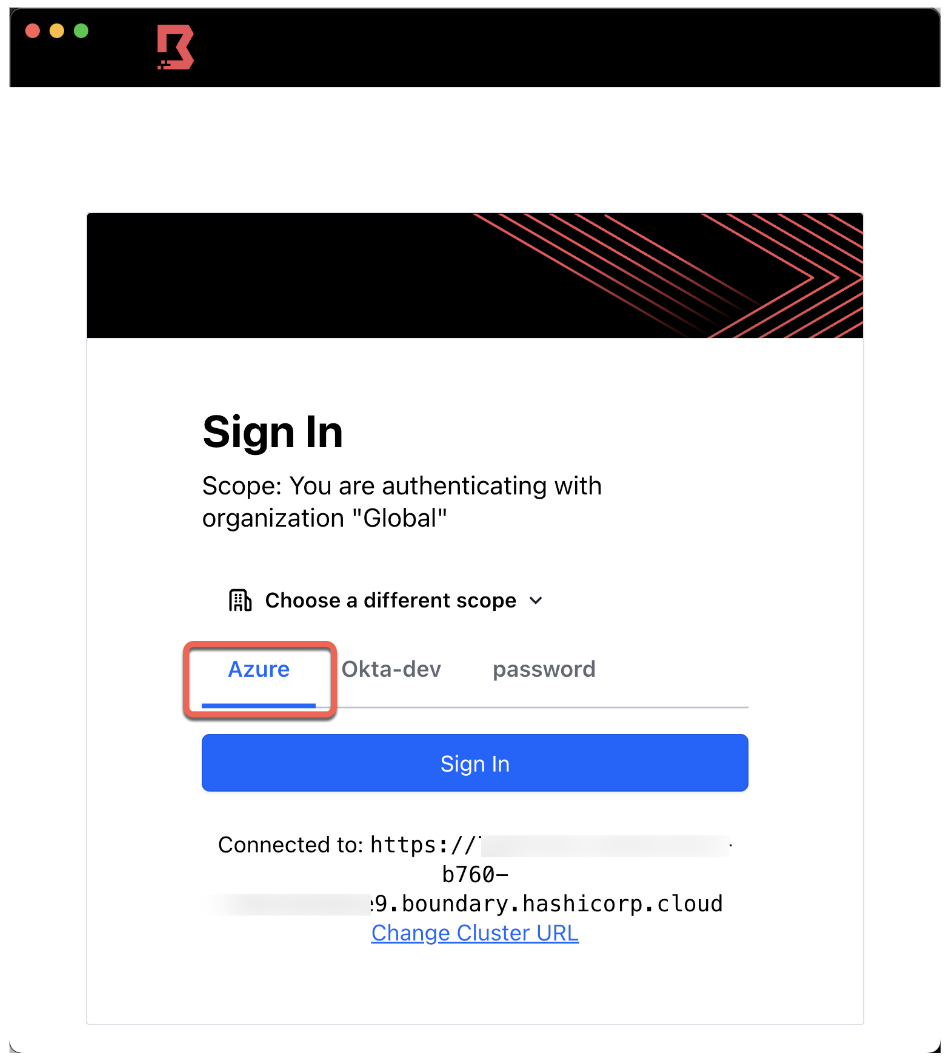
1. Using the Boundary Desktop client, log out if you are already logged in. Then select your Azure auth method, and click Sign-in.
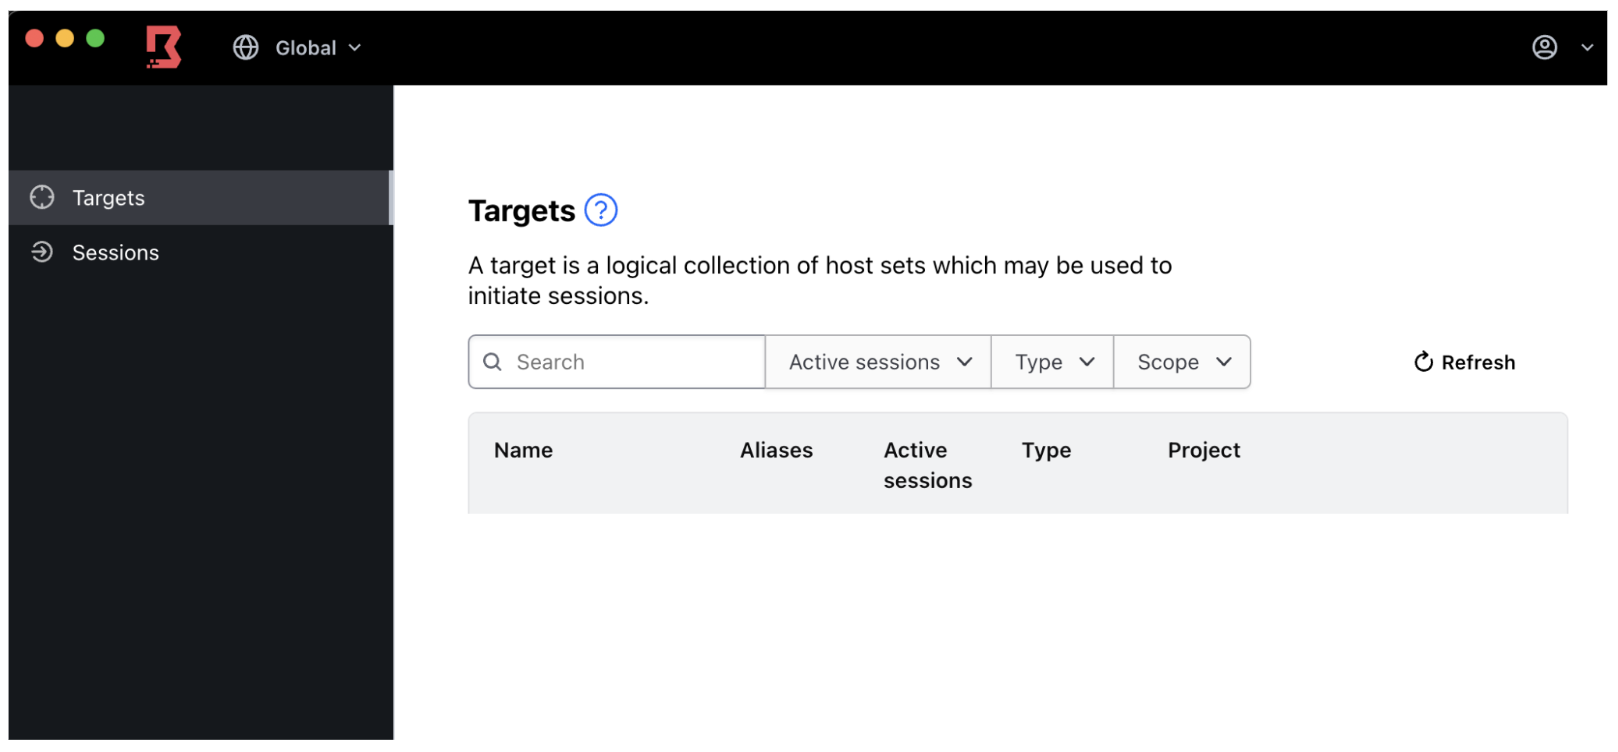
2. Confirm that your test target is not shown in the target list.
3. To see and connect to your test target, request approval using PIM.
Log onto your Azure subscription and go to the Microsoft Entra ID Privileged Identity Management menu.
4. Click My roles.

5. Click Groups. You should see the Boundary-Production group that you are eligible to request access for.
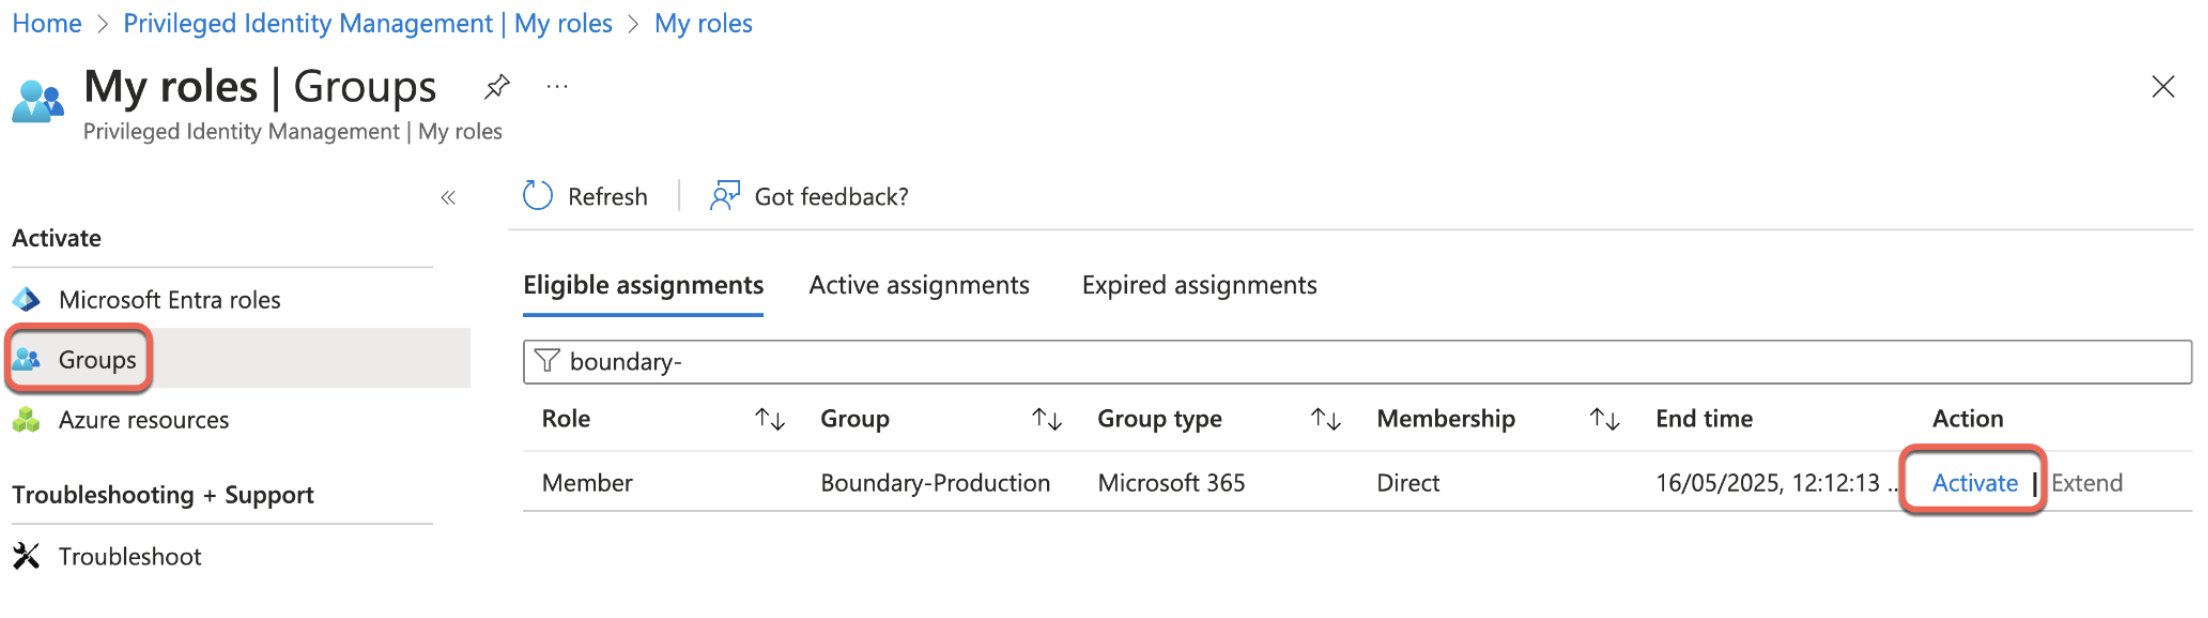
6. Provide the desired duration, reason, and click Activate.
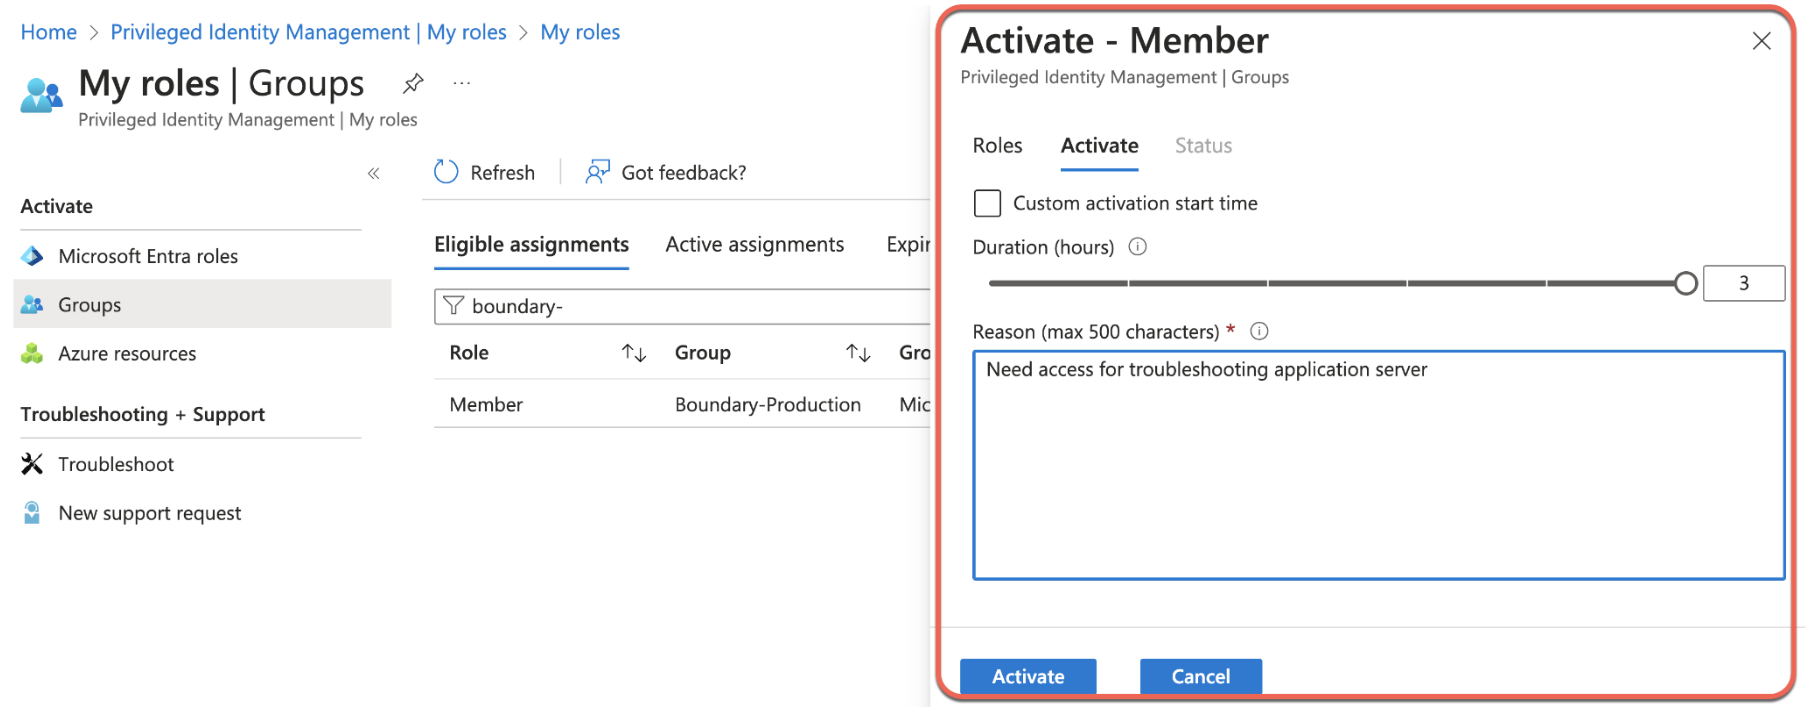
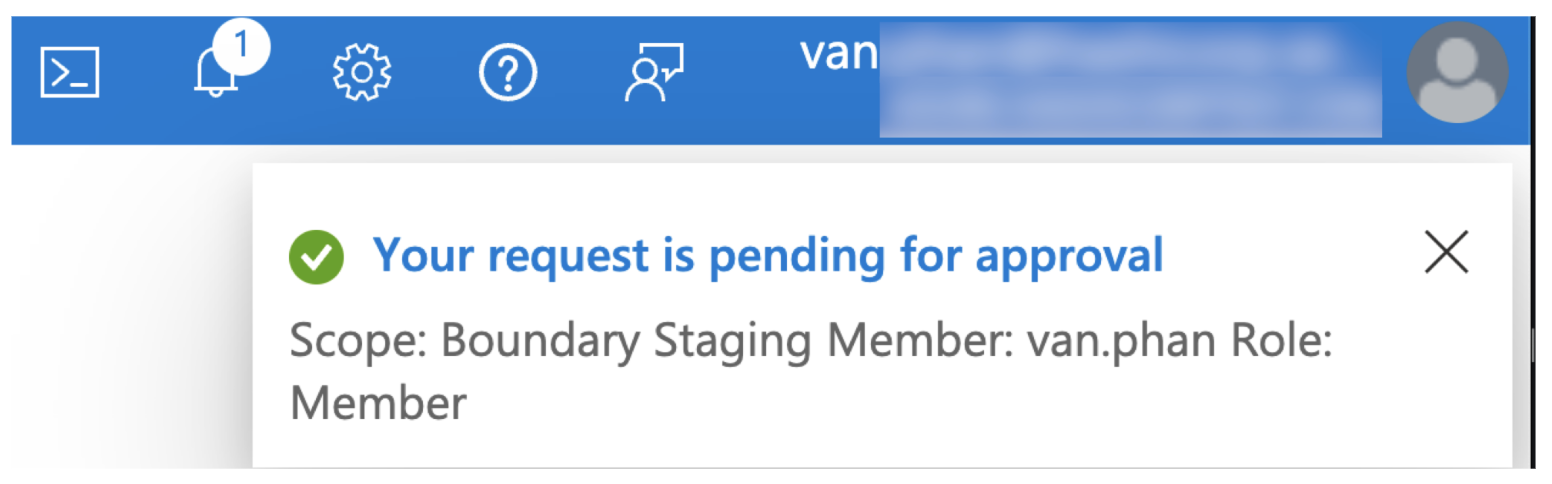
Your request is now pending for approval by the designated approver.
Ask your designated approver to log onto the same Azure subscription, navigate to the same Microsoft Entra ID Privileged Identity Management menu, and click Approve requests.
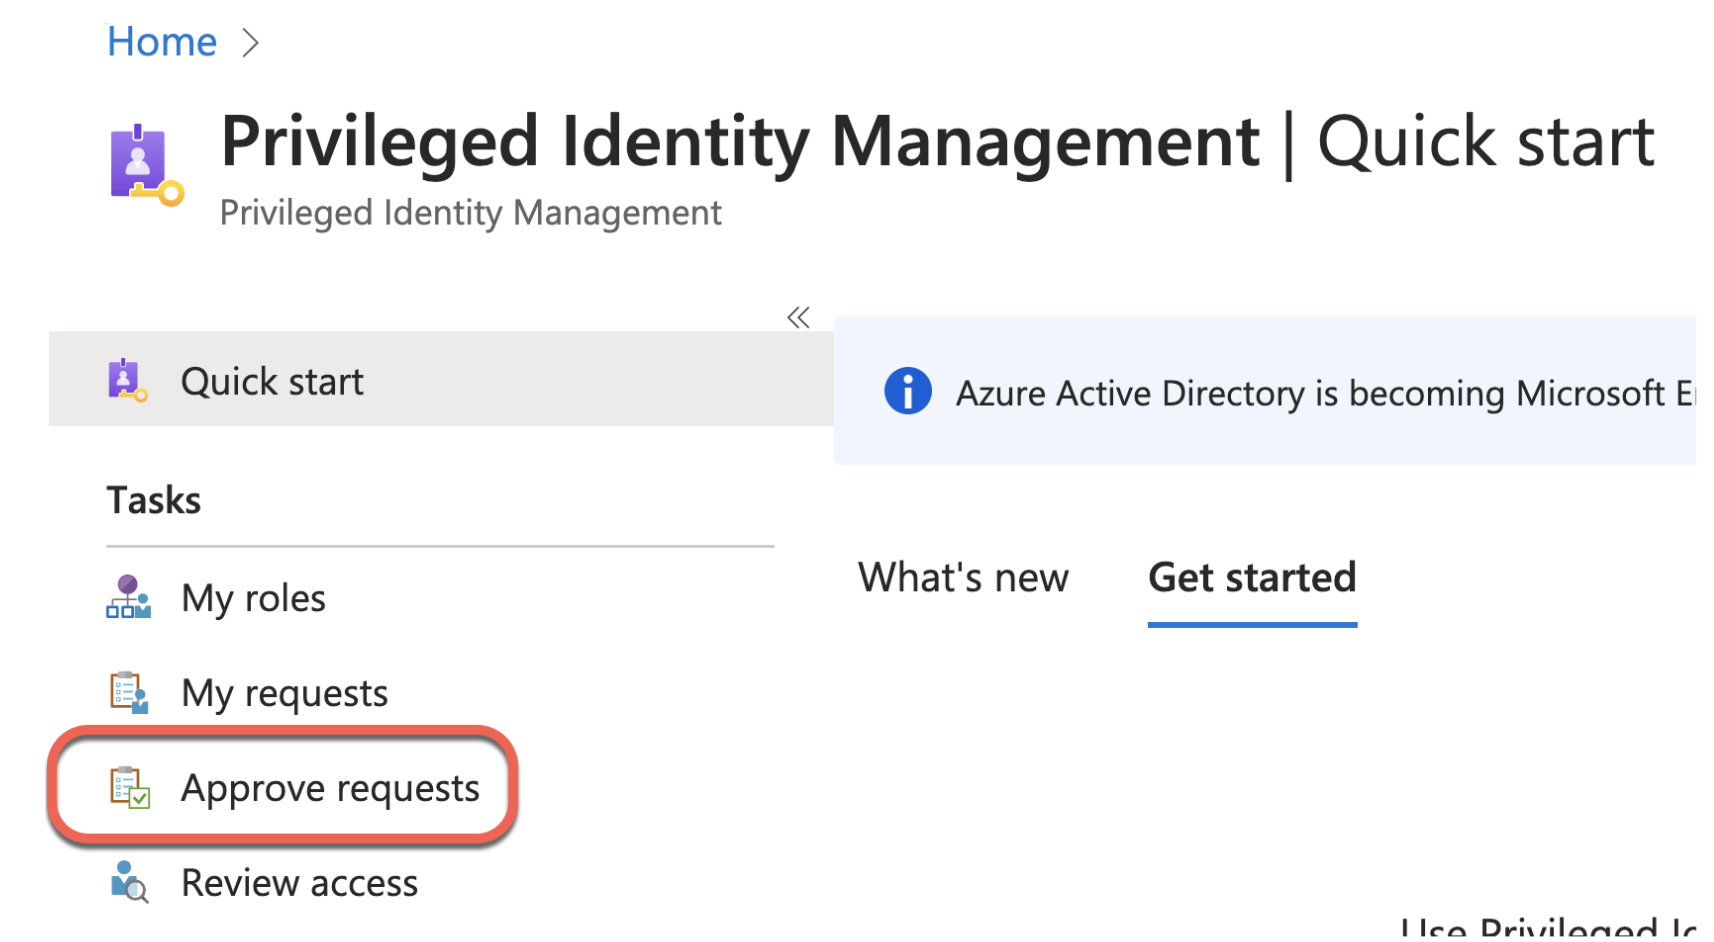
Then go to the Groups side tab and click Approve on the outstanding request.
Note: Requesters cannot approve their own requests even if they are designated as an approver.
Confirm that you are placed in the correct managed group and that you can see the test target. Using the Boundary Desktop client, log out. Then select your Azure auth method, and click Sign-in.
7. Confirm that you can see your test target in the Targets list.
Optional confirmation: You can also check other settings to confirm that you are now placed in the correct managed groups after the approval. Log onto the Boundary Admin UI (via browser) as an administrator. Navigate to Auth Methods on the left side tab and click on your Azure auth method.
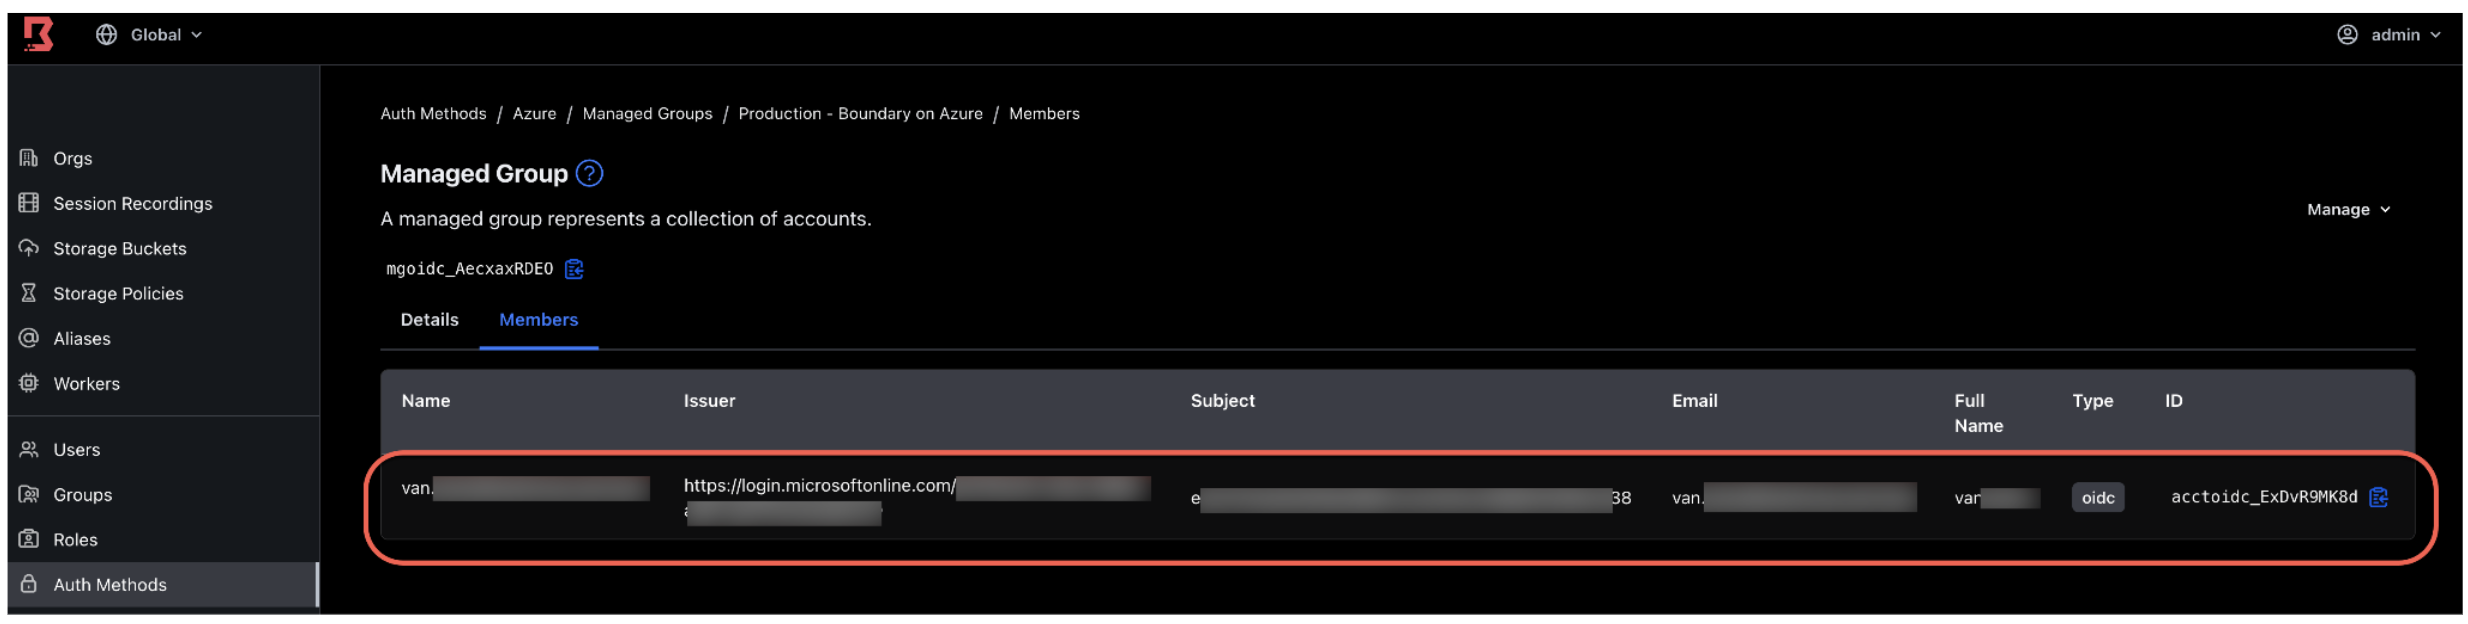
8. Click the Managed Groups subtab, and click the Production - Boundary on Azure managed group you created earlier.
9. Click the Members subtab. You should see yourself as a member of this managed group. Any other Azure user in the same Entra ID group as yourself will also appear in this Boundary managed group. Once your PIM approval expires, the next time you log onto Boundary, you will be removed from the managed group.
What’s next?
This blog post discussed how to automate just-in-time access to infrastructure resources based on approval workflows by integrating Boundary with Microsoft Privileged Identity Management or other platforms that offer approval workflow capabilities. This is just one of the many integration points that extend Boundary features and capabilities with other common products and tools. For example, Boundary seamlessly integrates with HashiCorp Vault to generate short-lived dynamic credentials for resources like SSH certificates for Linux hosts. This dramatically reduces the chances of a breach if credentials are stolen or leaked.
Boundary also features credential injection, which automatically injects credentials into an SSH target on behalf of the remote user, providing a passwordless experience. Boundary can also dynamically discover hosts in your Amazon Web Services (AWS) and Microsoft Azure environments. This means admins don’t have to manually add individual hosts into Boundary’s host catalog, dramatically reducing administrative burden, especially in cloud environments where IP addresses are ephemeral.
To learn more, you can explore Boundary’s capabilities in our Boundary tutorials:
- Inject SSH credentials with HCP Boundary
- SSH certificate injection with HCP Boundary
- Credential brokering to Postgres database
- Dynamic host catalogs on AWS
- Dynamic host catalogs on Azure
from HashiCorp Blog https://ift.tt/AL7ZGXq
via IFTTT
No comments:
Post a Comment