When building an application, user authentication (AuthN) is often a fundamental component. Writing your own AuthN implementation can be cumbersome and error prone. You would need to:
- Implement and enforce password complexity rules within your application
- Implement password checking yourself
- Enforce failed login attempts policies to protect your application against brute force attacks
The password would also be stored in the database, which means you would need to encrypt it, and that comes with another set of costs:
- Key management
- General cryptography costs when checking the password
- Whether or not convergent encryption is used
Instead it is much safer for businesses and their customers to delegate this implementation to a specialist platform like HashiCorp Vault because it can act as an identity provider (IdP).
In this blog post, you’ll learn how to set up Vault as an OpenID Connect (OIDC) IdP for all of your applications, allowing your organization to have secrets management and identity servers through one platform, like a standard library for security.
How OIDC works
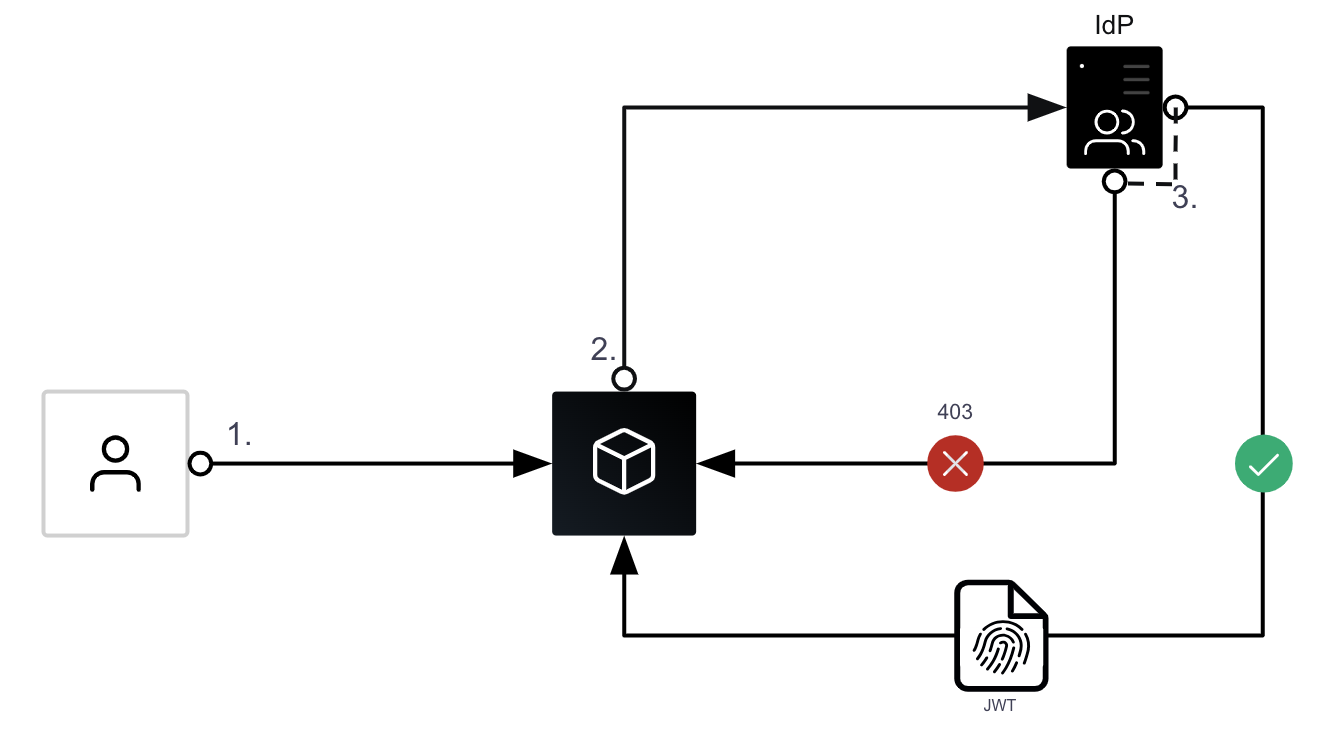
One of the most common workflows used for user AuthN is OIDC. It has slowly become one of the most popular standards for identity, and since 2021 Vault has had the ability to act as an OIDC identity provider. Here’s a quick, high-level look at an OIDC workflow:
- The user navigates to a web application, mobile application, or platform. This application / platform is known as the relying party (RP). An RP is something that delegates user AuthN to an external IdP.
- The user enters their credentials, usually a username and password combination.
- The RP sends this information as an AuthN request to the external IdP.
- The IdP authenticates the user by checking that the credentials submitted in the AuthN request are correct.
- If the submitted credentials are correct, the user is authenticated and the IdP responds to the AuthN request with an access token.
- The authenticated user can now submit requests to the application with their access token attached

The access token usually comes in the form of a signed JSON Web Token (JWT). The JWT is signed by the IdP, which allows the RP to confirm the authenticity of the JWT. This confirmation can be done in a couple of ways:
- IdPs often have a token verification endpoint that you can submit the token to, and it will confirm whether or not it is valid.
- IdPs also publish JSON Web Key Sets (JWKS), which are a set of public cryptographic keys that can be used to verify the authenticity of the JWT signature.
Vault as an OIDC provider
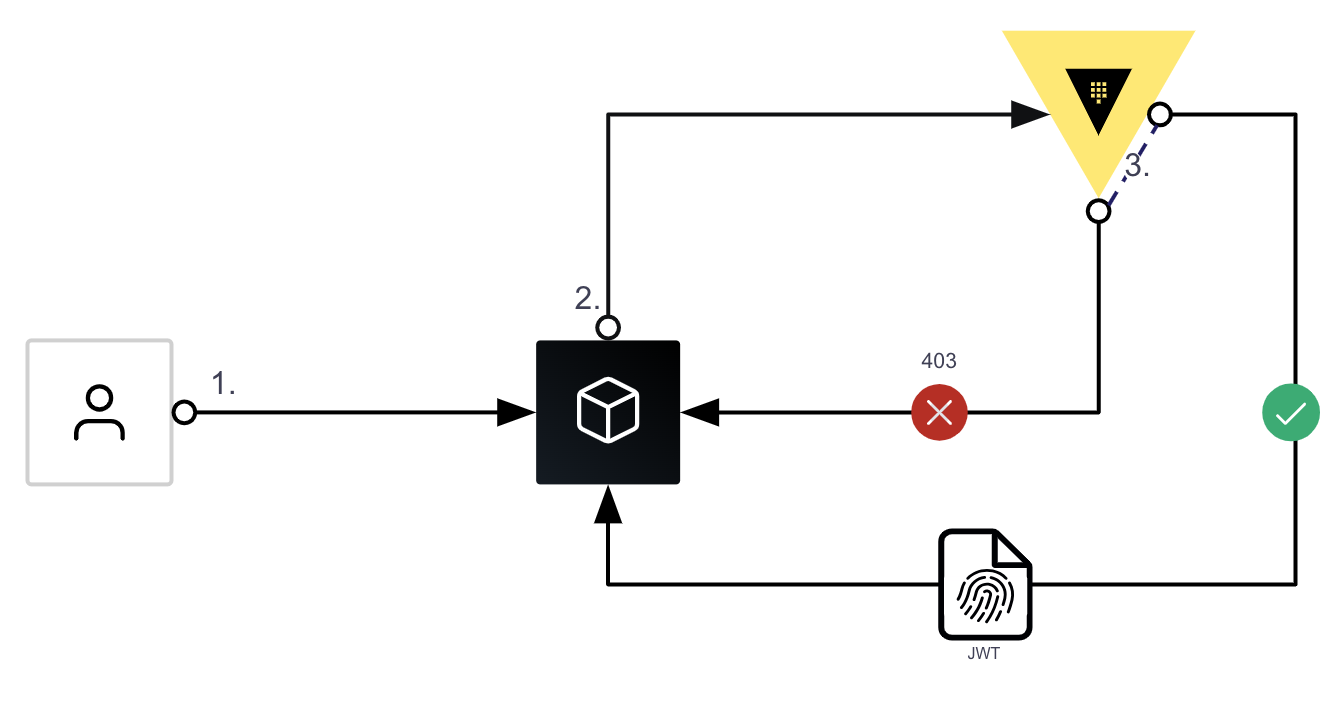
Vault having the ability to act as an OIDC provider means that if the identity exists within Vault, RPs can delegate AuthN to Vault as set out in the OIDC workflow outlined above. Here is a diagram of that same workflow with Vault as the IdP:

Vault’s role in this process is simple: authenticate users, issue signed JWTs, and verify JWT signatures.
How to configure Vault as an OIDC provider
To configure Vault to act as an OIDC provider, you first need to enable the auth method that your users will authenticate with. The userpass auth method is a good example for a simple user database. The Terraform code below will enable this auth method:
resource "vault_auth_backend" "userpass" {
 type = "userpass"
}
In this code, no mount point has been specified so it will create it at the /userpass mount point by default. This is where your application will create new users.
Next you need to create a key that will be used to sign JWTs:
resource "vault_identity_oidc_key" "oidc_key" {
 name               = "my-key"
 rotation_period    = 3600
 algorithm          = "RS256"
 allowed_client_ids = ["*"]
 verification_ttl   = 7200
}
This code will configure Vault to create a signing key using the RS256 algorithm. You’ll want to automatically rotate this key every hour to keep it secure, and allow all client IDs to use this key to sign JWTs. This could be narrowed down to the client ID of the OIDC role created for your application.
The next step is to create an OIDC provider. This requires minimal configuration:
resource "vault_identity_oidc" "oidc" {}Next, you will need to create an OIDC role that will be used when creating JWTs:
resource "vault_identity_oidc_role" "role" {
 key  = vault_identity_oidc_key.oidc_key.name
 name = "my-role"
template =
from HashiCorp Blog https://ift.tt/TBOlGZ1
via IFTTT
No comments:
Post a Comment